 Android | Work in “EDIN Driver” application (instructions for Drivers)
Attention
For the correct operation of the service, the application “EDIN Driver” and all applications on which signing depends must be updated to the latest version!
1 Installation “EDIN Driver” application
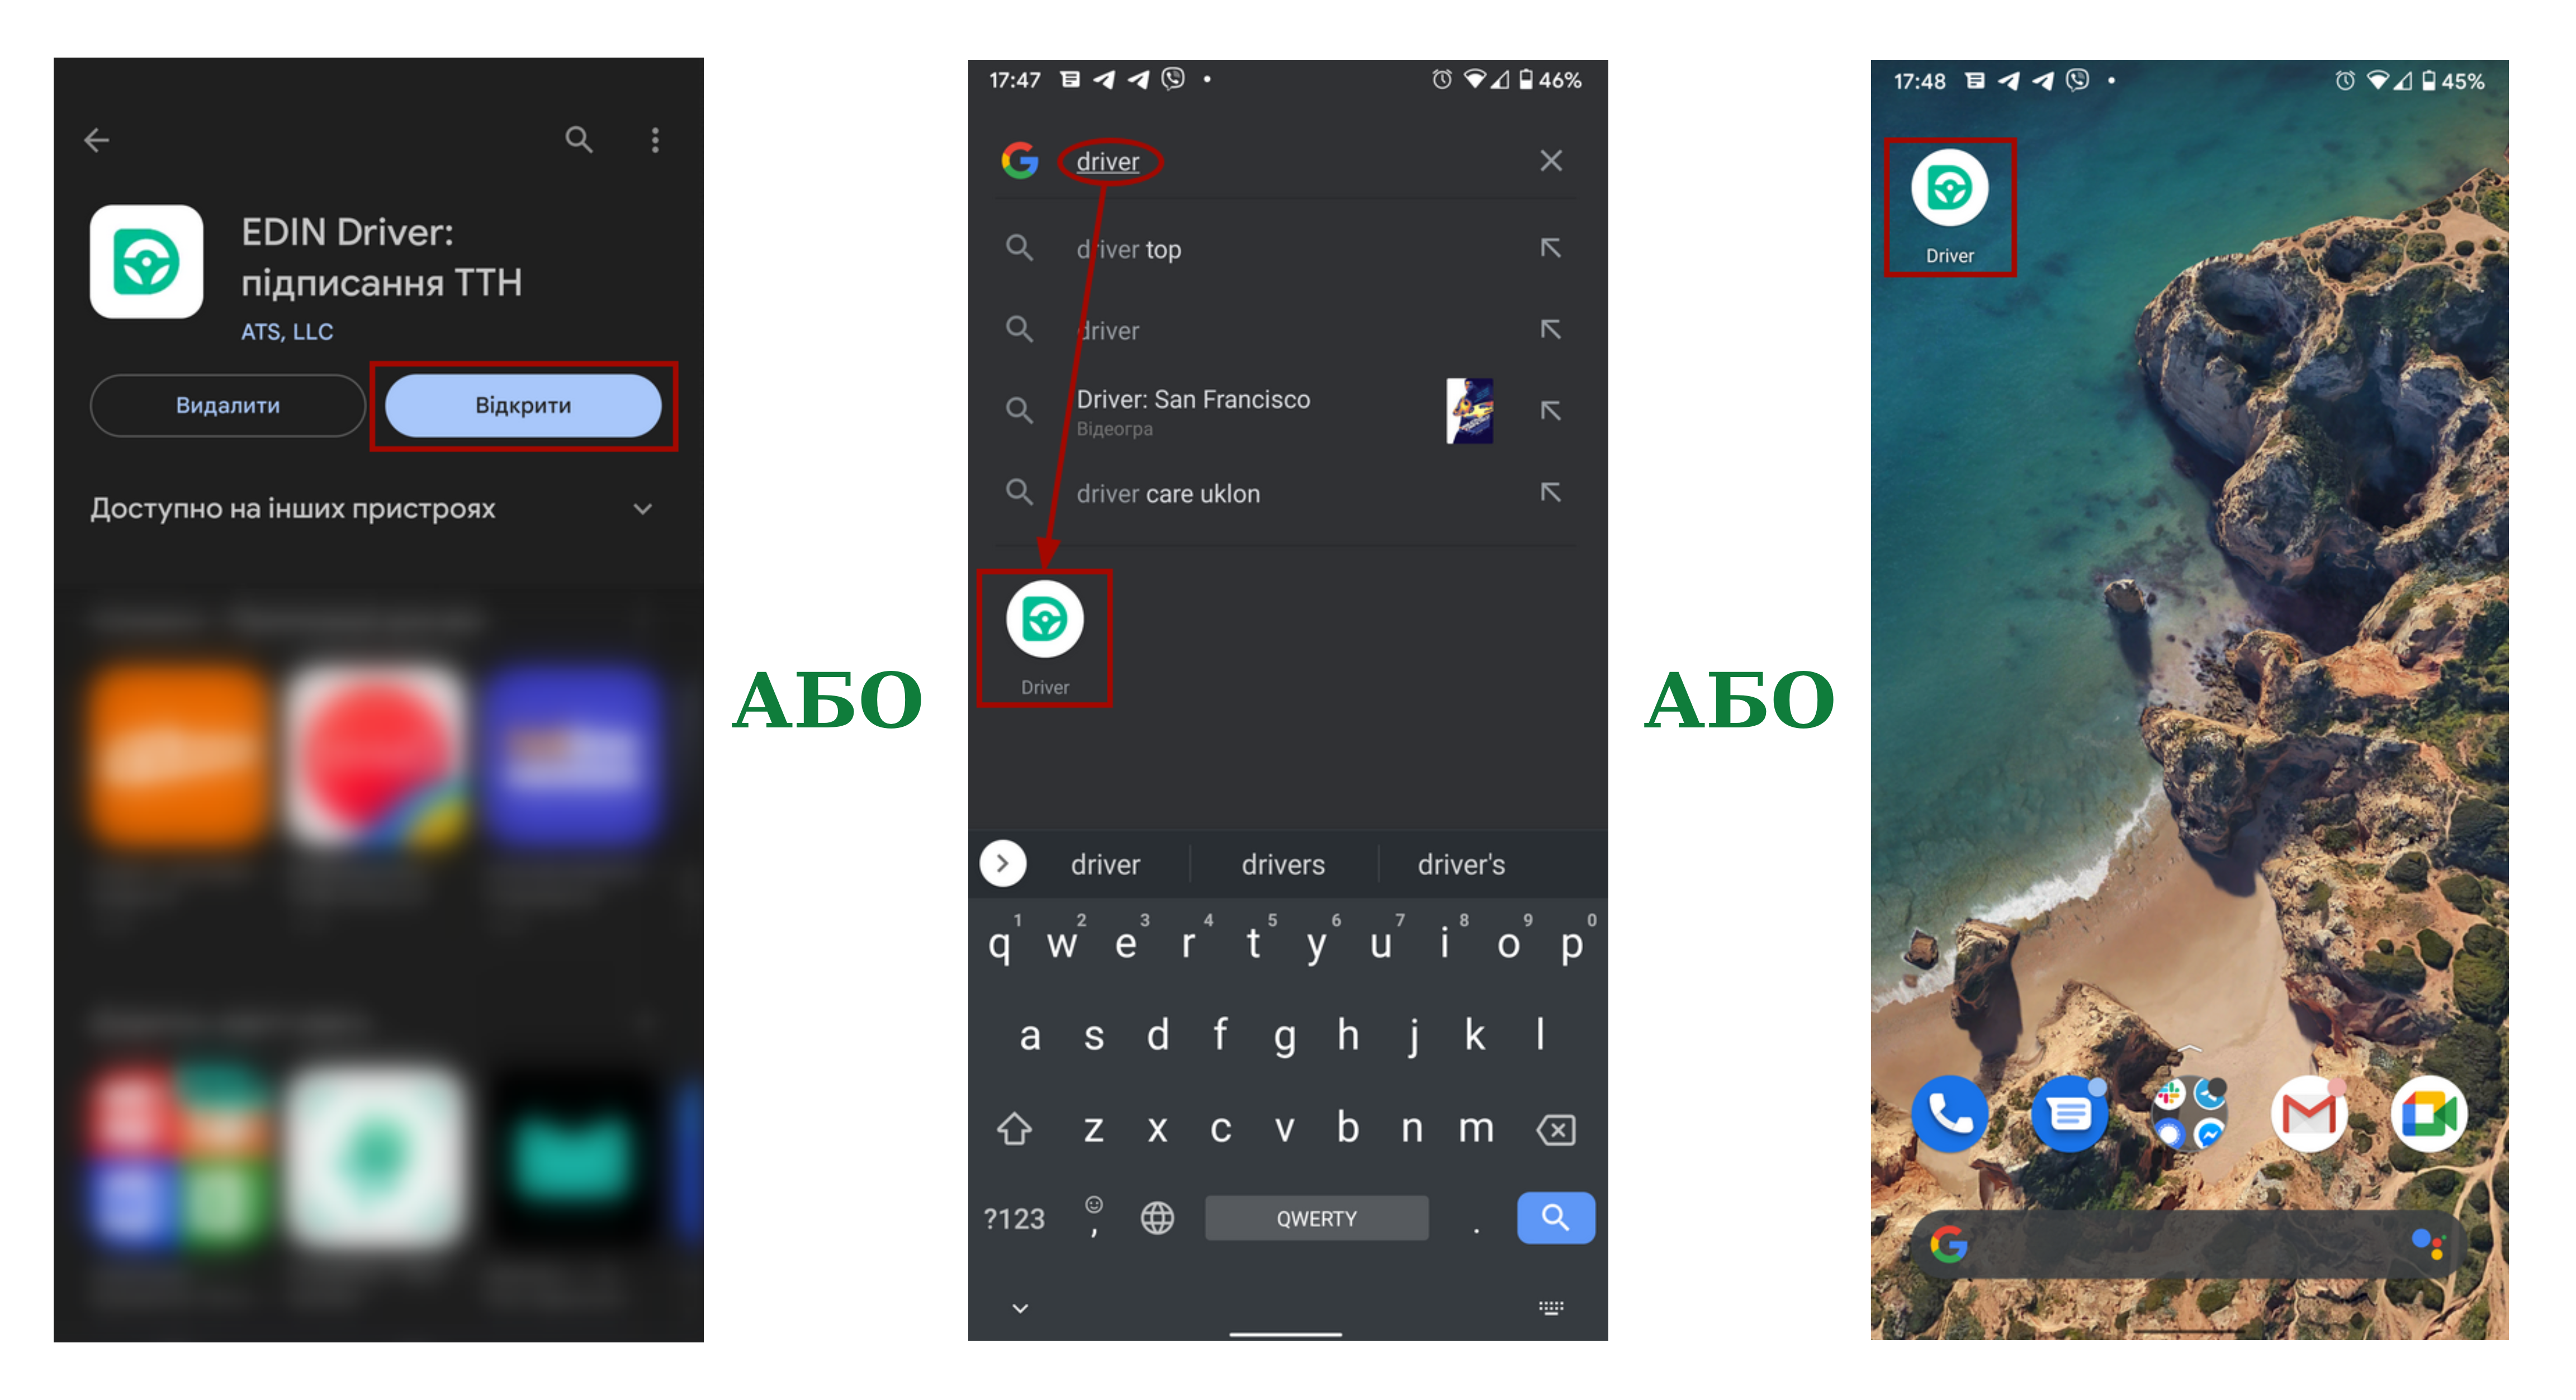
To install the “EDIN Driver” application, click the  button or search for the widget by name in “Google Play Market”. Next, you need to “Install” the application:

The installed application “EDIN Driver” can be immediately “Open” from “Google Play Market” or found among the installed applications on your device by the name:
2 Driver registration/authorization in “EDIN Driver” application
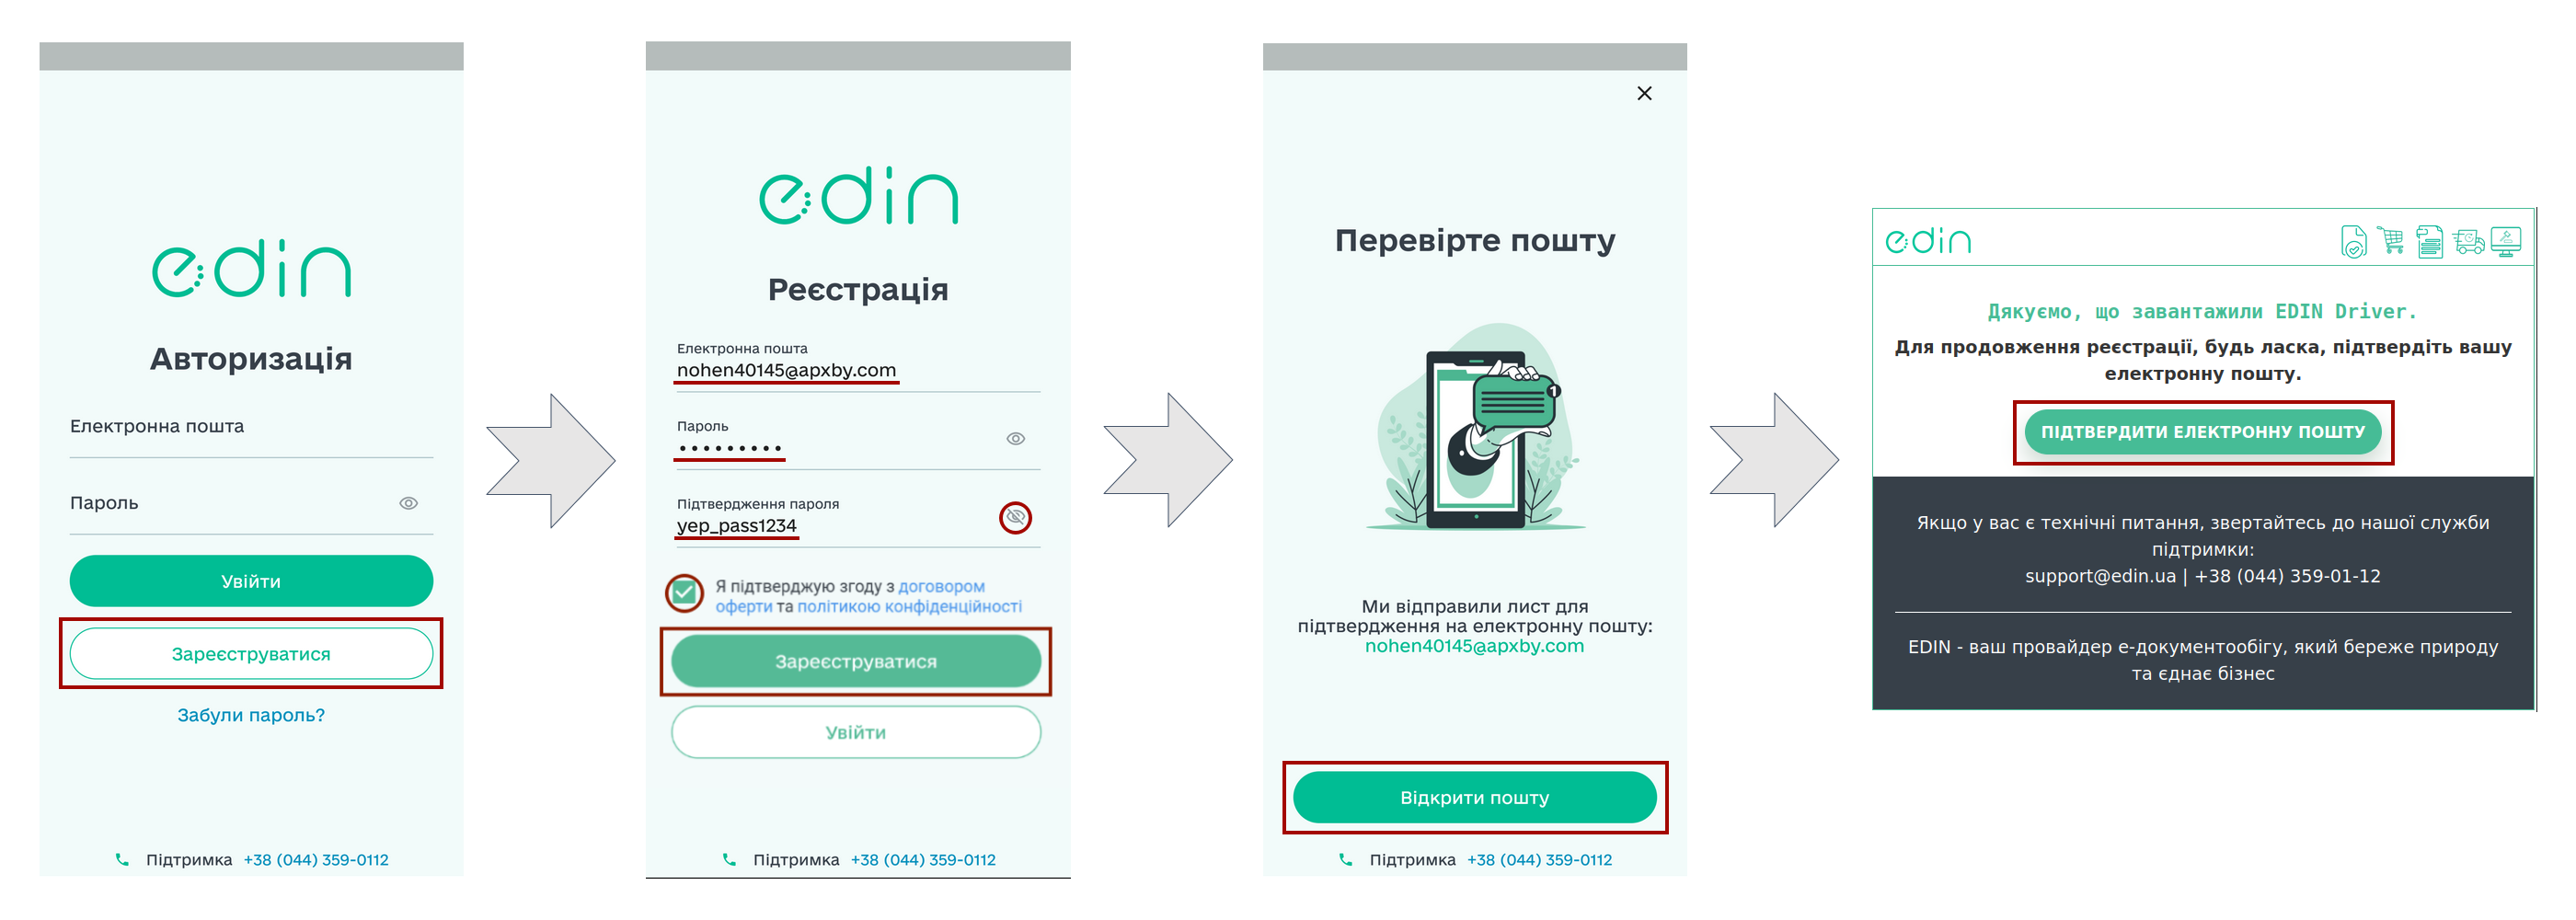
To self-register in the “EDIN Driver” application, the Driver must click on the “Register” button on the authorization page, enter his email, come up with a password and click “Register” again. After that, a letter with a link to confirm registration is sent to the Driver to the specified mail - follow the link (valid for 72 hours) in it to confirm the email:
Attention
The letter could have gone to spam. Therefore, check not only “Inbox”, but also “Spam”. In case of spam, configure the rules so that the following emails from EDIN are not sent to spam.
Hint
To restore a lost password, you need to click on the “Forgot your password?” button and enter your email, which you used to enter the application. A letter will be sent to the indicated mail - you need to follow the link to reset the password; after which the application will open, where you need to enter the new password twice and “Save” the changes:

Congratulations: Your new password can be used for authorization!
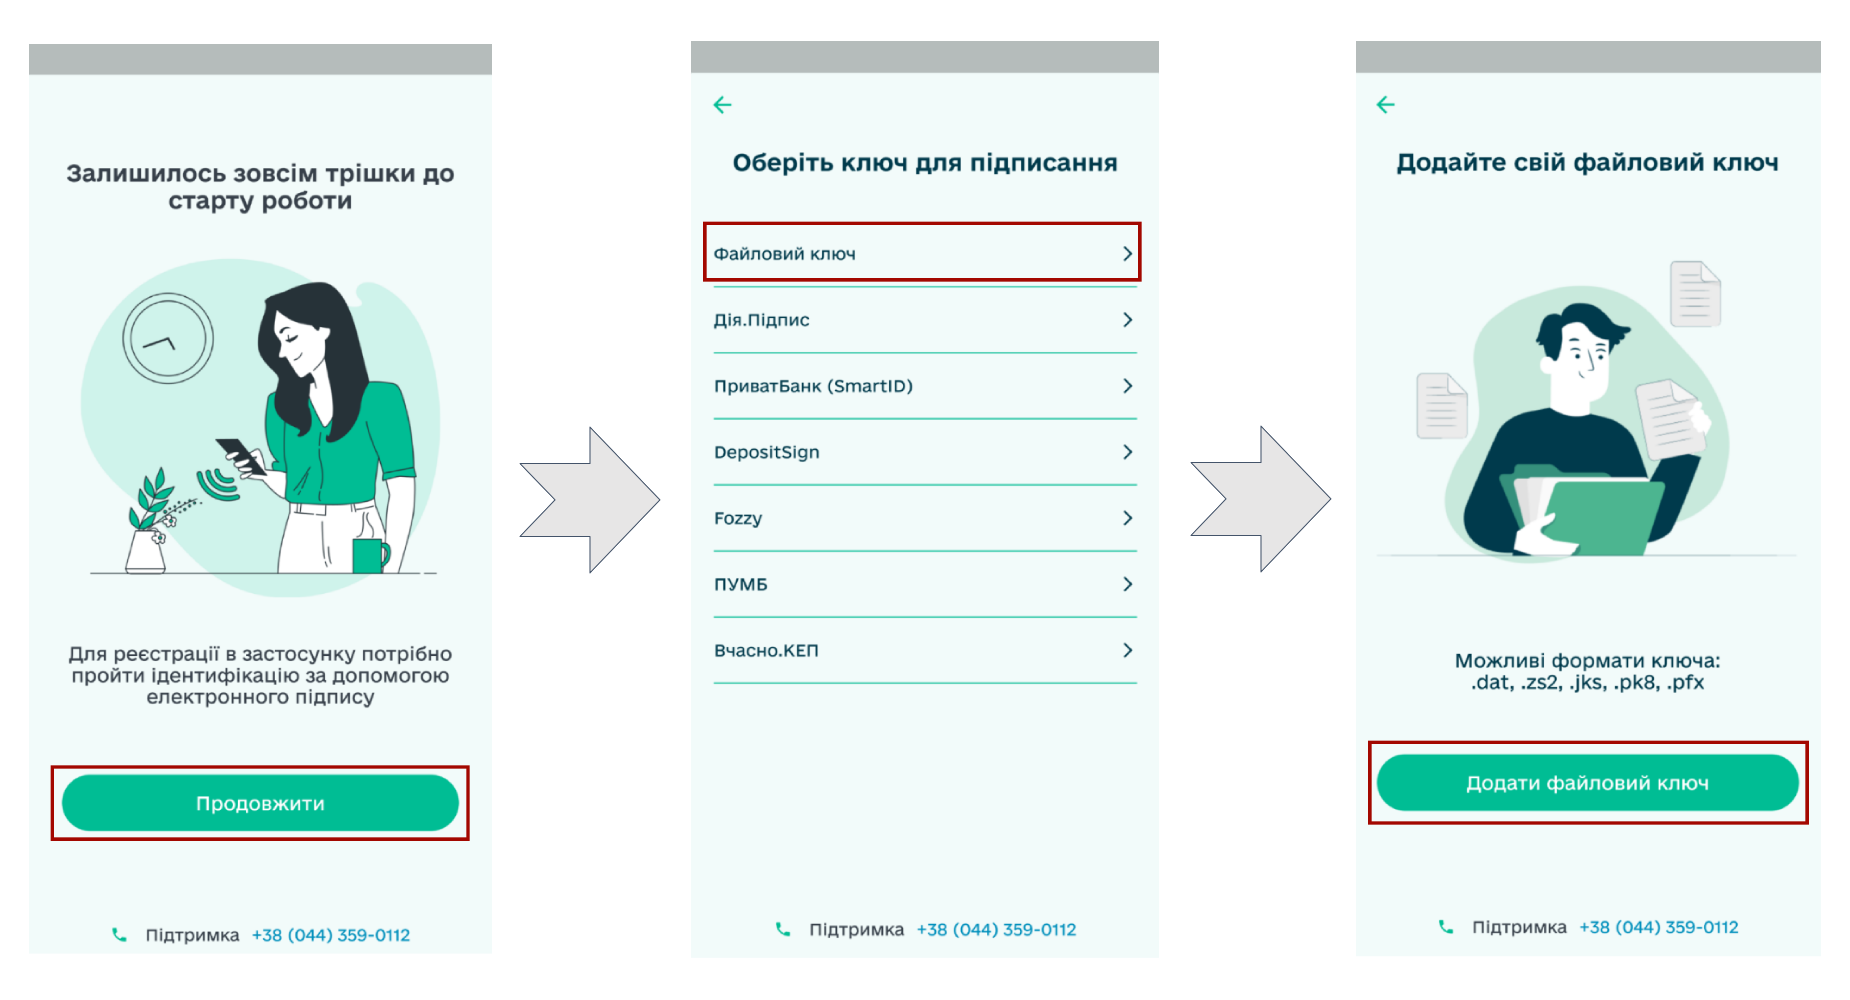
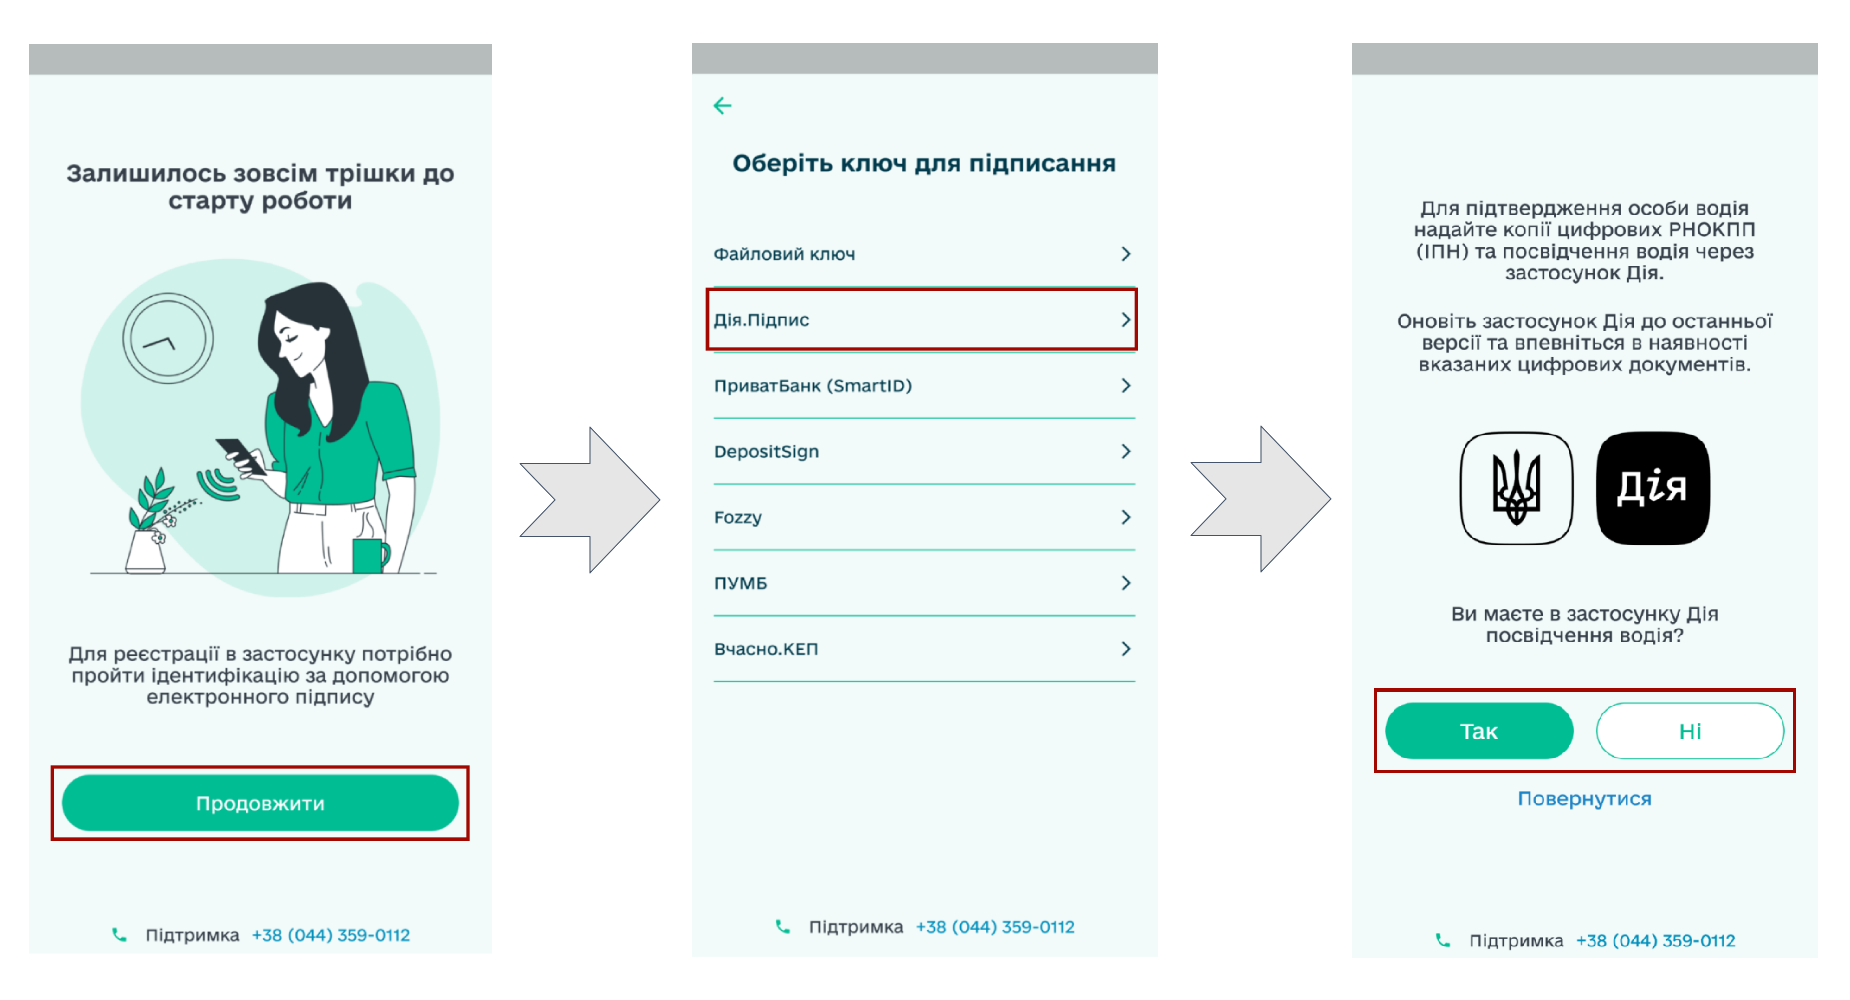
To continue, you need to “Choose” one of the methods for identification by your KEP:
When using a file key, you must make sure that it is on your device! You need to select “File key” -> “Add file key”:
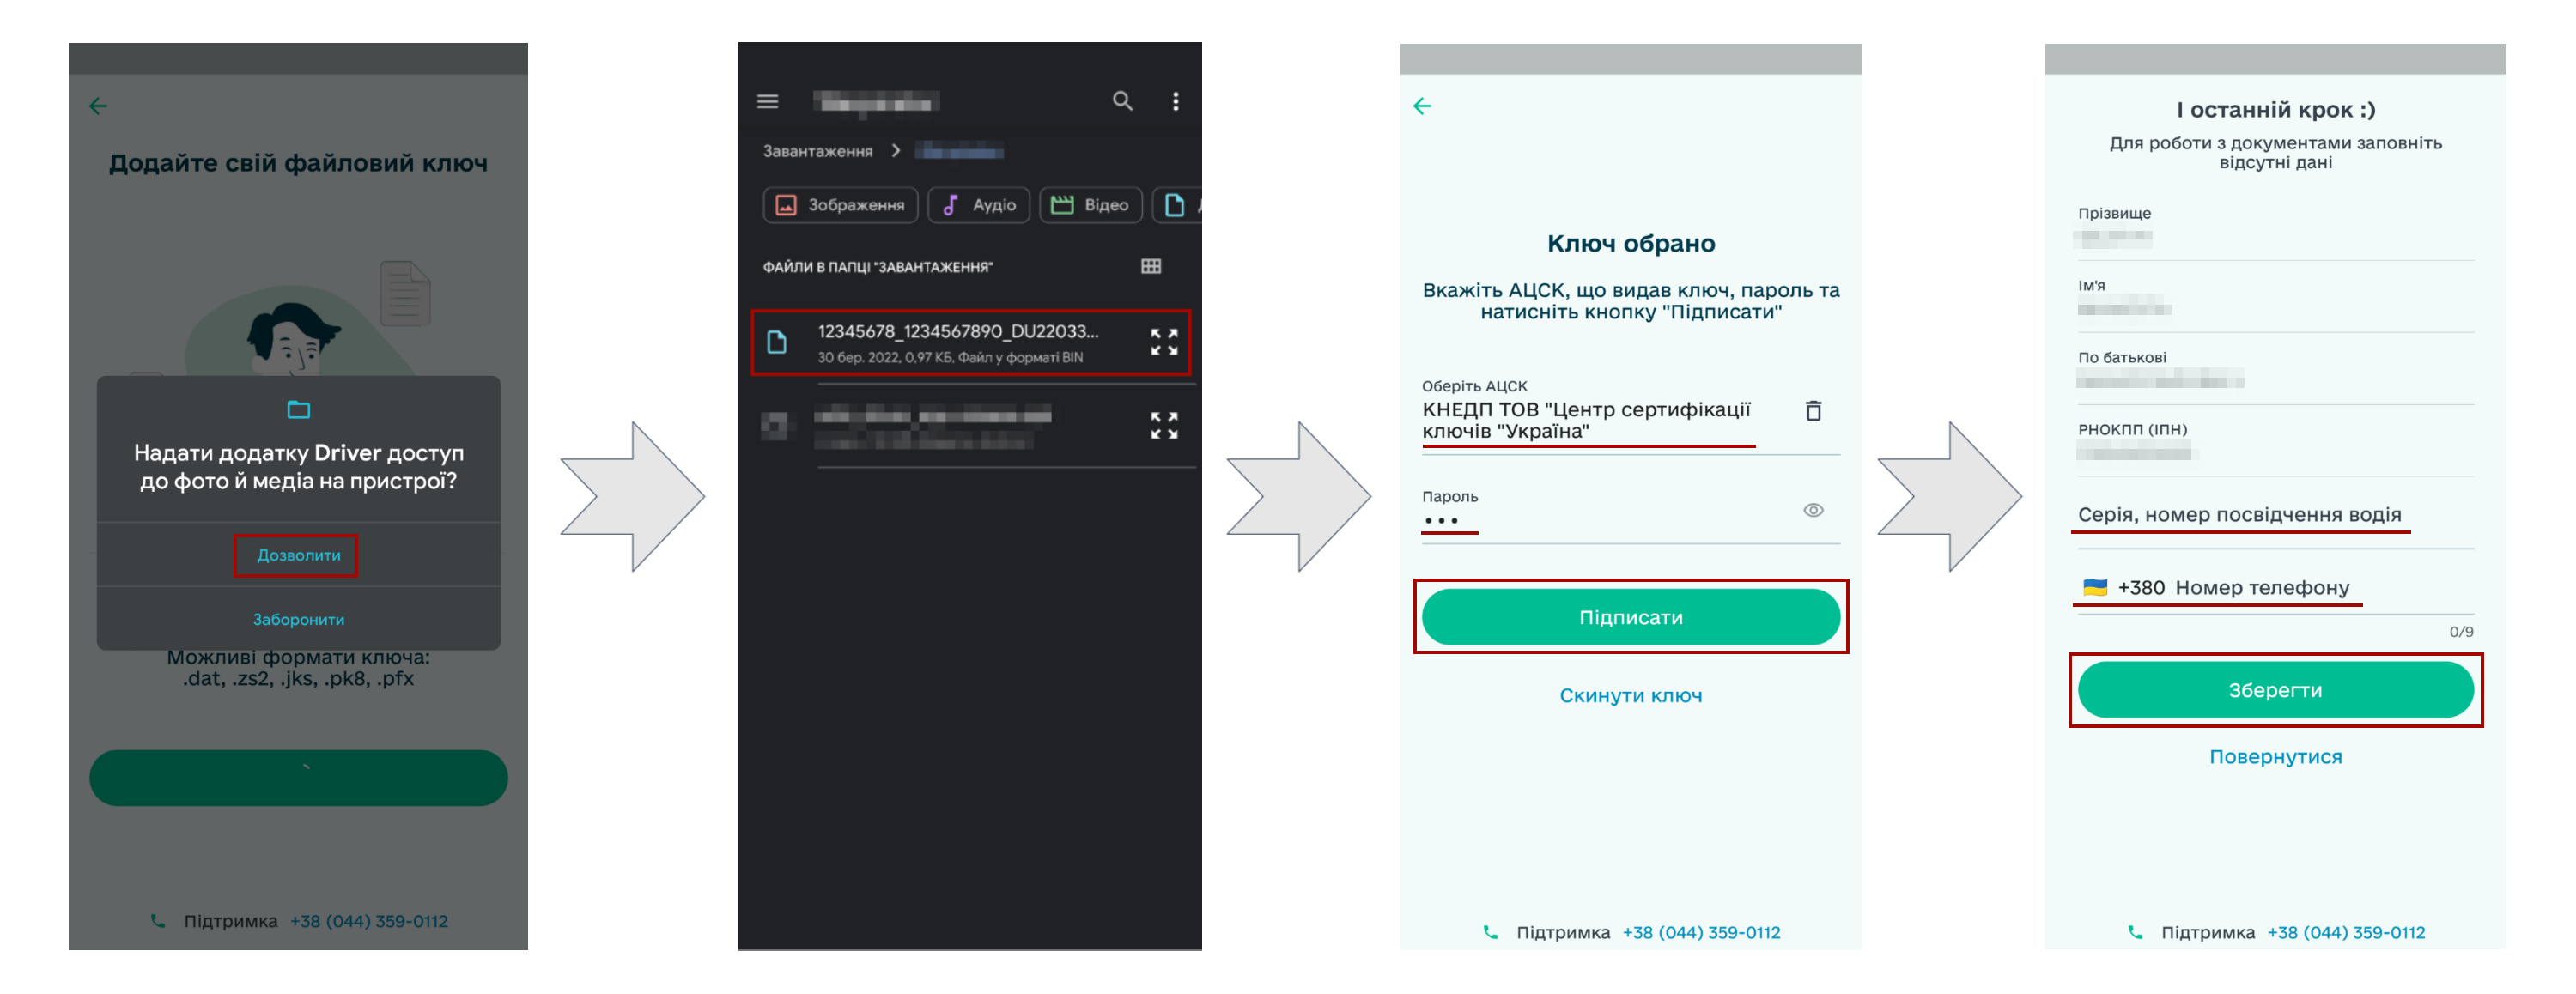
If necessary, you need to allow “EDIN Driver” application access to your files and choose your key from among them. Next, you need to choose from the list of ATSSK that issued you the key, specify the password and click “Sign”. Your data will be uploaded automatically (when registering for the first time, you must also specify Driver’s license series and number and Phone number):
Now your signature key is displayed in the menu “User” -> “Signature key” (if necessary, it can be replaced there).
When using the key from PrivatBank (SmartID), you must make sure that you have installed the latest version of the application from the bank! You need to select “PrivatBank (SmartID)” -> “Continue”:
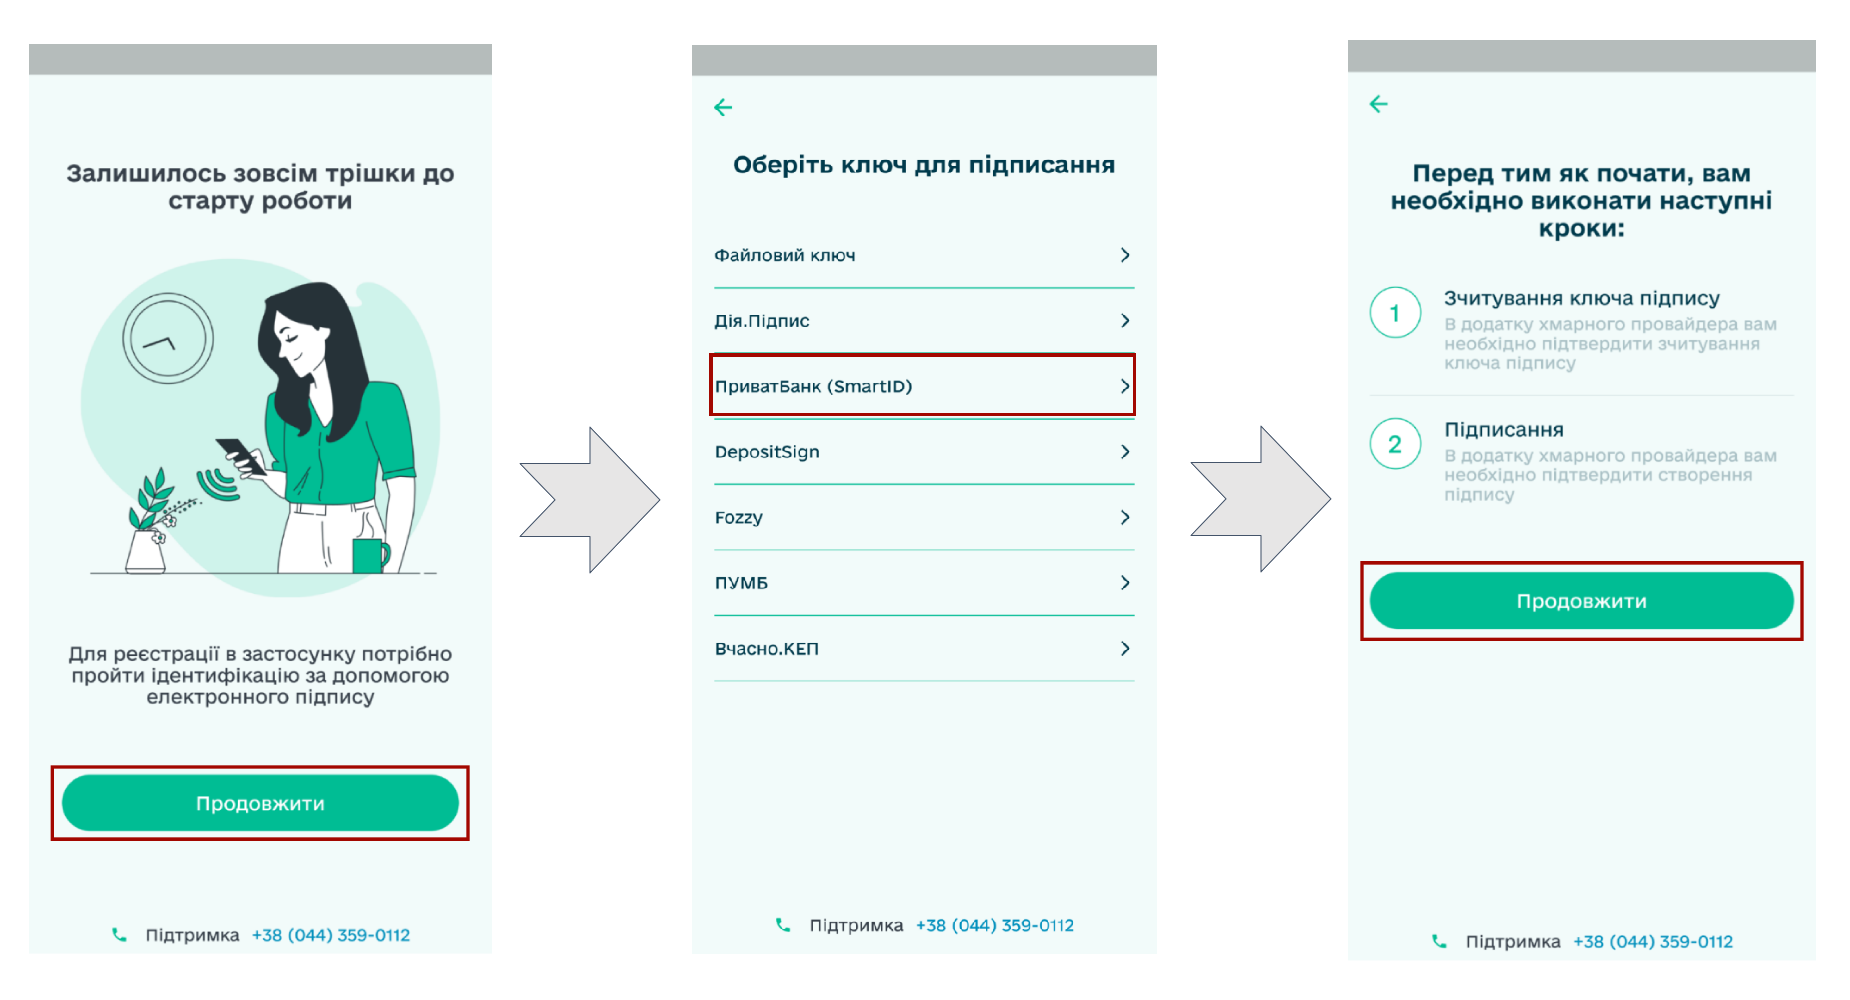
At the first stage, you need to allow opening a request through the “Privat24” application, log in to the banking application, pass the “SmartID” authorization and press the ” button already in the **”EDIN Driver” application Sign”**:
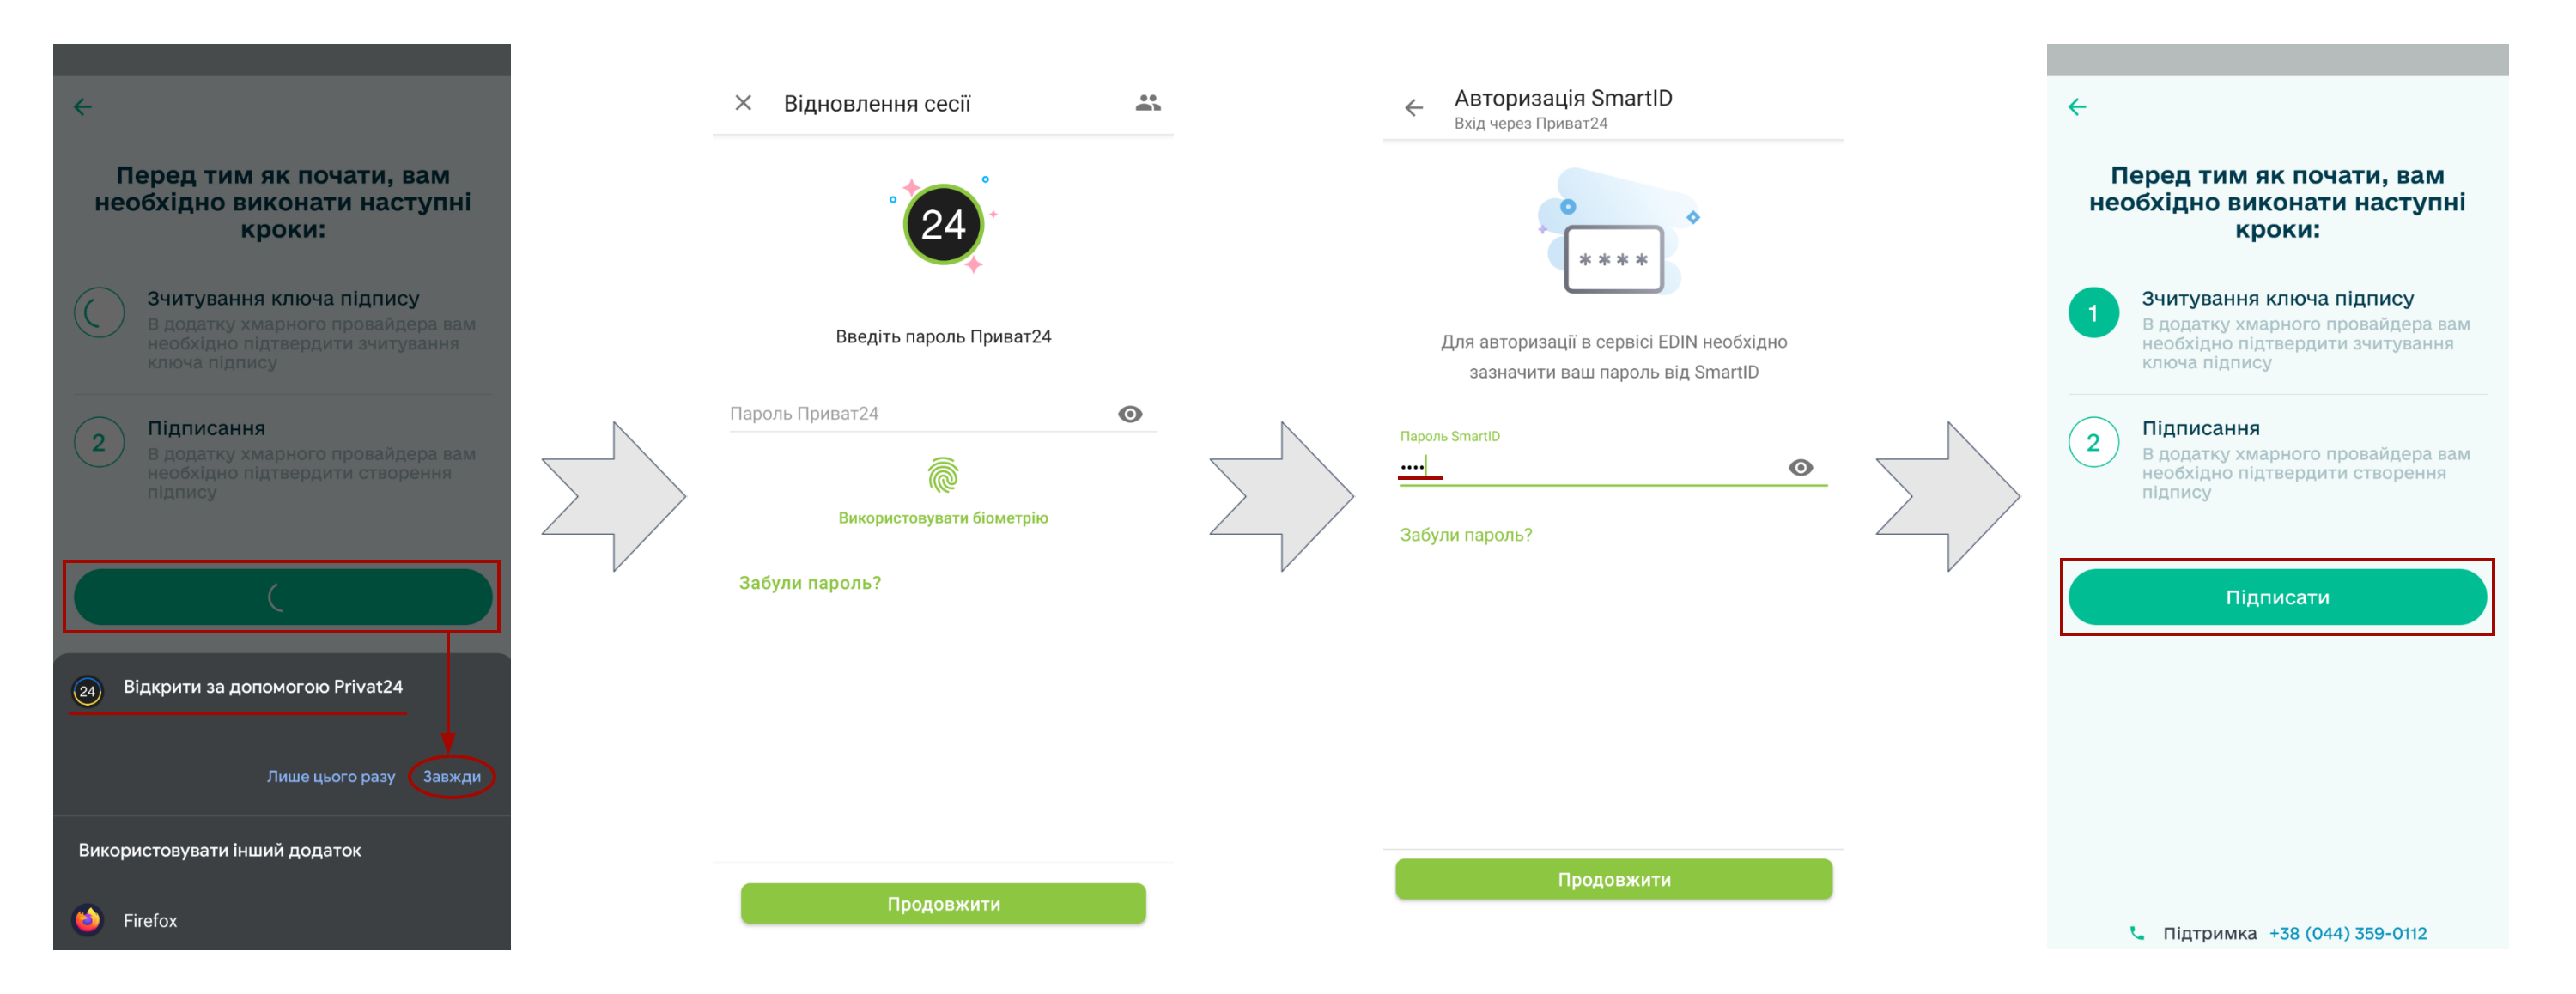
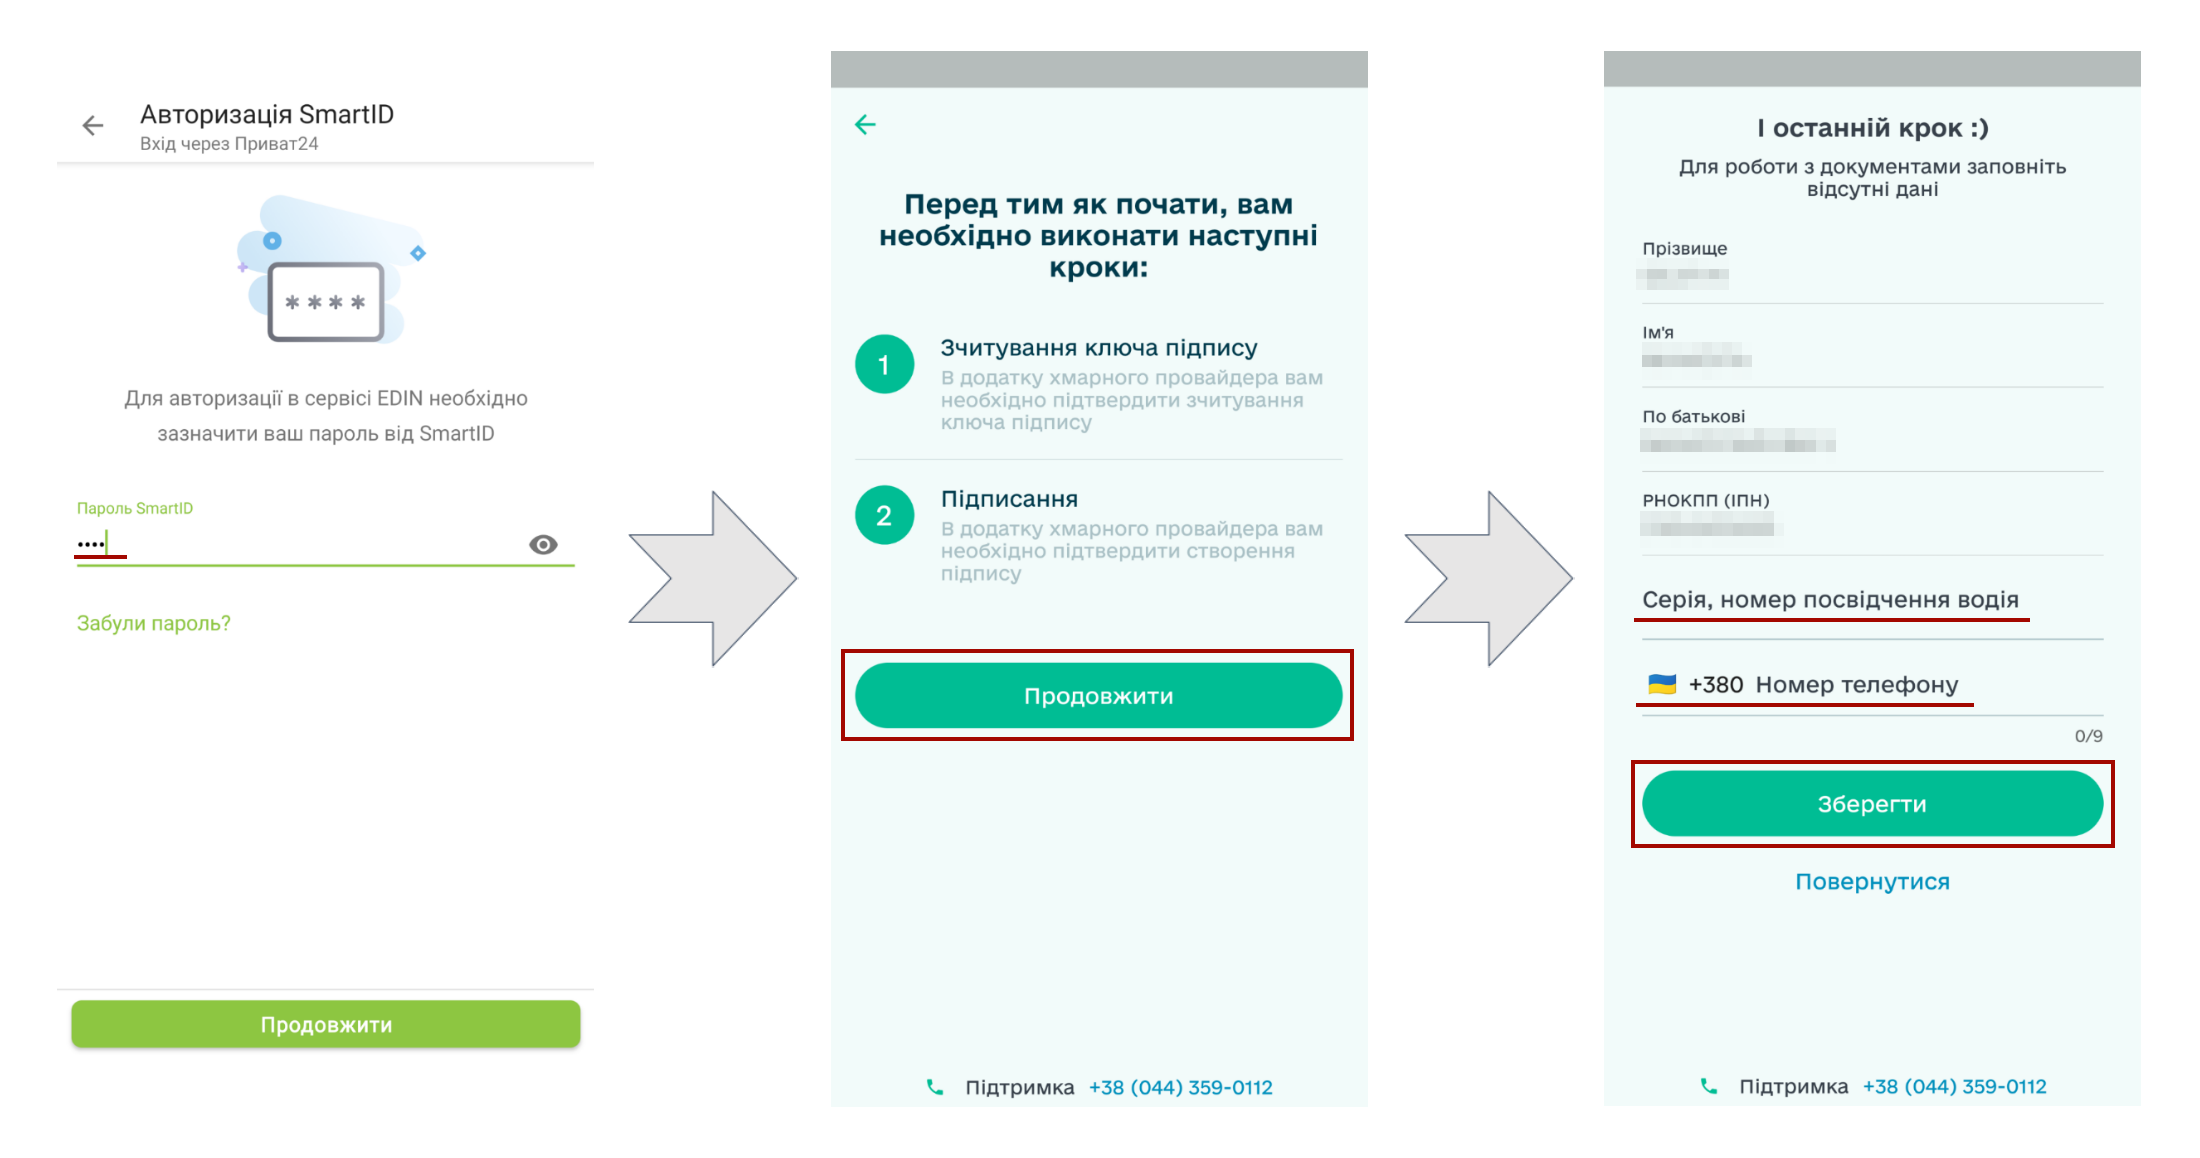
At the second stage, you need to go through the “SmartID” authorization again and press the “Continue” button in the “EDIN Driver” application. Your data will be uploaded automatically (when registering for the first time, you must also specify Driver’s license series and number and Phone number):
Now your signature key is displayed in the menu “User” -> “Signature key” (if necessary, it can be replaced there).
When using a key from Diia.Sign, you must make sure that you have the latest version of this application installed! You need to select “Diia.Sign” and press the “Yes / No” button depending on whether “Action” has your driver’s license:
Next, you need to perform an authorized login to the Action application, press “Sign” the request to receive copies of documents from the PBX company (after which you need to confirm the code for Diia.Sign):
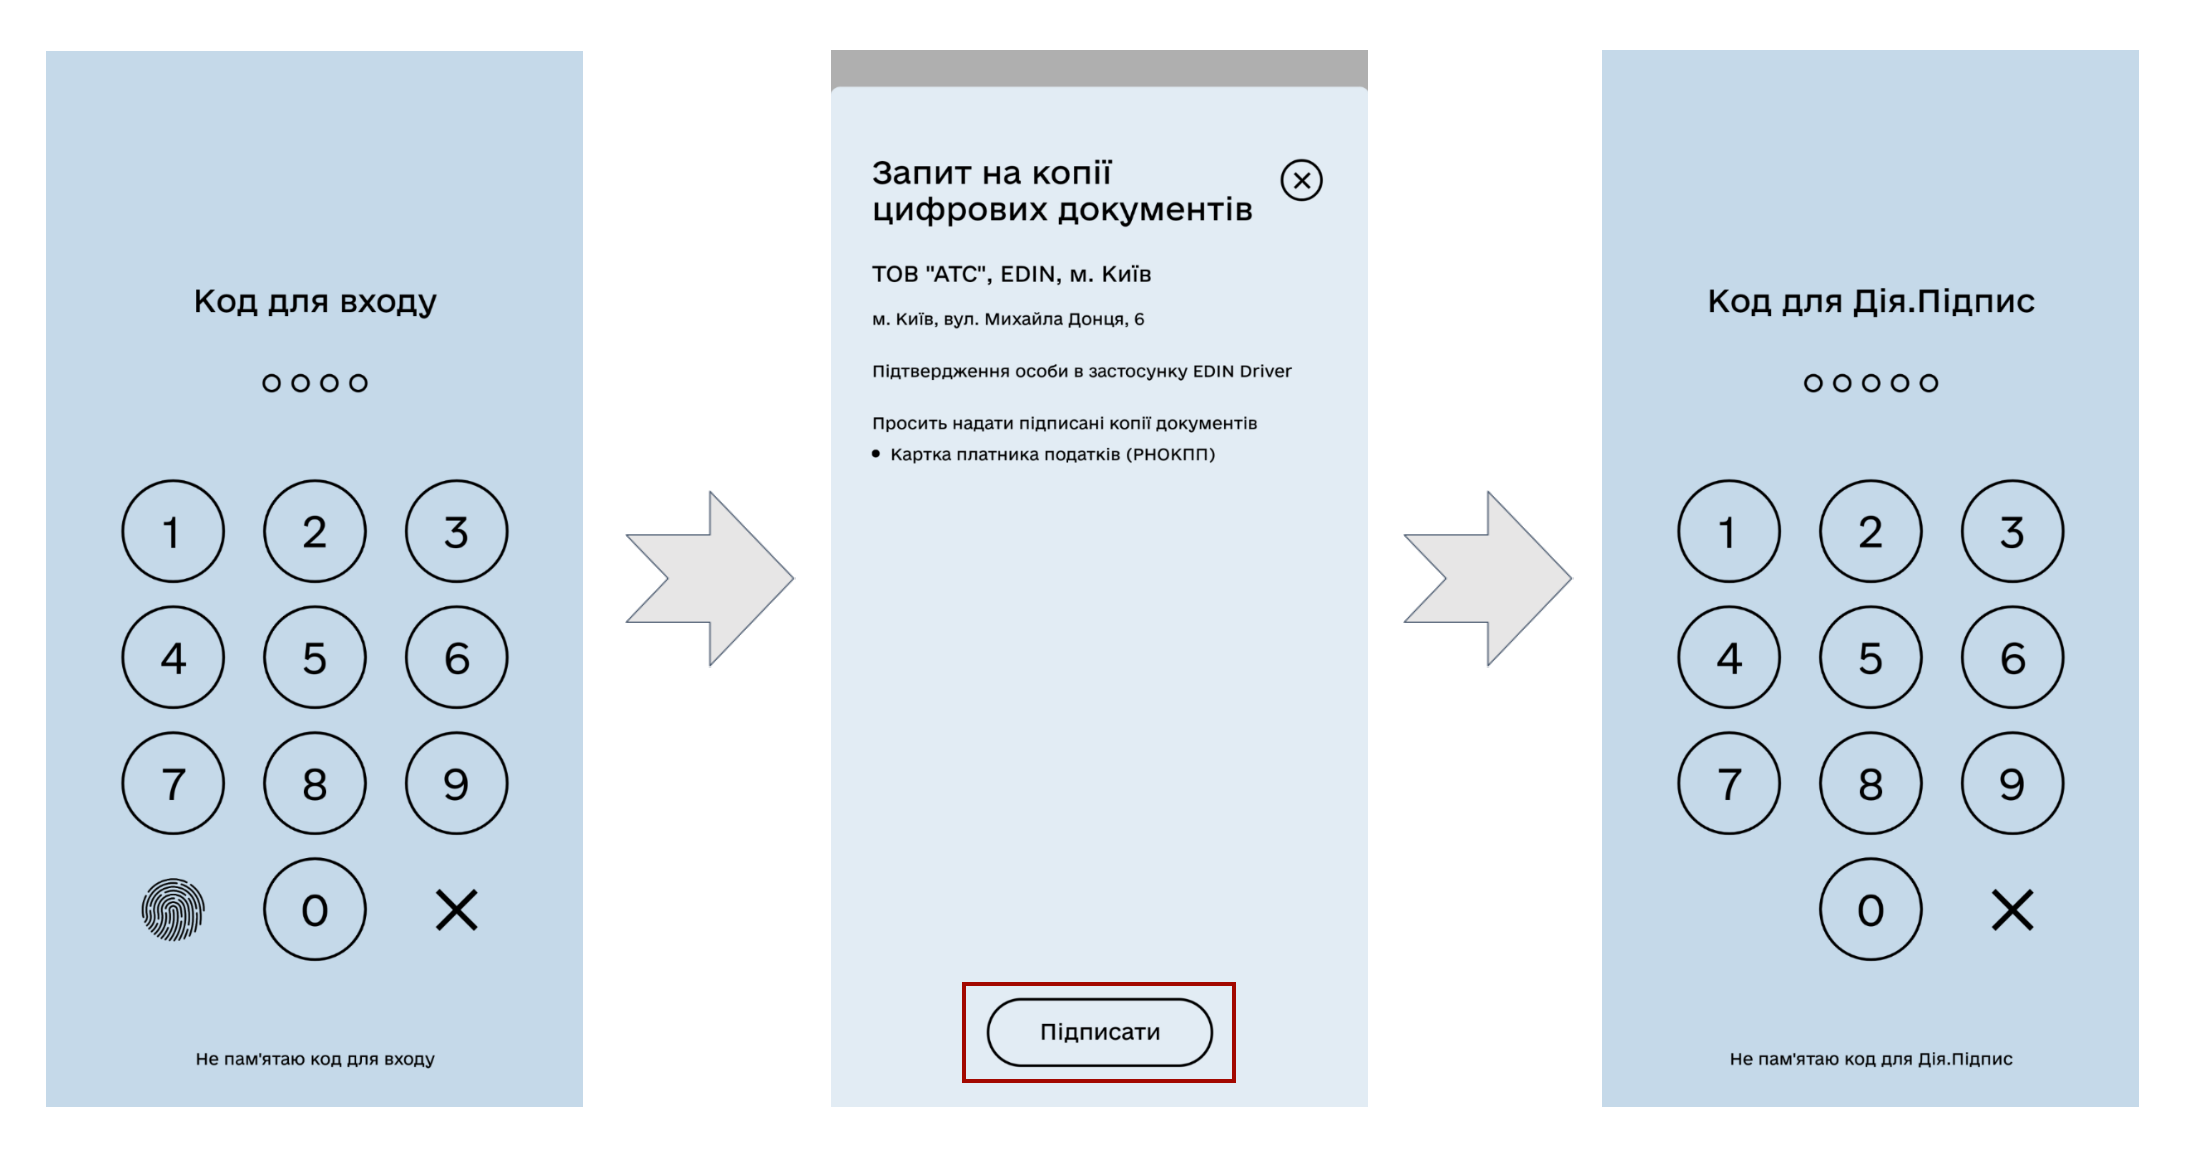
Next, you need to “Send via Action” the signed documents, having previously ticked the consent to transfer data to a third party. Click the “Continue” button to return to the “EDIN Driver” application. Your data will be uploaded automatically (if your driver’s license data is not available in “Action”, the application will ask you to enter it):

Now your signature key is displayed in the menu “User” -> “Signature key” (if necessary, it can be replaced there).
3 Signing e-TTN in EDIN “Driver”
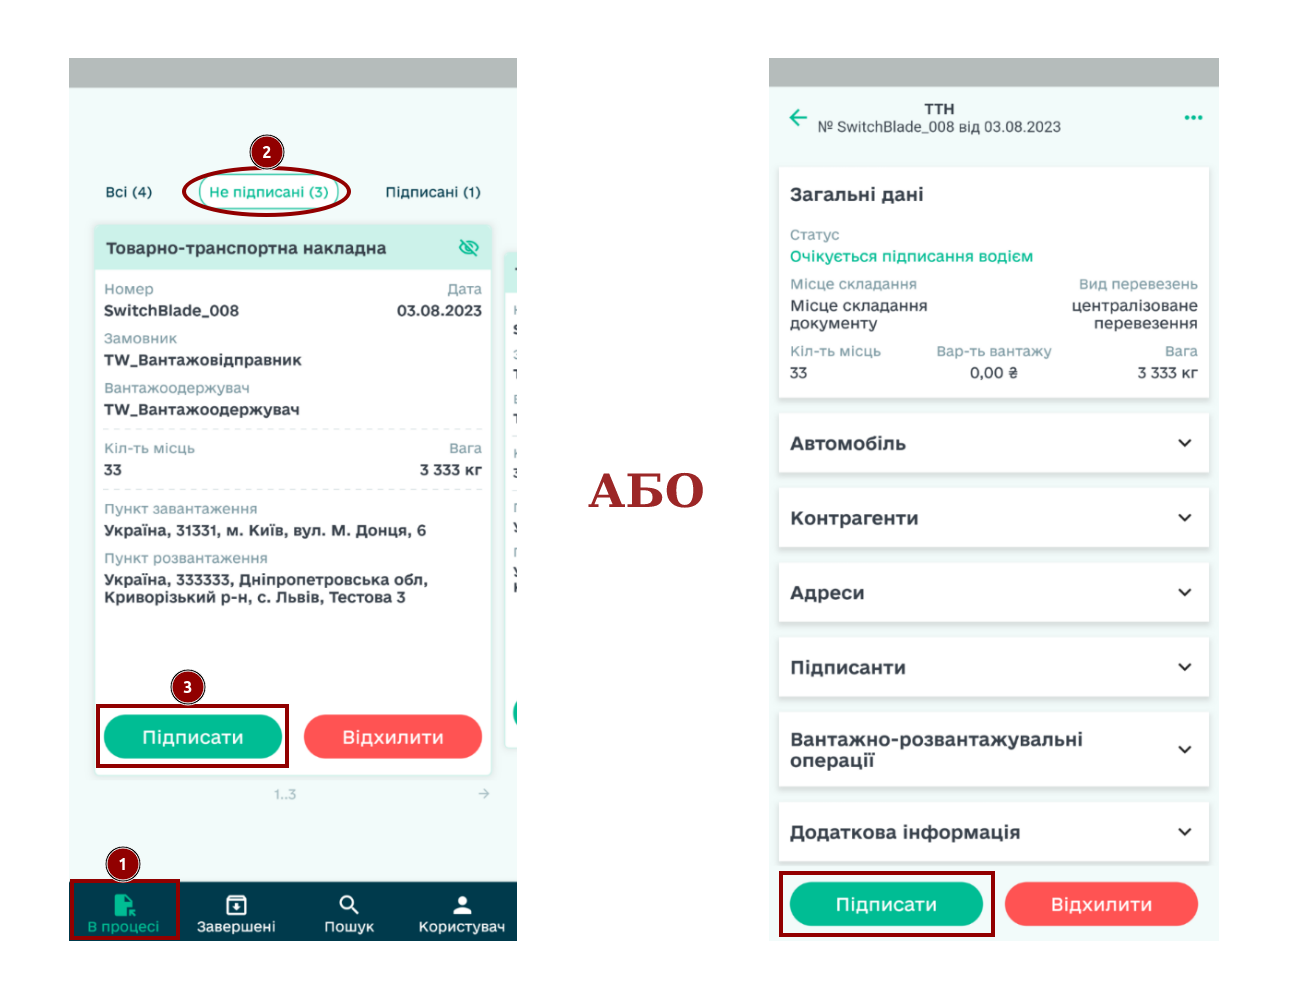
In the “In process” tab, e-TTNs are displayed, which you can filter (“All”, “Signed”, “Not signed”). In order to familiarize yourself with the document in more detail, you need to click on it, and the selection of the document is carried out by “swiping” left to right:

Hint
“Unsigned” e-TTN documents can be signed individually or in bulk by selecting several documents.
In order to sign 1 document, when viewing the document or in the “In progress” tab, select an unsigned document and press “Sign”:
In order to sign several documents, in the “In process” tab, among “Unsigned” documents, pin one of the documents (to activate the mass signing functionality), check the required documents or “Select all” and press “Sign (item)”:
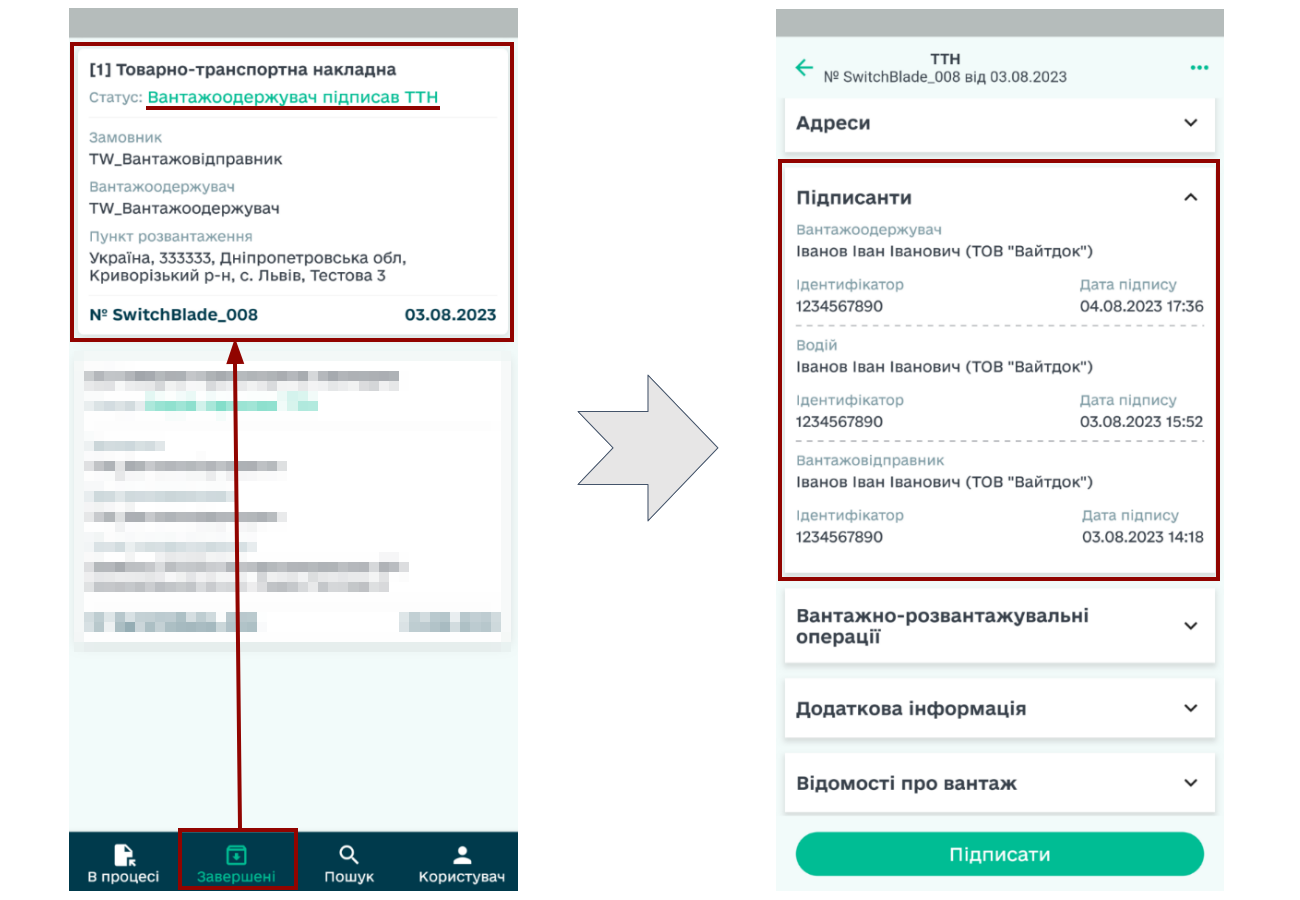
The selected documents are signed: you can get acquainted with the data of the signatories by opening “Signatories” in the document:

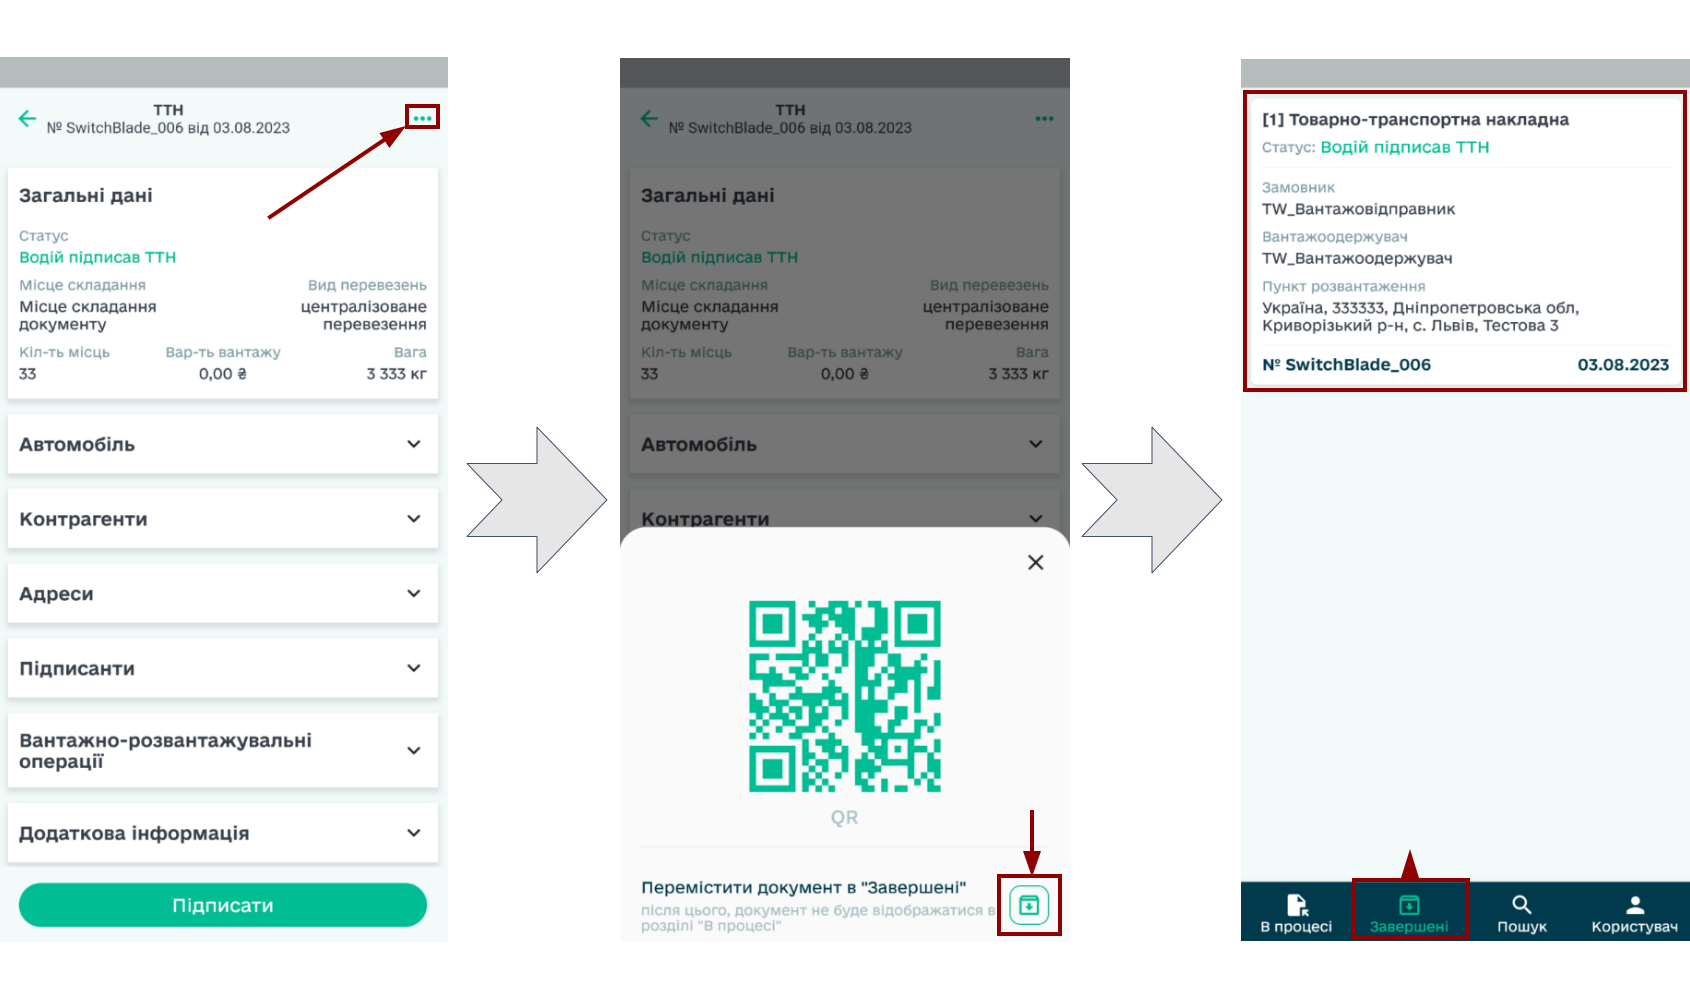
After the Consignee signs and sends the e-TTN document from his side, its status changes (You will receive a notification) to “Consignee has signed the TTN” and it is automatically transferred to the “Completed” tab:
Hint
For convenient work with new and current documents in the EDIN “Driver” application, old documents can be “Moved to completed” (after that, the document will not be displayed in the “In progress” section):
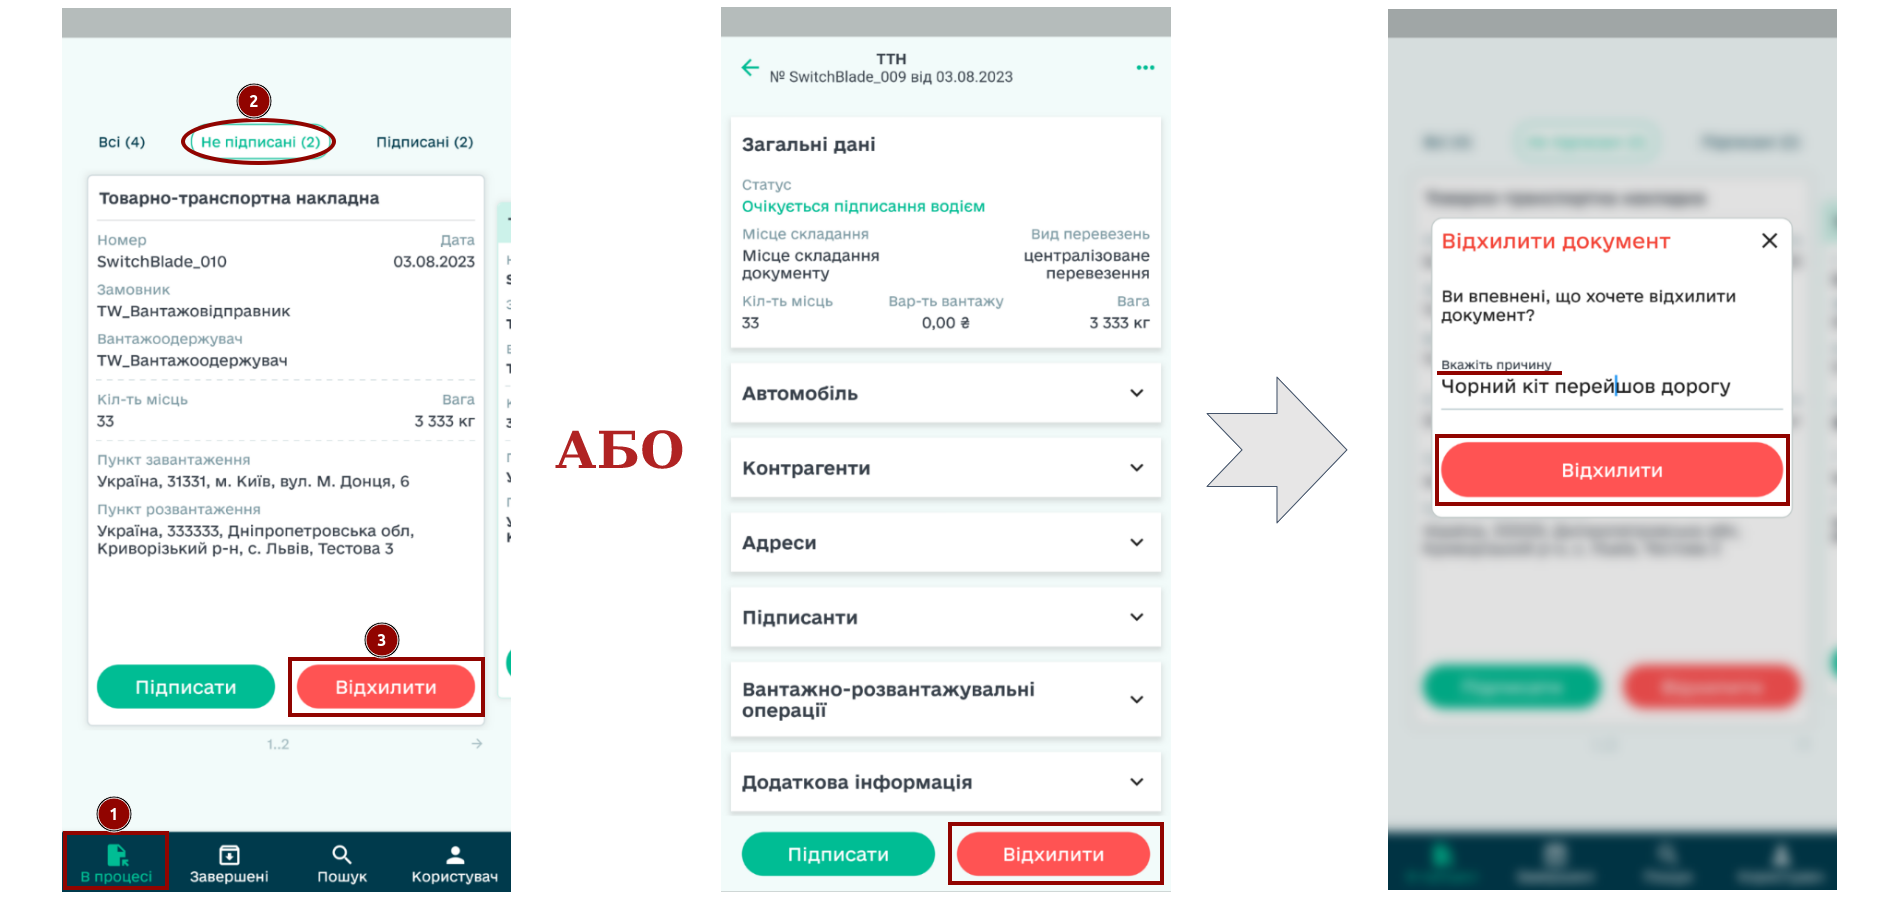
4 Rejection of e-TTN in EDIN “Driver”
In order to reject a document, when viewing a document or in the “In Process” tab, select an unsigned document and press “Reject”; you need to specify the reason for the rejection in text (for your counterparties) and click “Reject” again:
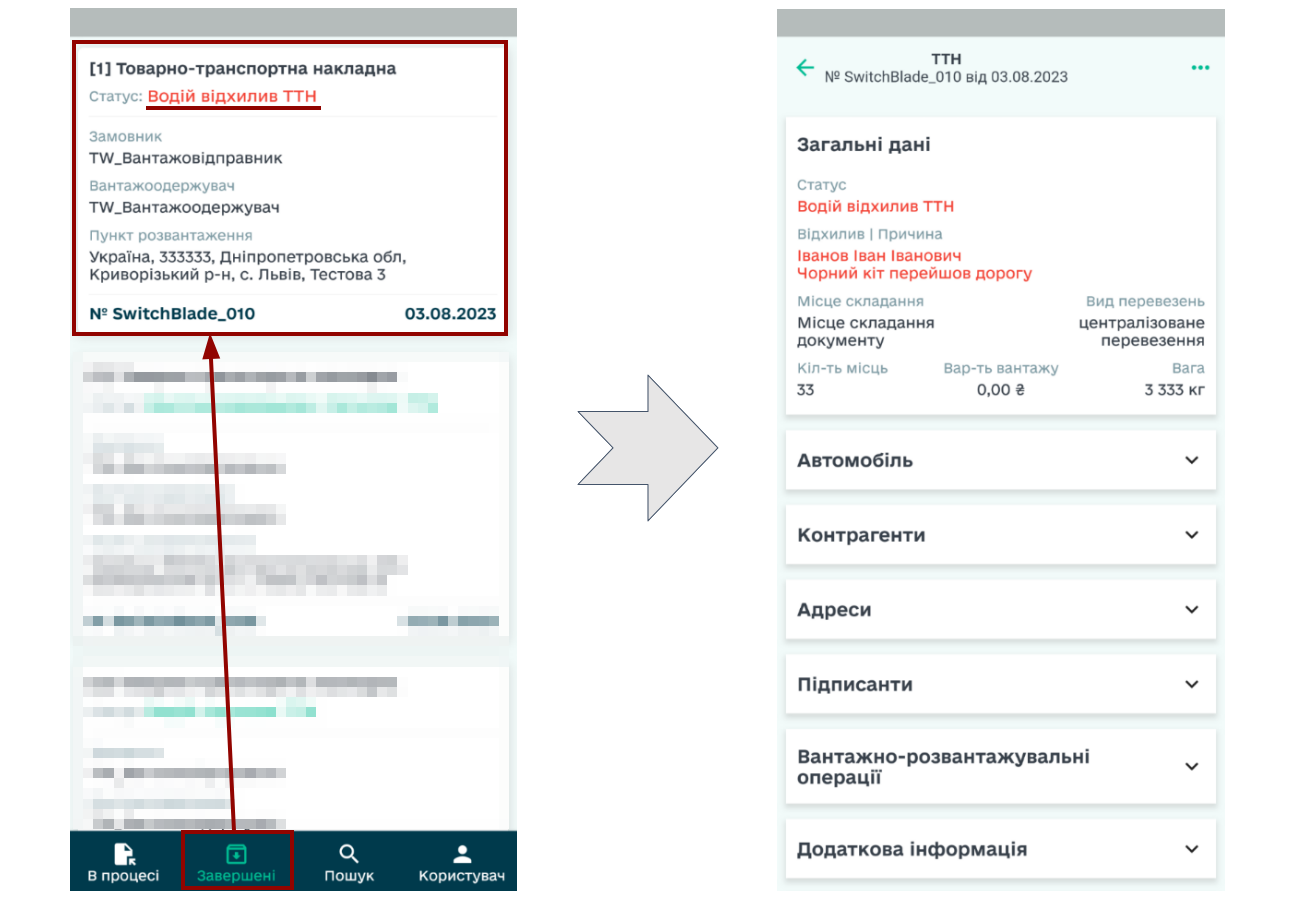
The rejected document changes its status to “The driver rejected TTN” and automatically enters the “Completed” tab, when you view it, your comment-the reason for the rejection is displayed:
5 Working with Acts to e-TTN in EDIN “Driver”
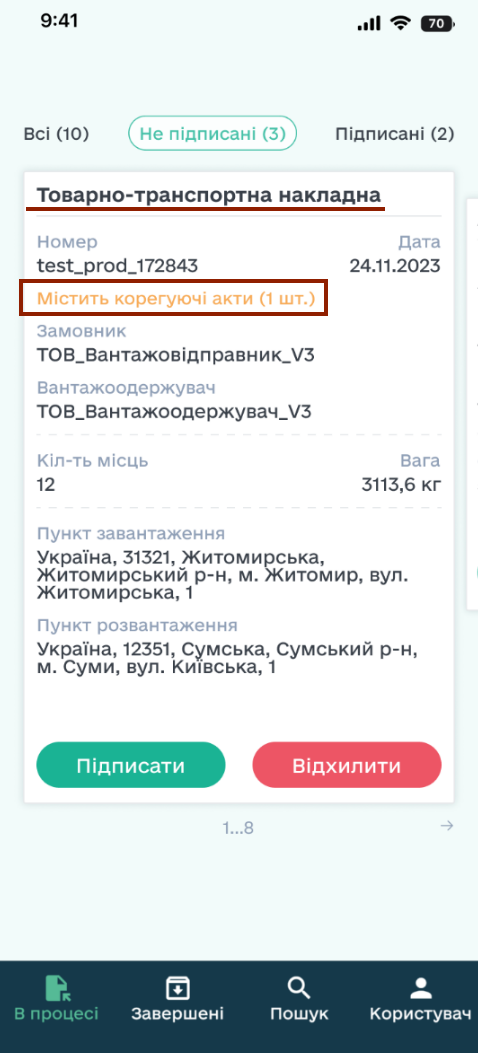
If an Act was drawn up for the e-TTN document, then this document is also displayed in the tab “In process”:
At the same time, the e-TTN document itself, to which this Act is drawn up, contains information about the acts (in orange):
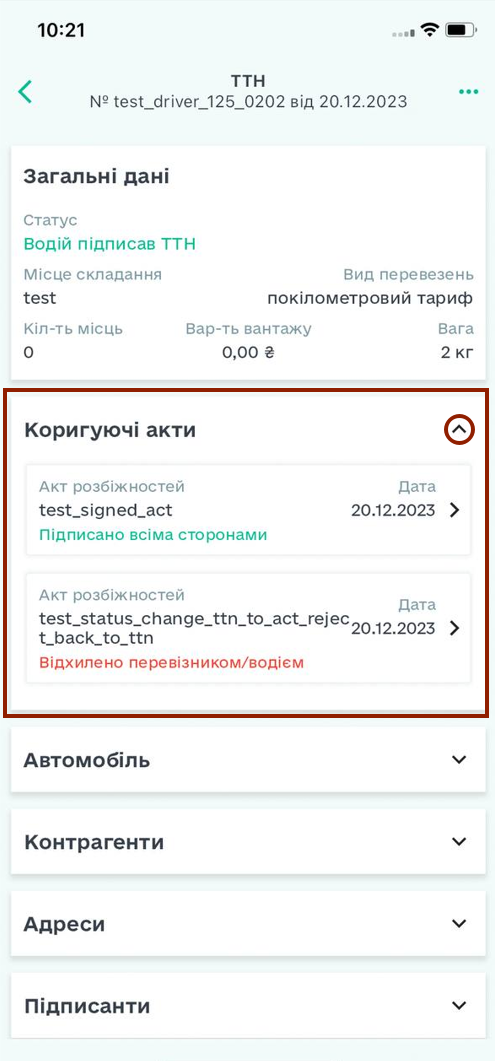
When viewing the e-TTN document in detail, the “Corrective Acts” block is displayed, where all accompanying Acts are displayed (the Act is opened by clicking on its tile):
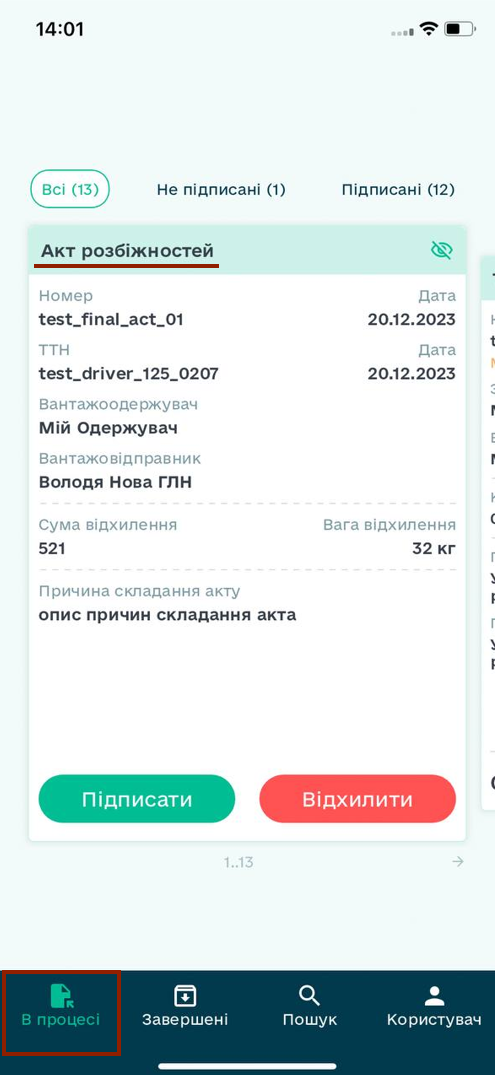
5.1 Processing of incoming “Disagreement Act” in EDIN “Driver”
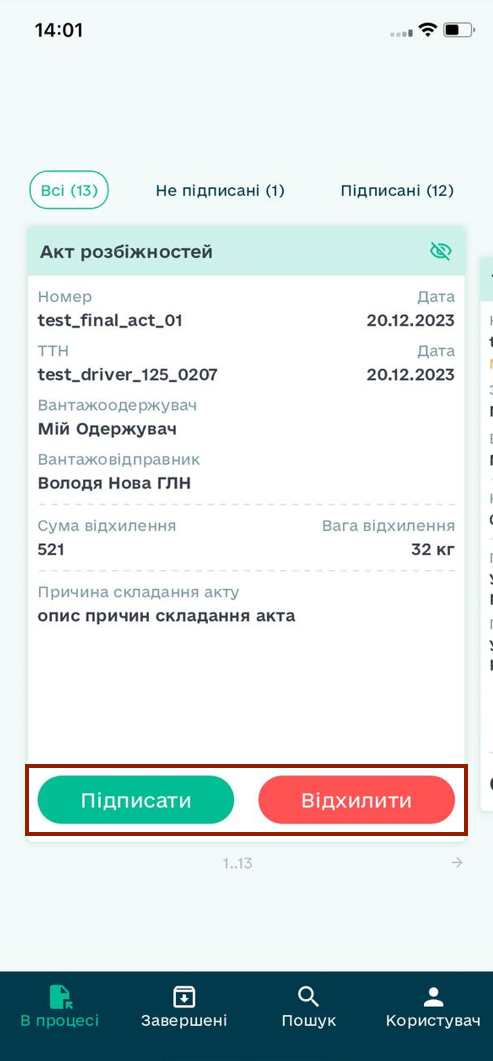
When the Consignee creates a “Cargo Discrepancy Act” work with e-TTN is blocked and to continue work the Carrier/Driver needs to “Sign” or “Reject” this Act:
The processes of Signing and Rejection of Acts are identical to the actions performed before e-TTN and described in the sections above (section 3 and section 4, respectively). After Signing or Rejection, the Act changes its status from “Awaiting signature by the driver” to “Signed by all parties” or “Rejected by the carrier/driver”, respectively.
6 Useful Information
In order to view the printed TTN form, you need to go to the document card => “three dots” => “Open the printed form”:
In order to share a printed TTN form, you need to go to the document card => “three dots” => “Share”:
In order to build a route immediately from the document, you need to go to the TTN card => expand the Addresses block => click on the address of the unloading point and select the application for building the route:
To use the document search, you need to go to the Search tab bar => specify the search data => press the Search button:
Hint
Search is possible by 5 values (document date, document status, customer, consignee, carrier)
If the Carrier has blocked the Driver, when the TTN is displayed for the user, the message “The Carrier has restricted access to the document” will be displayed:
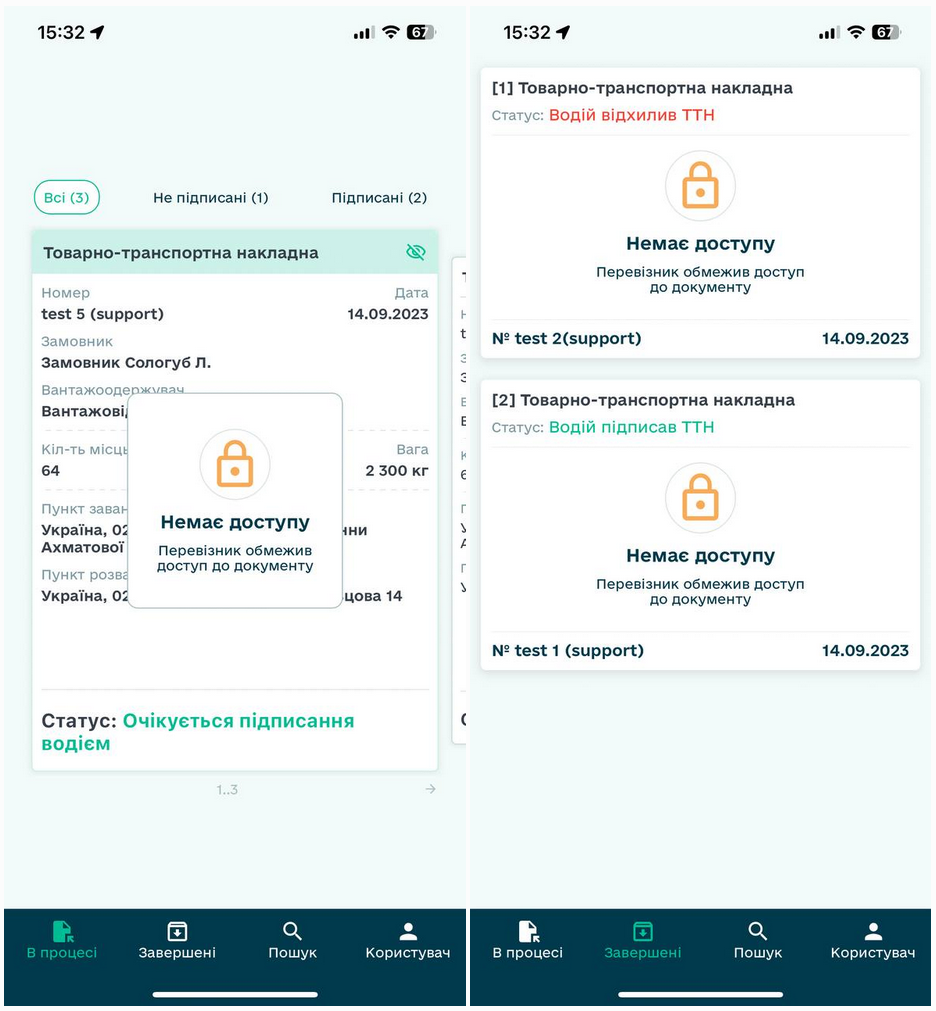
Blocking of the Driver takes place in the personal account of the Carrier (for more details on blocking, see link).
7 EDIN “Driver” settings
Your personal settings, application policy and rules, our contacts and other useful information are stored in the “User” tab.
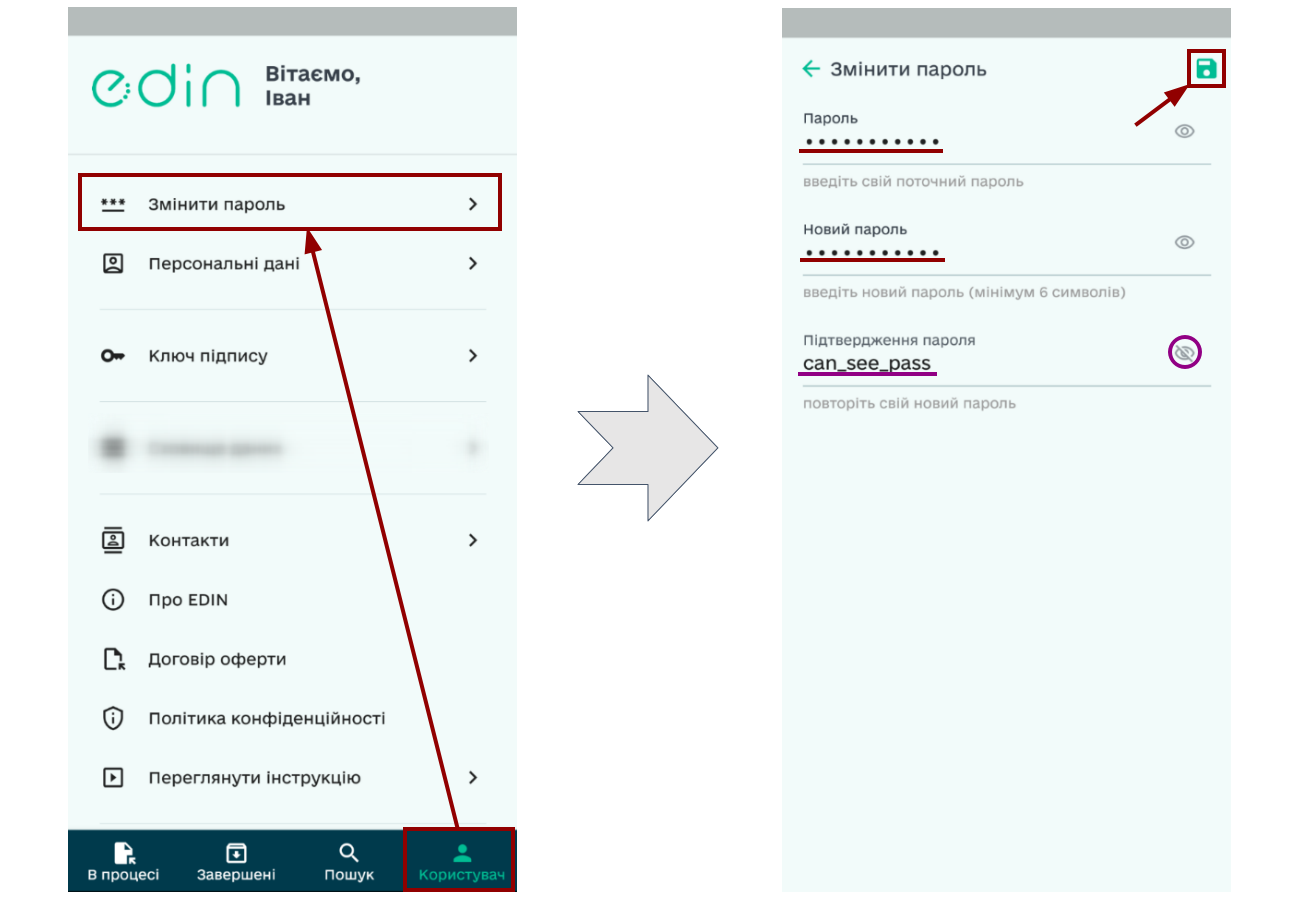
To change your password, you need to select “Change password” in the “User” tab and in the open form enter your current password, enter a new password (at least 6 characters), re-enter the new password (to to avoid typing errors) and be sure to Save the entered changes using the  icon button:
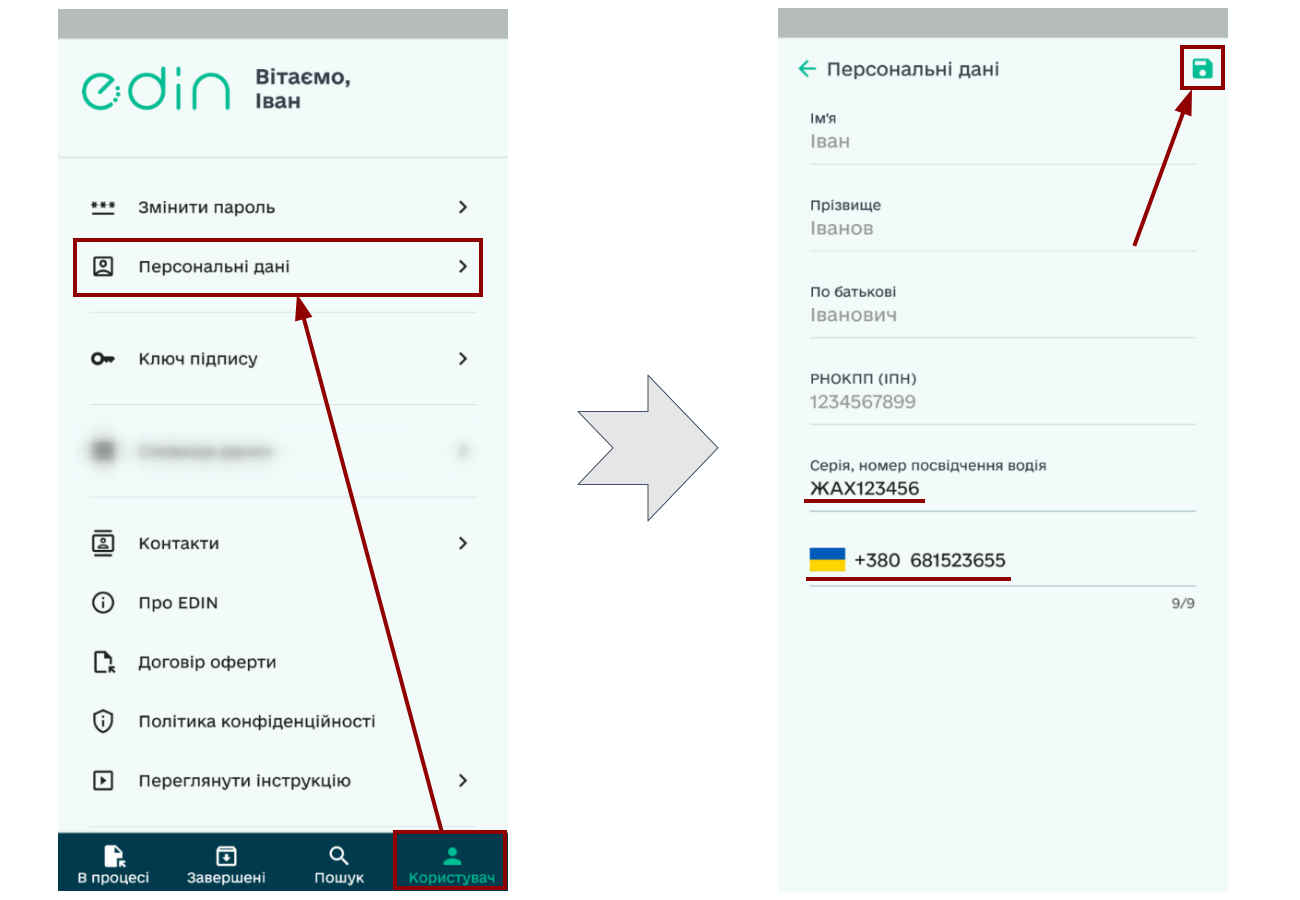
To change driver’s license data and/or phone number, you need to select “Personal data” in the “User” tab, make changes and Save the entered changes using the button with the icon | diskette|:
Hint
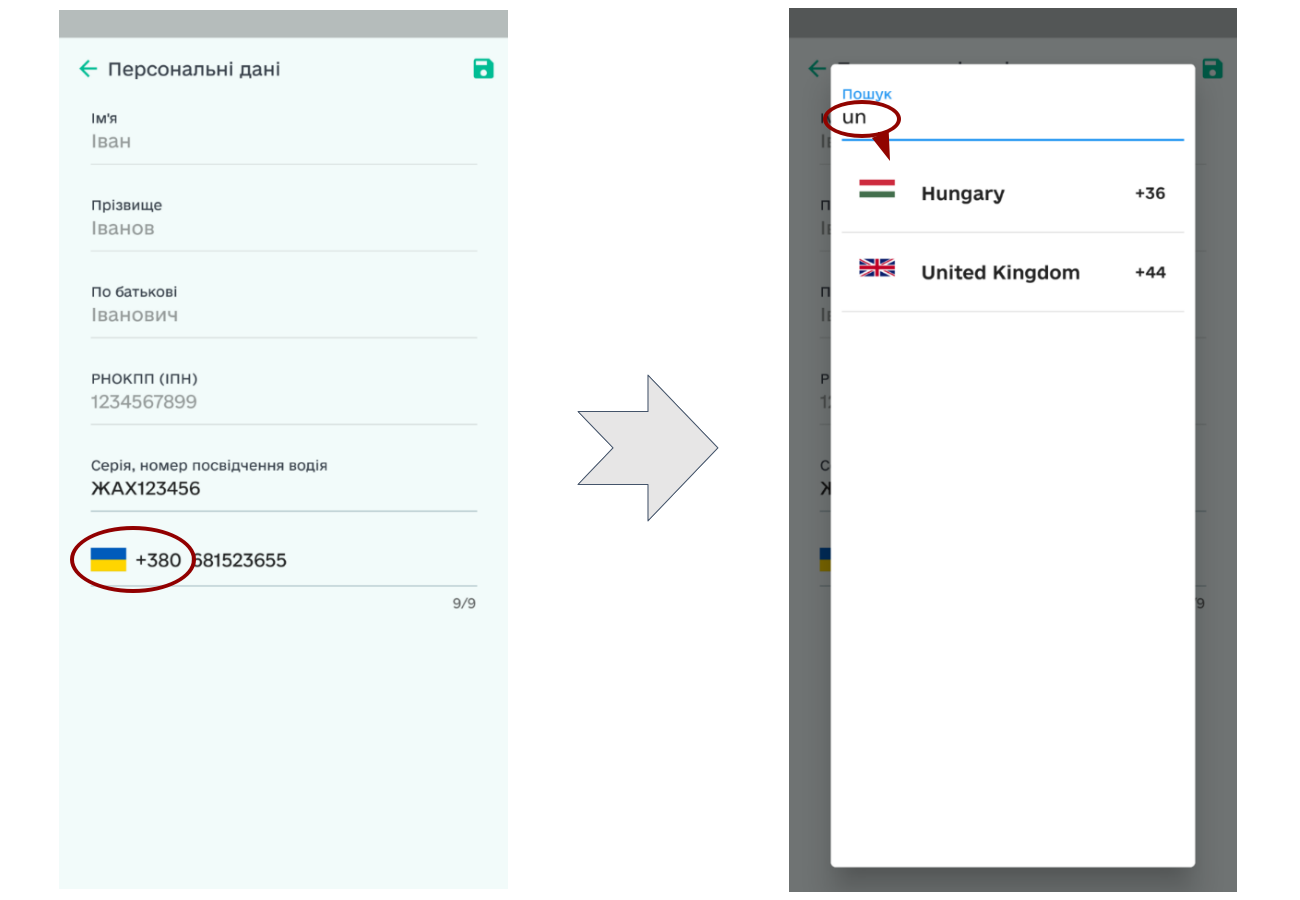
To change the country code of a phone number, click on the flag with the code and select a country from the list (for convenience, you can search by name (Latin) or code):
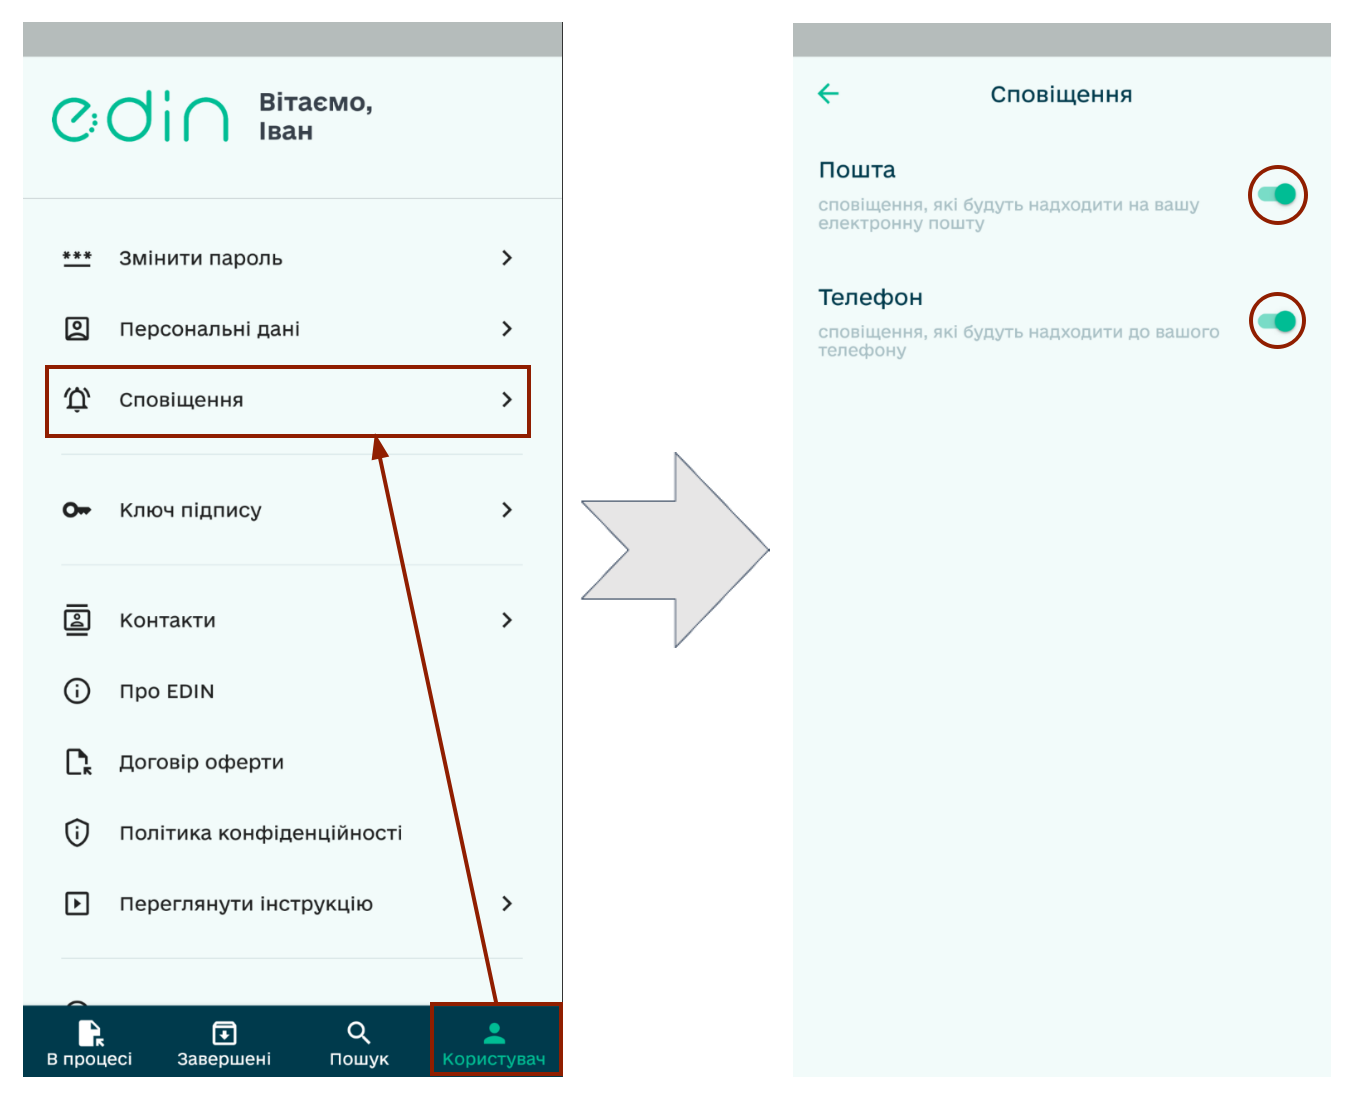
To set up service notifications, in the “User” tab, select “Notifications” and enable/disable notifications to Mail and directly to the Phone (your device) from the application:
To change or add a signature key, select “Signature key” in the “User” tab. After Adding the key (description on the link) You will be presented with detailed data of the added key, which is automatically pulled up for Signature:
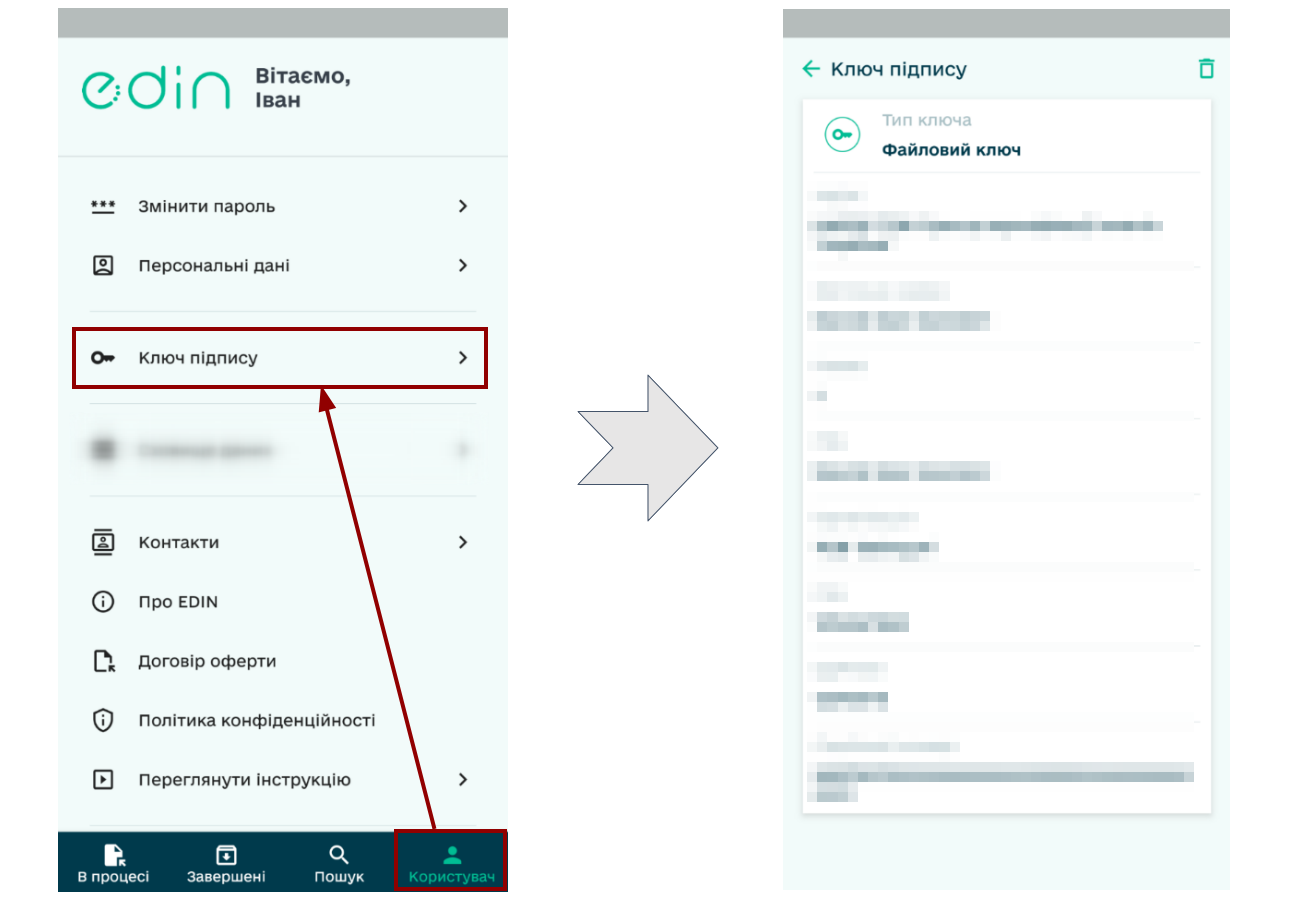
Only one key is stored in the EDIN “Driver” application - to add another signature key, the current one must be Delete using the button with the icon  .
.
Let us know immediately when you receive an error in the application: you need to select “Report an error” in the “User” tab and specify the reason for the error (“what is not working as it should”) in text:
Hint
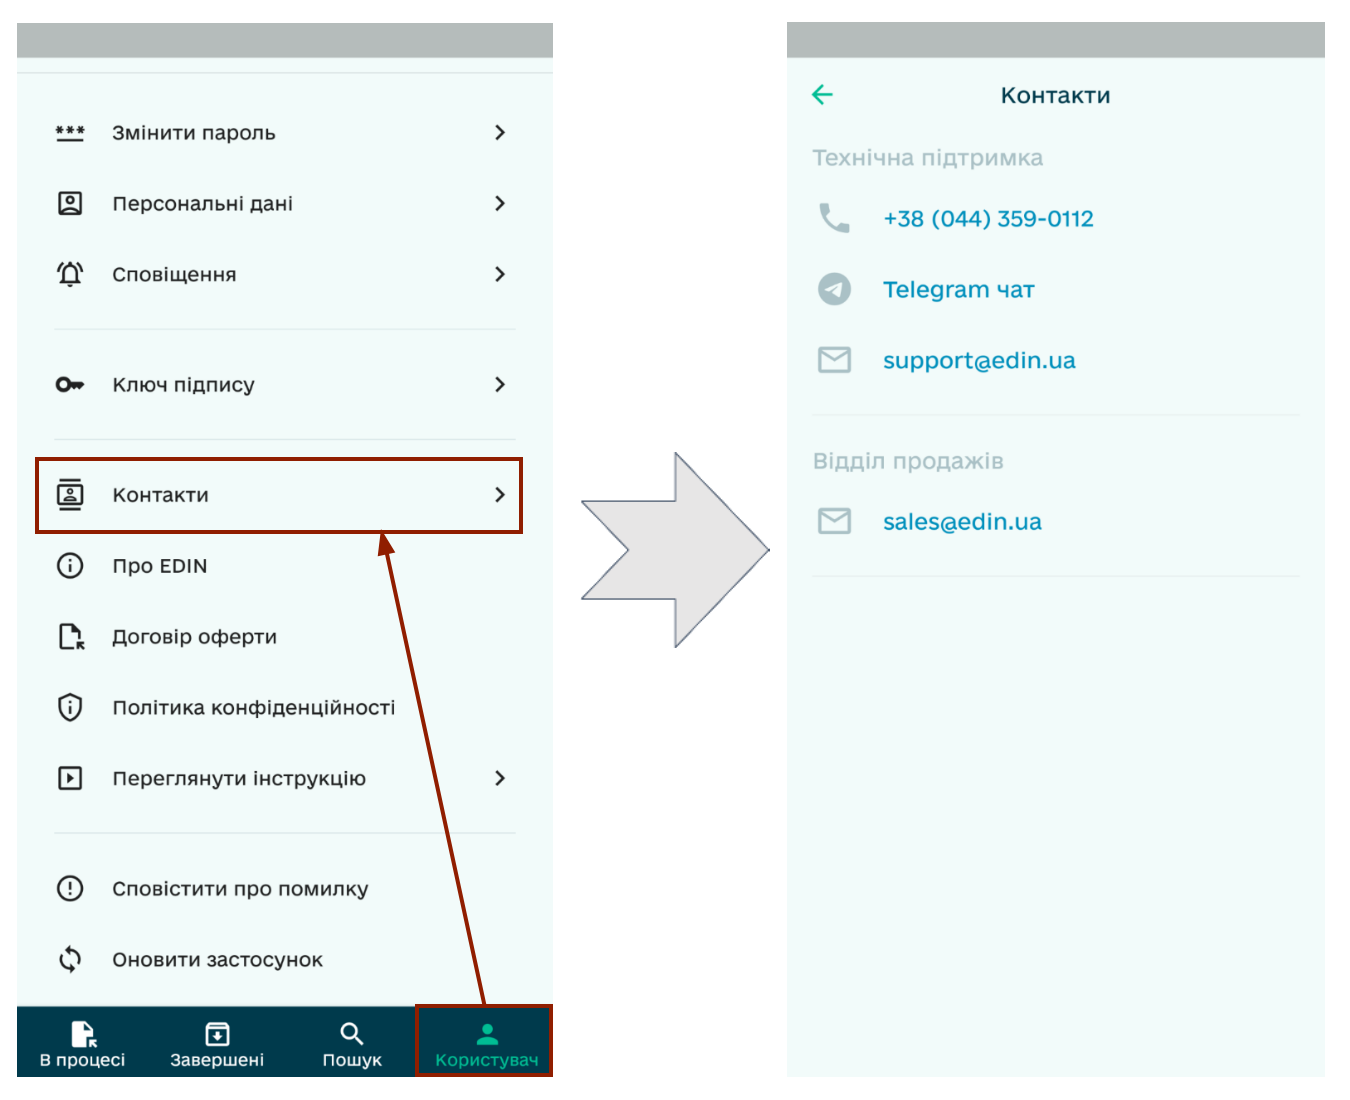
It is also possible to contact technical support in a way that is convenient for you (phone, telegram, e-mail):
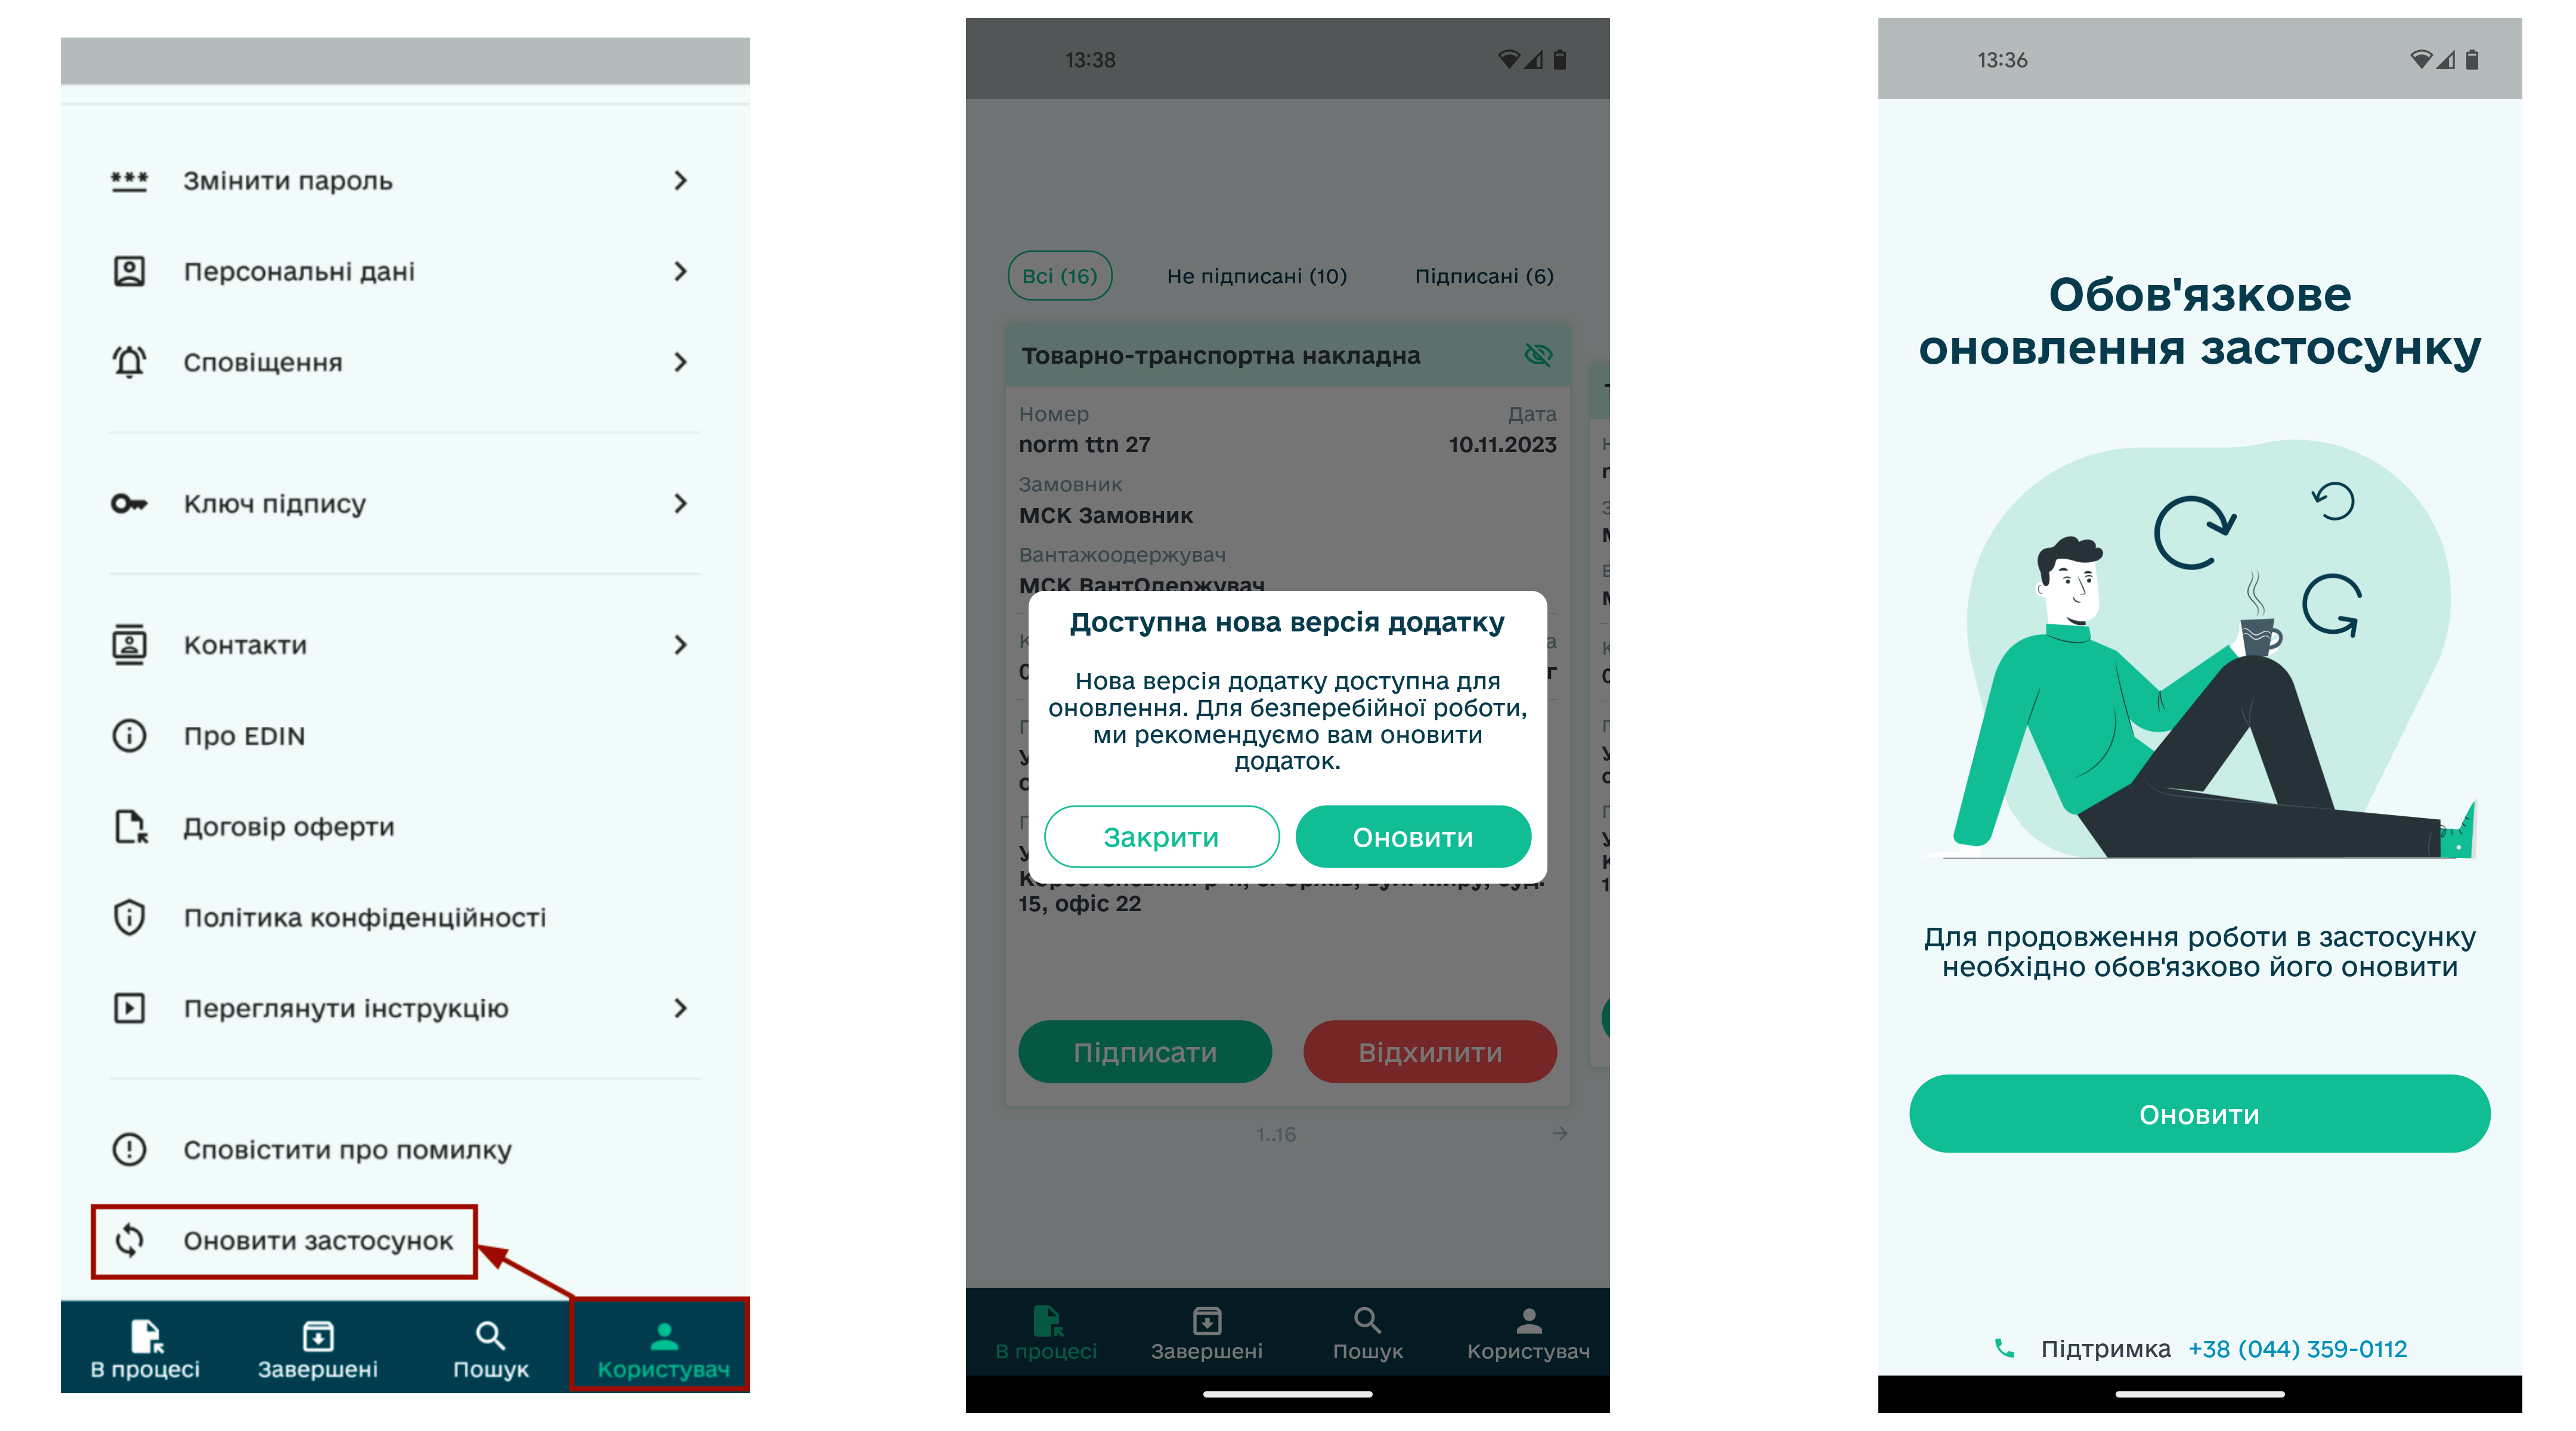
We recommend timely “Update the application” (1 click in the “User” tab). You will also receive a notification that a new version of the application is available (if you ignore the need to update the application for a long time, it may stop working):
Hint
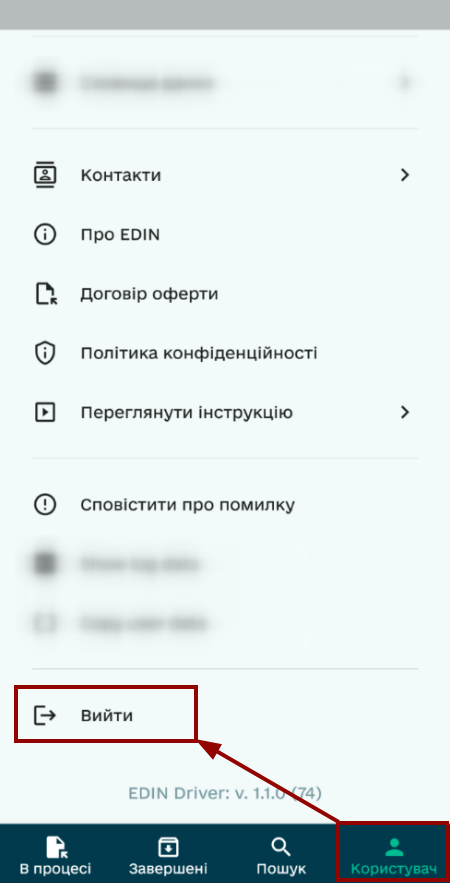
If the device on which the EDIN “Driver” is installed is used by several drivers: we strongly recommend that you “Exit” the application before transferring such a device to another person to protect your confidential information!
8 Deleting your account in EDIN “Driver”
Caution
We care about the confidentiality of your credentials, and you can “Delete account” by specifying the reason and reconfirming the action with the button:
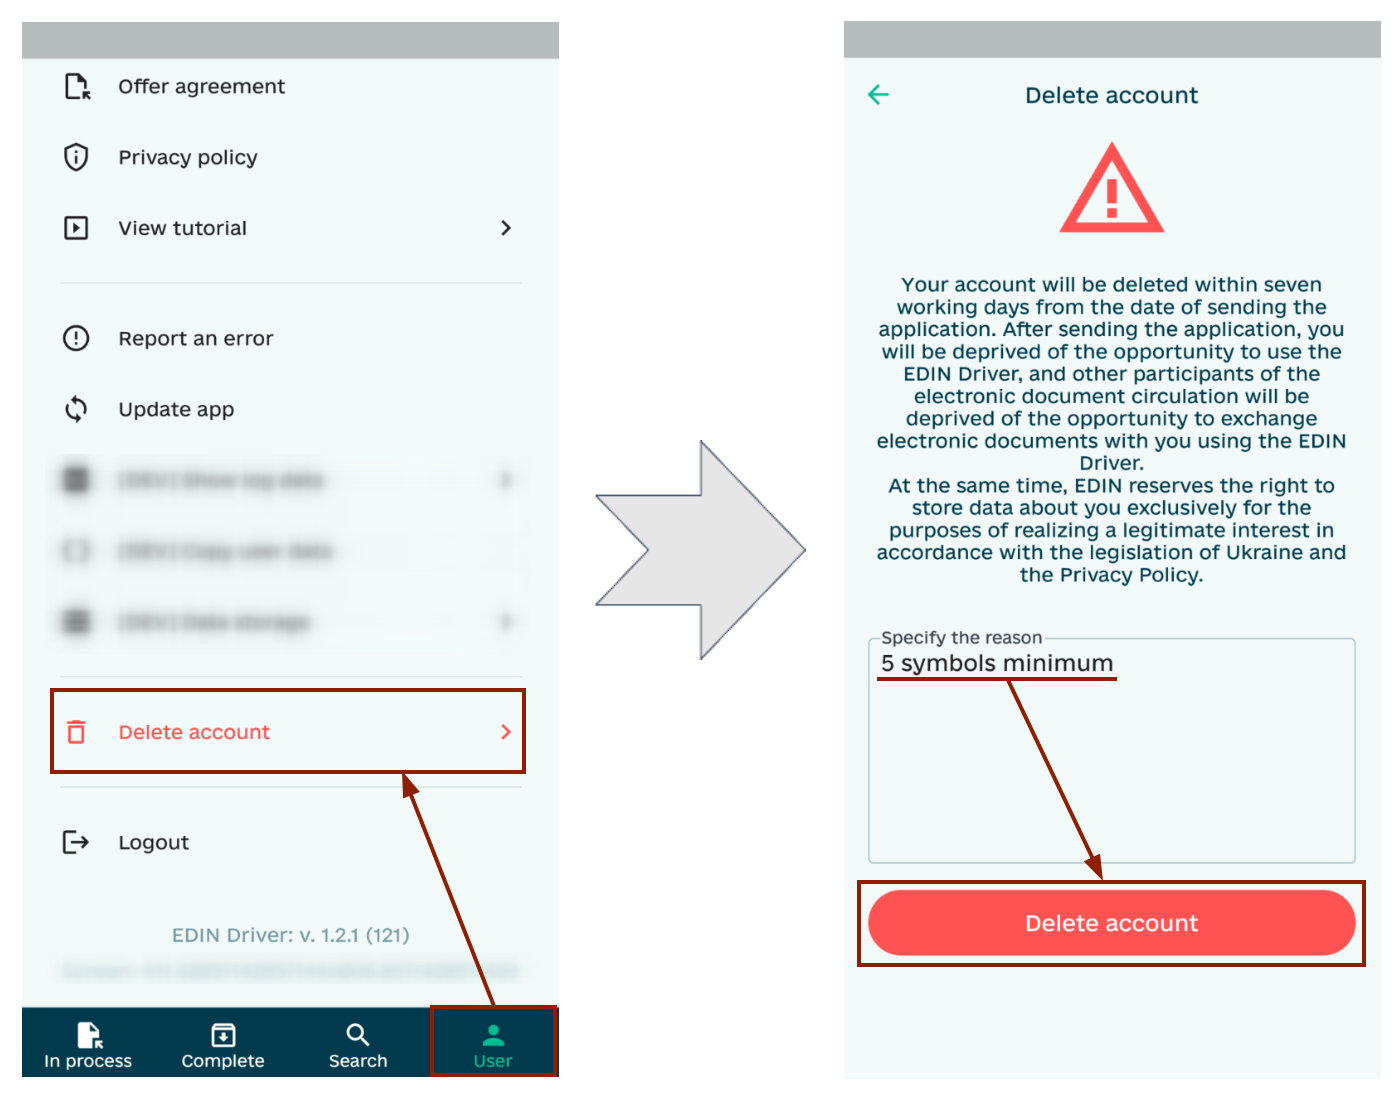
However, you should know that you will be deprived of the opportunity to use EDIN Driver, and other participants of electronic document circulation will be deprived of the opportunity to exchange electronic documents with you using EDIN Driver! You may find out more about the deletion and storage of data from our Privacy Policy (p.5 and p.9.2.3 respectively).
Service support service: support@edin.ua