Work with “Vilnyi”
Contents:
1 Login to the platform
You can use any browser to work with the WEB service (Google Chrome latest version is recommended). To start work with the EDI Network platform, you need to Authorize : follow the link https://edo-v2.edin.ua/auth, enter your user login and password, press “Sign In”, as shown in the image below:

Hint
New users can easily go throught self- “Registration” on the “EDI Network” platform using Email. You can change your password, e-mail or other personal data in your “User Profile”.
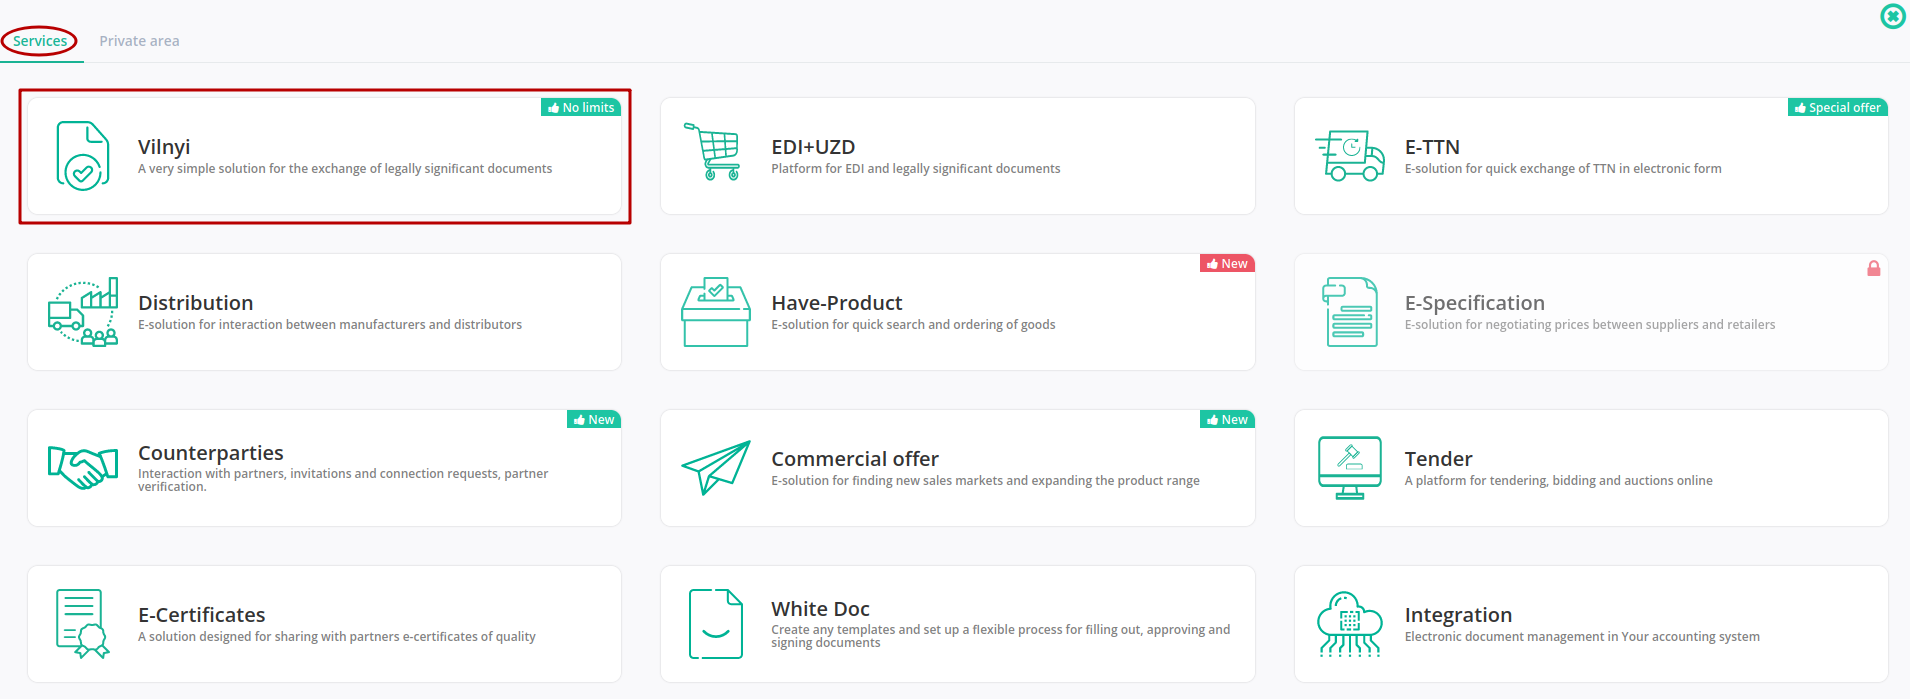
After successful authorization, the main menu of EDIN products and solutions will open. In the “Services” tab you need to select the “Vilnyi” tile:
Hint
You can use the  button or EDIN logo to return to the services menu.
2 Service general view
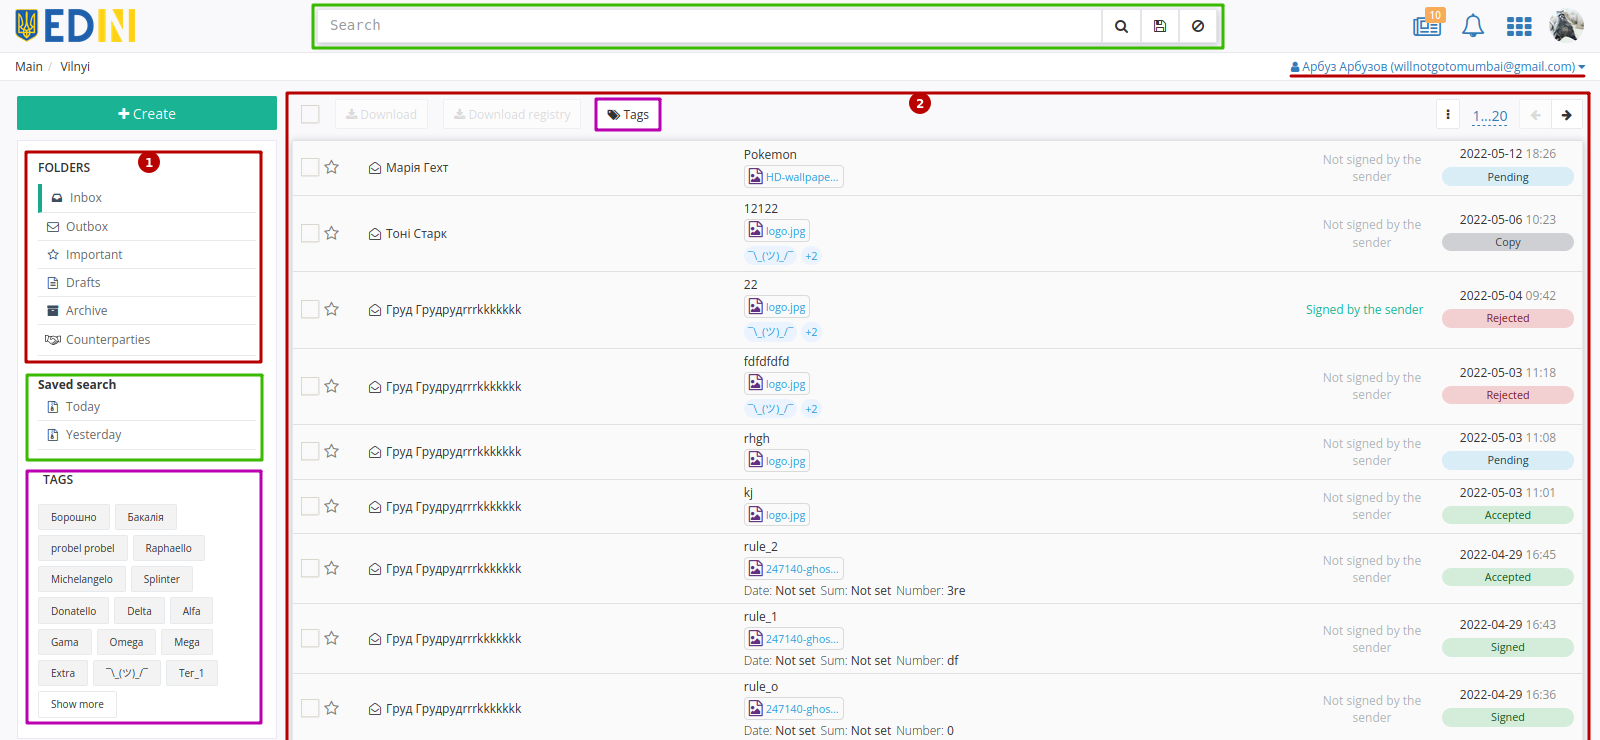
“Vilnyi” service contains common functional elements of the platform and among the main elements: own folders with documents (1) and a journal of documents (2) for viewing and working with documents. Search and Tags functionality significantly simplify the work in the service.
There is an opportunity to switch to the folders of other employees and perform actions with documents on their behalf if the user is configured access to service documents of other employees of the company :
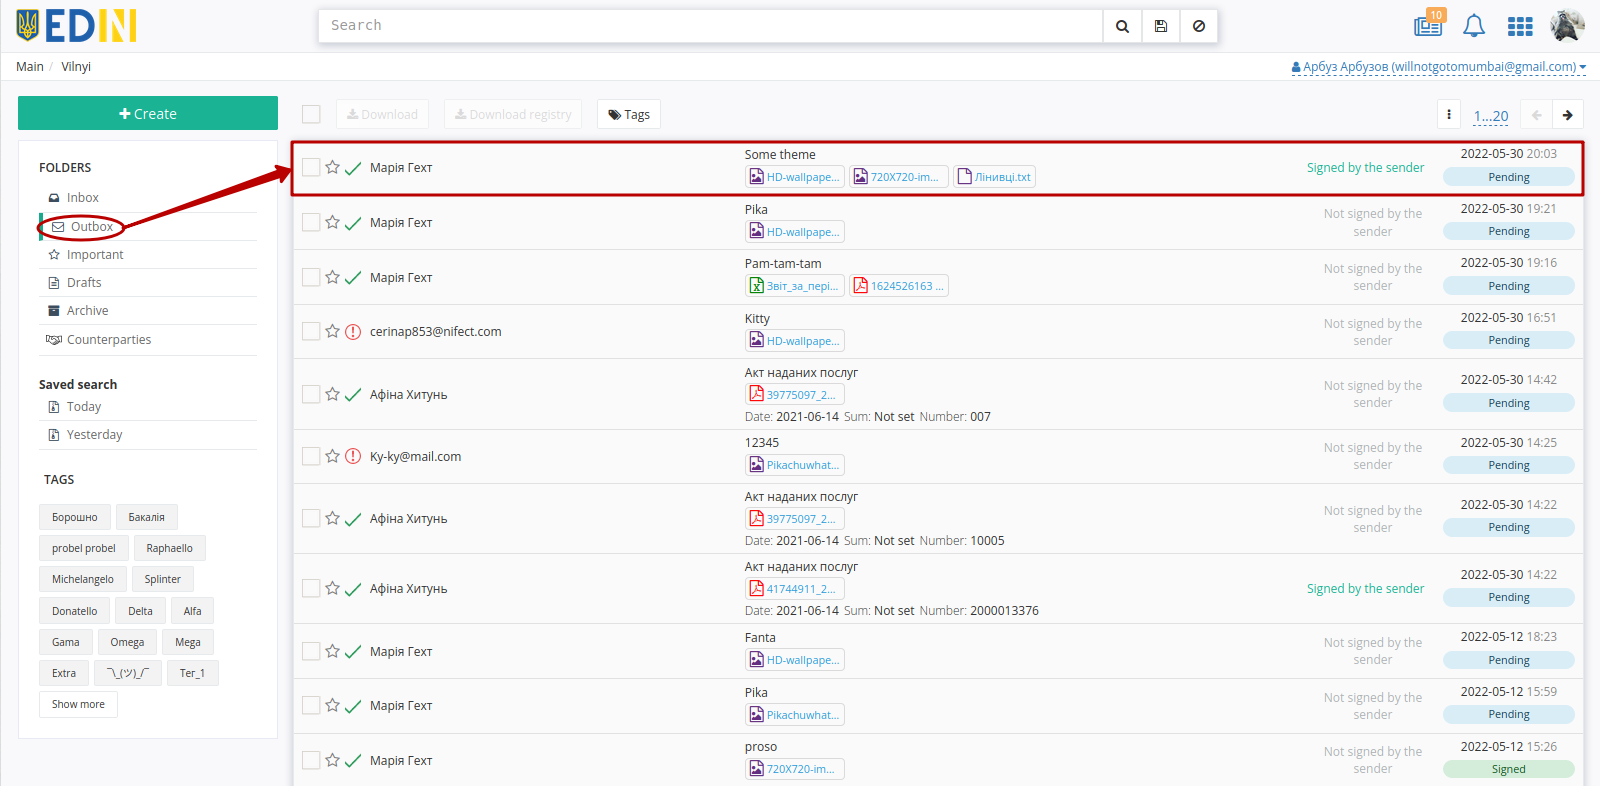
3 Browse service folders
The current location of the user in the service marked by a green line and a path is highlighted in a “breadcrumbs”.

To go to the folder you need, you need to select it:
“Inbox” - folder of incoming documents of the organization (from contractors).
“Outbox” - folder of sent documents of the organization (to contractors).
“Important” - folder of all documents that have been marked as “important” with a star symbol (“important”
 /
/  “ordinary”).
“Drafts” - folder for documents that were created but not sent yet.
“Archive” - folder for documents that have been transferred to the archive.
“Counterparties” - allows you to find your unregistered counterparties and send them invitations by e-mail.
3.1 Document statuses
“Vilnyi” service have the following statuses:
For inbox documents:
- signed/unsigned document sent (Recipient has not signed the document yet);
- signed/unsigned document sent (Recipient has not accepted the document yet);
“Signed” - the incoming document was signed by the Recipient; may be the final status if the Sender has not signed the document;
“Accepted” - the incoming document was accepted by the Recipient; may be the final status if the Sender has not signed the document;
“Processed” - final status of the document; sent document signed by the Sender, which was signed/accepted by all Recipients;
“Rejected by recipient” - final status of the document; sent signed/unsigned document was rejected by one of the counterparties (the document is considered rejected despite the actions of other counterparties);
“Copy” - not available for editing “snapshot”-copy of the document (contains the status of the original and information about the signatures at the time of copying). No actions are available with the document (exclusion: Sender can add Recipients to a copy that has already been sent).
For outbox documents:
- signed/unsigned document sent (none of Recipients has not signed the document yet);
- signed/unsigned document sent (none of Recipients has not accepted the document yet);
“Partially signed by recipients” - a signed / unsigned document was sent and some of the Recipients signed it;
“Partially accepted” - a signed / unsigned document was sent and some of the Recipients accepted it;
“Signed” - final status of the document; Sender sent an unsigned document which was signed by all Recipients;
“Accepted” - final status of the document; Sender sent an unsigned document which was accepted by all Recipients;
“Processed” - final status of the document; sent document signed by the Sender, which was signed/accepted by all Recipients;
“Rejected by recipient” - final status of the document; sent signed / unsigned document was rejected by one of the counterparties (the document is considered rejected despite the actions of other counterparties);
“Copy” - not available for editing “snapshot”-copy of the document (contains the status of the original and information about the signatures at the time of copying). No actions are available with the document (exclusion: Sender can add Recipients to a copy that has already been sent).

Hint
Additionally, in the service folders, documents signed by the Sender have a green mark “Signed by the sender”.
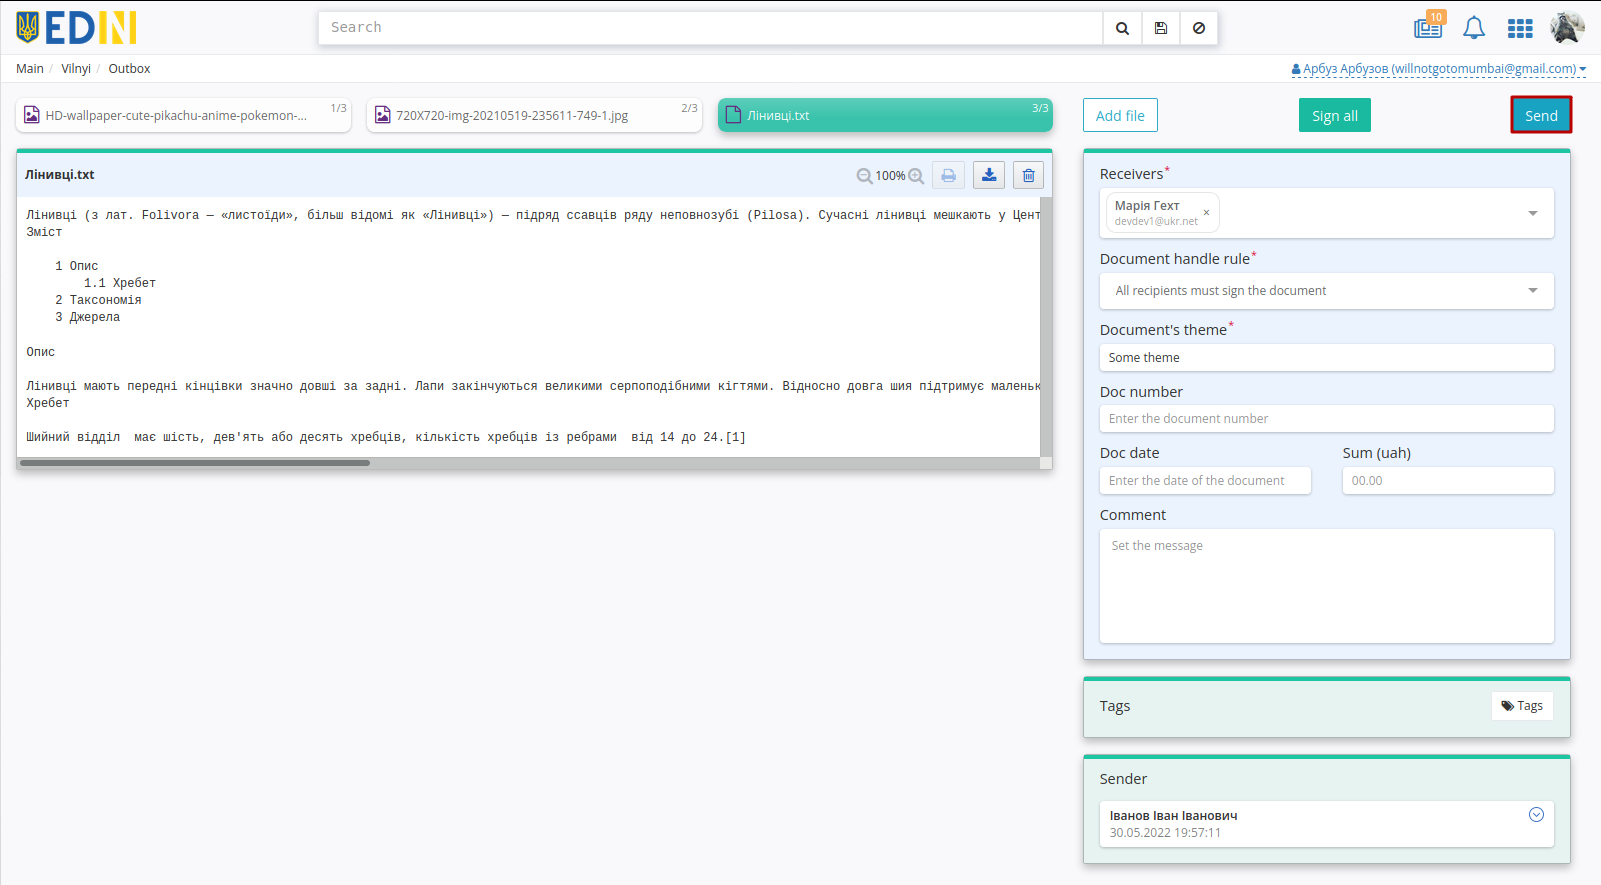
4 Creating and sending a document
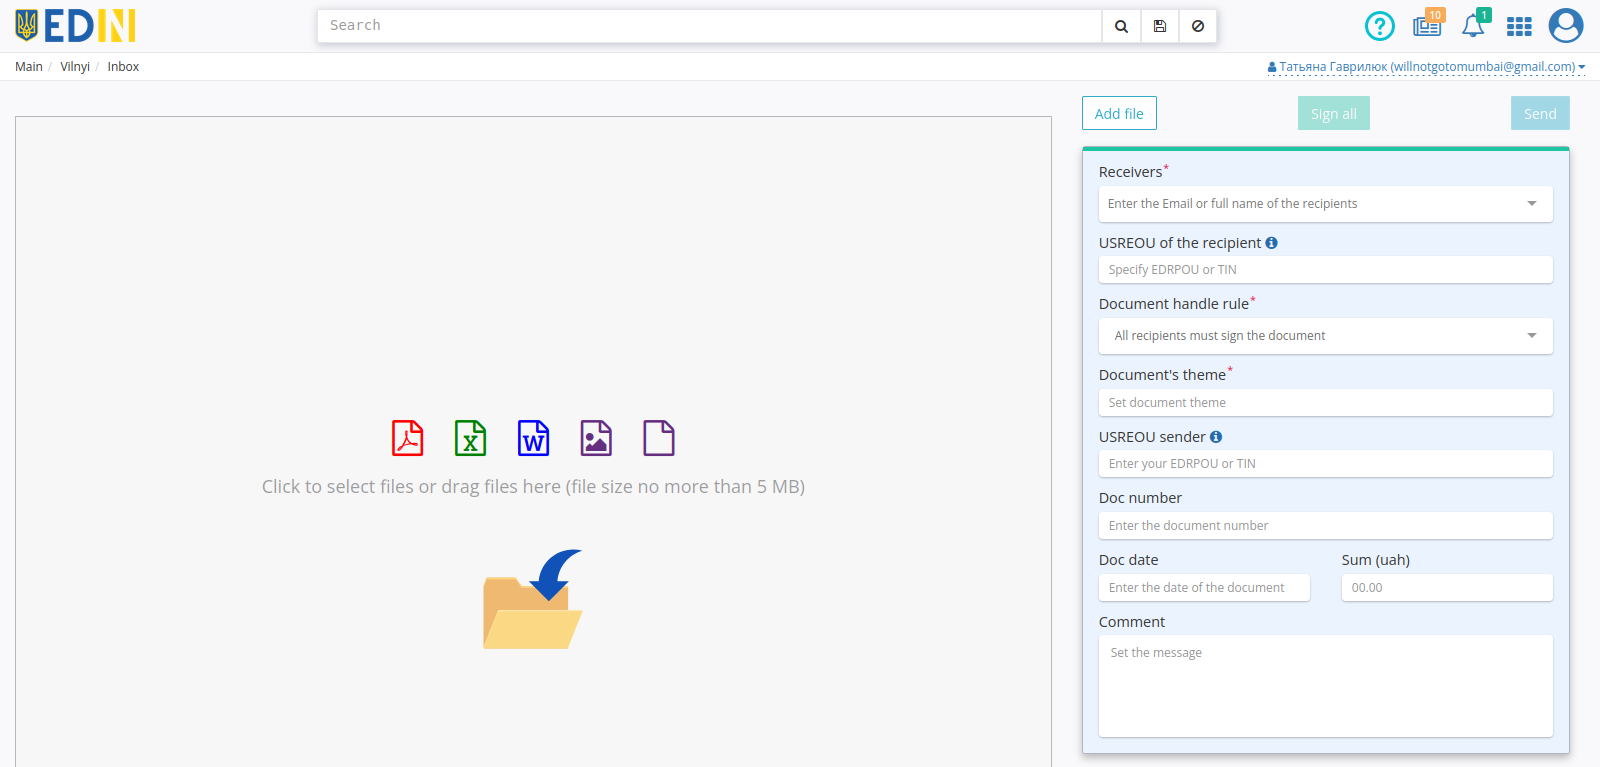
To create a document on the platform you need to click on “+Create” button:

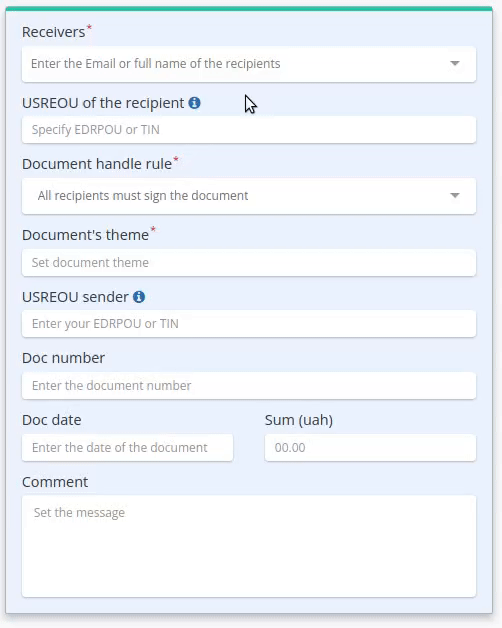
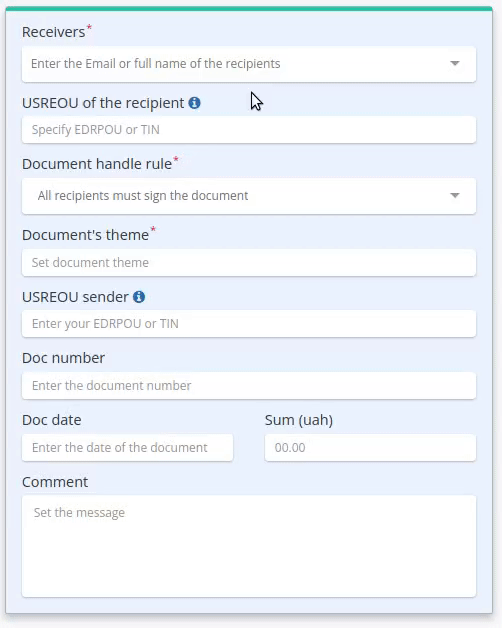
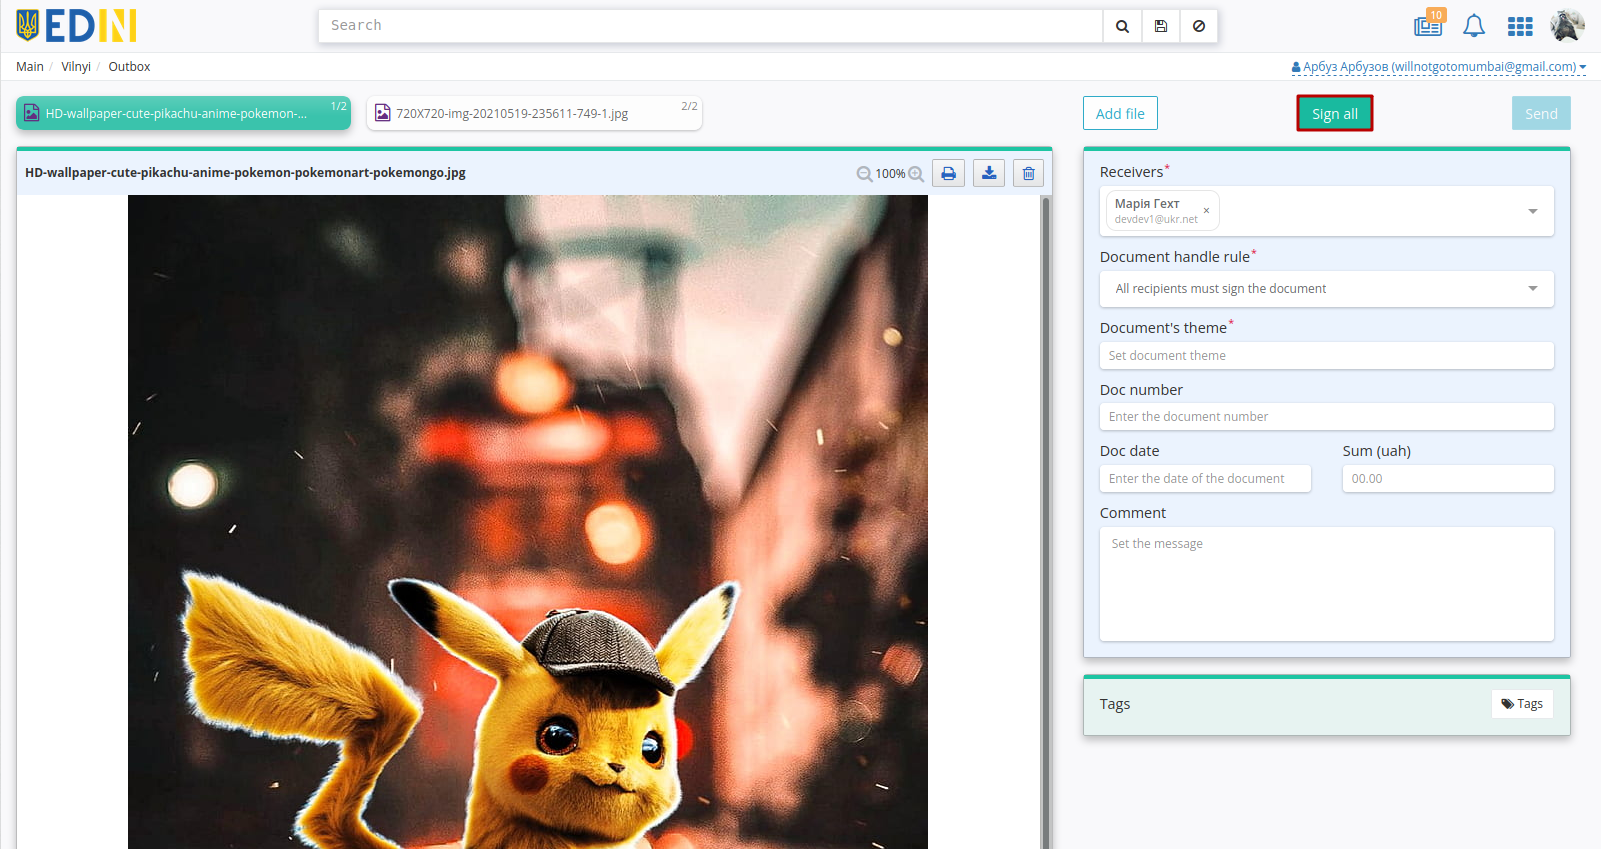
After that, on the form of creating a document you must specify “Receivers”, “Document handle rule”, “Document’s theme” (from 1 to 100 characters) and add some attachments.
Note
Fields “Doc number”, “Doc date”, “Sum (uah)”, “Comment” are not required.
Warning
The fields “USREOU of the recipient” and “USREOU sender” are optional to be filled out. The fields can be filled in to form control of the correctness of signing documents according to USREOU. If the fields are filled in, the “Vilnyi” service will check You and Your counterparties at the stage of signing documents (the specified value of the USREOU and USREOU of the signatory QES key must match). If the value is incorrect (8,9,10,12 digits, a combination of 2 letters and 6 digits are allowed), You will not be able to sign/send the document, and if the value does not match, an error will occur during signing:

4.1 Document handle rules
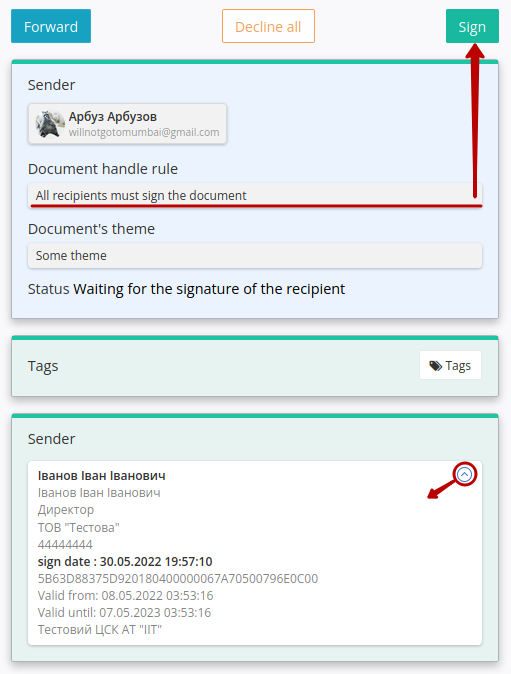
The initiator of the document flow (Sender) configures the requirements for the completion of the document flow using the available “Document handle rules”:
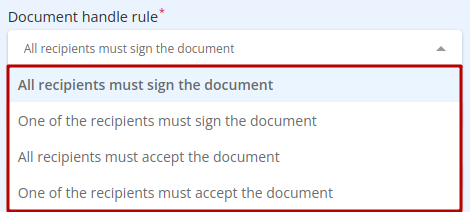
All recipients must sign the document - the document receives the final status “Signed” / “Processed” after all specified Counterparties-recipients sign the document;
One of the recipients must sign the document - the document receives the final status “Signed” / “Processed” immediately after one of the Counterparties-recipients (the first one) signs the document;
All recipients must accept the document - the document receives the final status “Accepted” / “Processed” after all specified Counterparties-recipients accept the document;
One of the recipients must accept the document - the document receives the final status “Accepted” / “Processed” immediately after one of the Counterparties-recipients (the first one) accept the document.
4.2 Add recipients
Recipients of the document are shown only the sending counterparty, but Recipients are shown the status of the document.
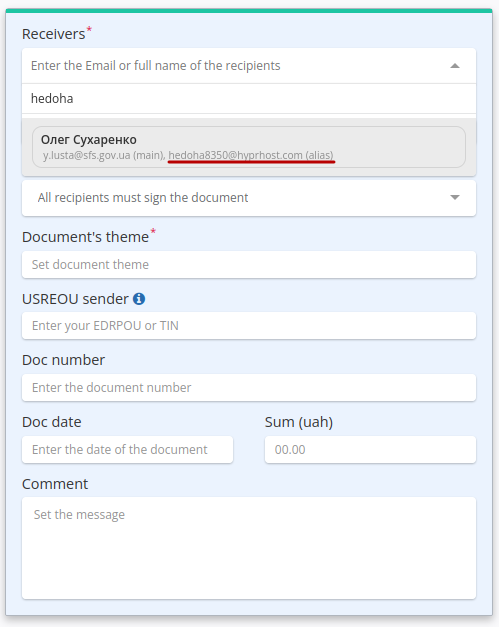
To choose the right Recipients (several possible) you need to start entering the name, mail or USREOU of the counterparty (min 3 characters) in the field and select from the list of registered users on the platform:
When entering an alias in the Mail Recipients field (read more about alias settings) the name of the counterparty, his main email and the alias are displayed:
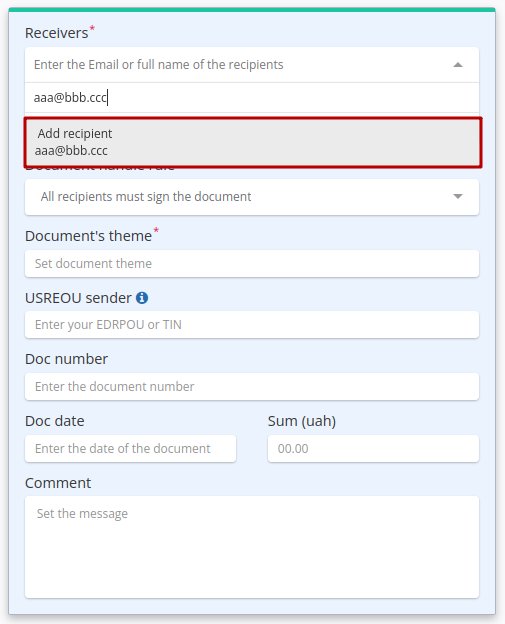
Implemented the ability to specify the Email of an unregistered user on the platform in the “Receivers” field. When adding such a user, select “Add Recipient” in the results of the drop-down list:
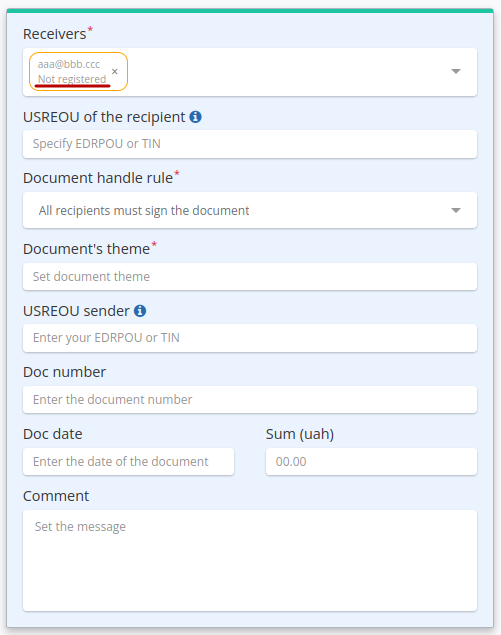
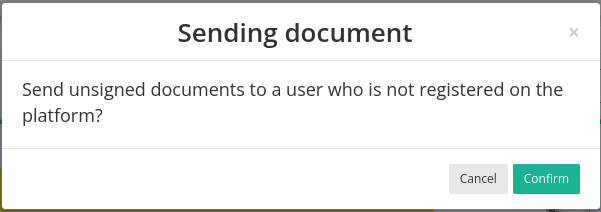
When sending a document, the sender receives a warning that requires confirmation:
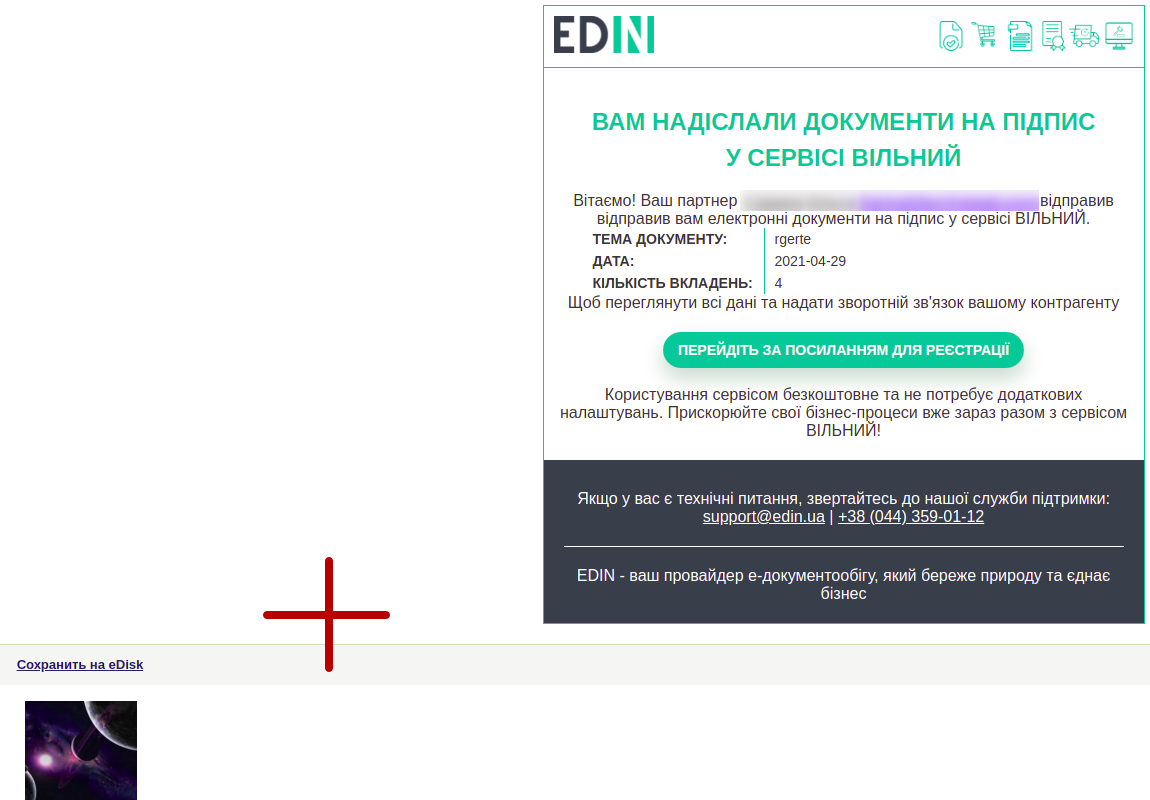
If the recipient is not registered, an invitation is sent to the specified Email with a link to registration and attached one (first) file without a signature:
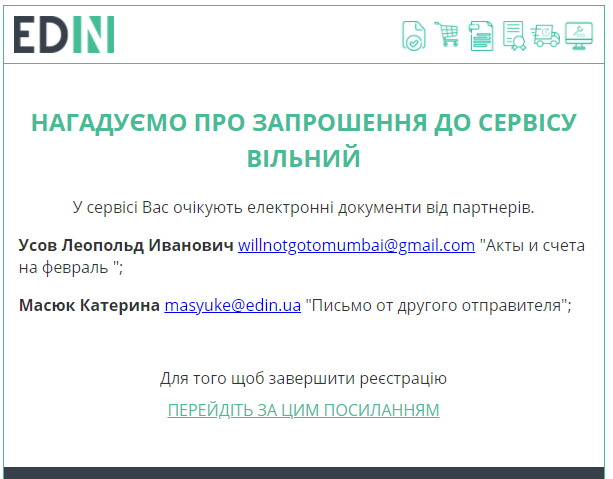
Also not registered recipient get on Email reminders about invitations with list of senders and subject topics at next, 3rd, 6th, 12th and 27th days:
It is also possible to add registered / unregistered Recipients in bulk by copying (Ctrl+C) a list (values separated by commas, spaces or semicolons) of the required Email addresses and paste (Ctrl + V) them from the clipboard:
4.3 Adding files
Files can be added from local media via the “Add File” or “Drag-and-drop” way:
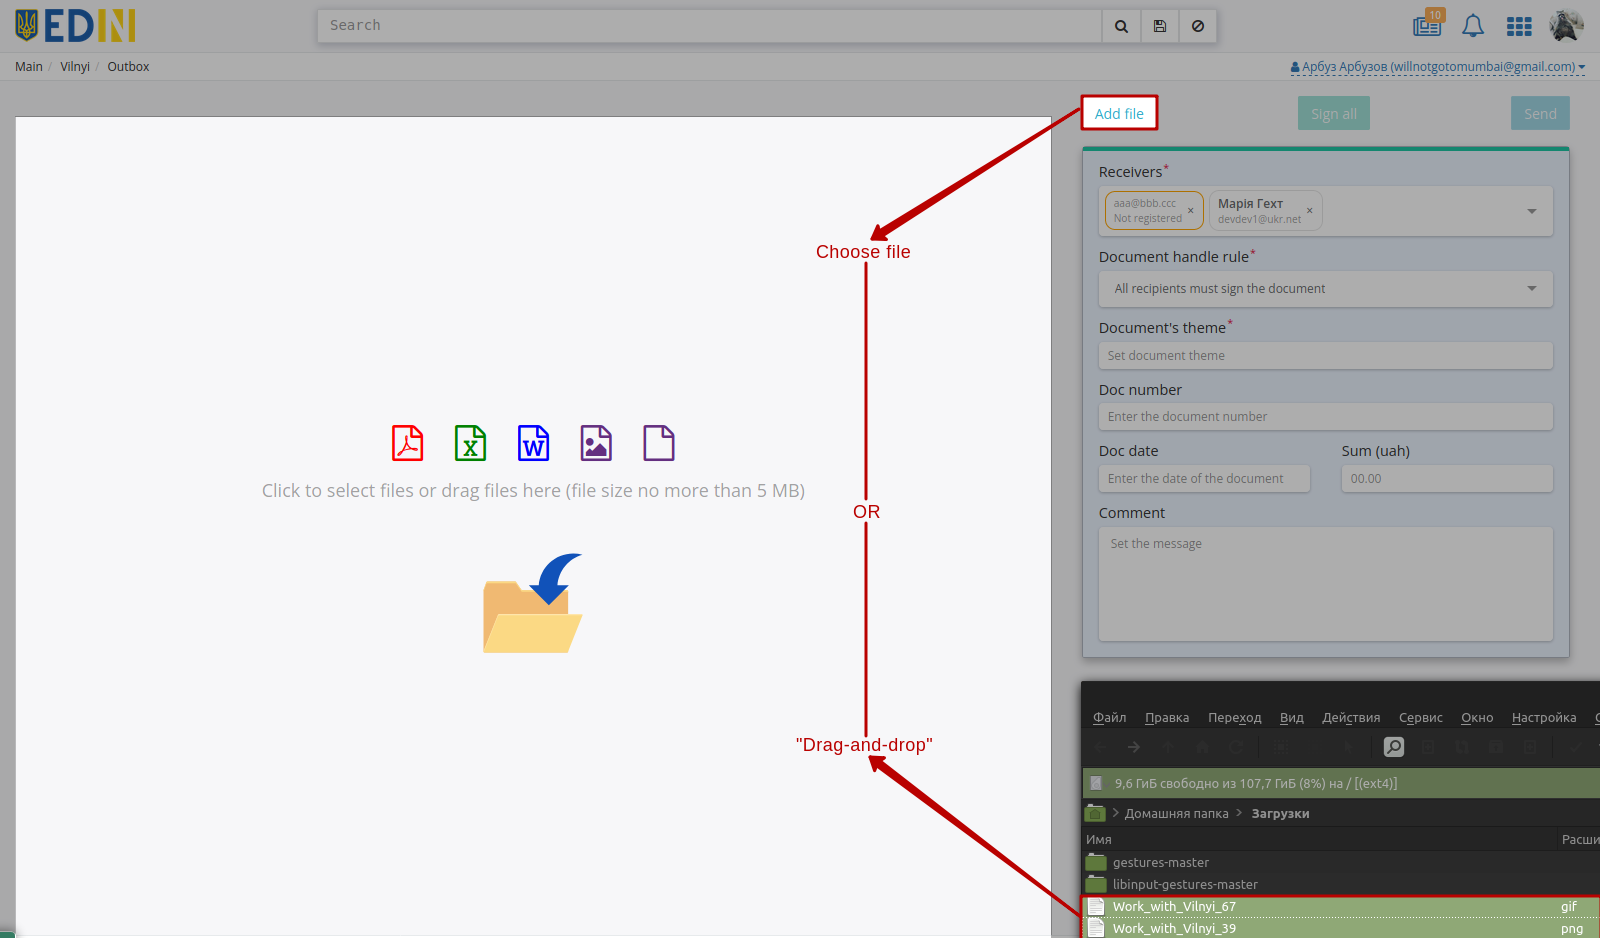
Note
One document can contain no more than 10 files in the following formats: PDF/JPG/JPEG/PNG/BMP/DOC/DOCX/XLS/XLSX/PPT/PPTX/CSV/TXT/XML/P7S (previews are available except for CSV and P7S) with a file size no more than 5 MB.
When adding more than 3 files, else files are hidden behind the scroll arrows (
 ). A preview of their contents is available for the attached files:
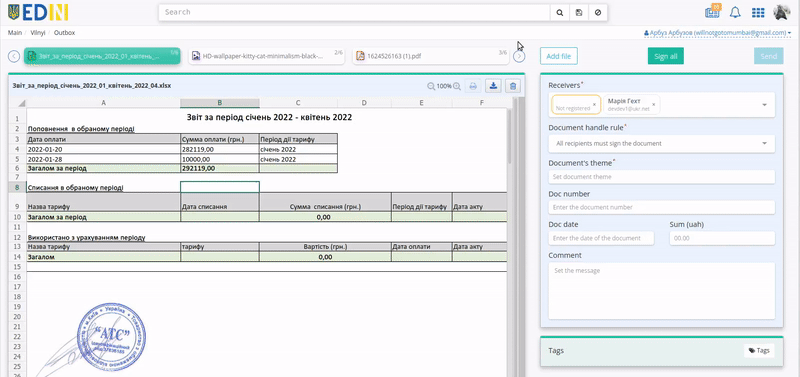
When viewing an attached file, you can scale the file preview (1), use pagination (2), print a file (if it signed: layout with the signature visualization in the form of a watermark and a signature letter) (3)  (the button is active only for files in PDF/JPG/JPEG/PNG/BMP formats), download (4)
  or delete (5)
  file.
file.

Note
Downloading (4) format rules:
if the document is NOT signed, only the original file is downloaded;
if the document is signed, a zip archive (archive name = file name + Date + Creation time) is loaded; zip contains the original file and the signed file in p7s format;
if the document is signed and the file has PDF/JPG/JPEG/PNG/BMP extension, then zip archive (archive name = file name + Date + Creation time) is loaded; zip contains the original file, the signed file in p7s format and printed layout with visualization of the signature in the form of a watermark and a signature letter in pdf format (more).
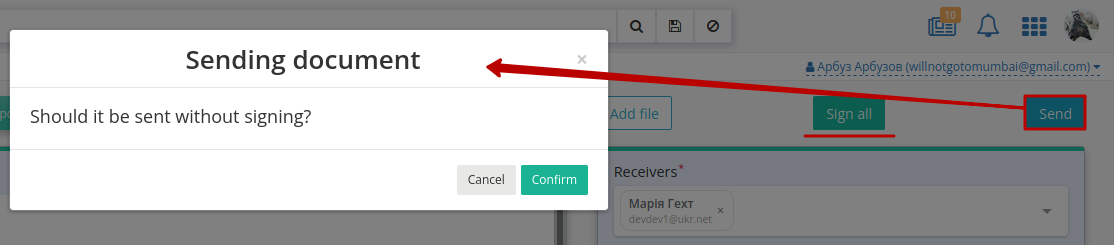
After adding the file (s) and filling in all required fields is possible “Sign all” files en masse and “Send” document (“Send the document without signing” also possible). With sending an unsigned document, a hint appears that requires confirmation of the action:
But “Sign all” files of the document is also possible after sending the document (if it was not rejected):
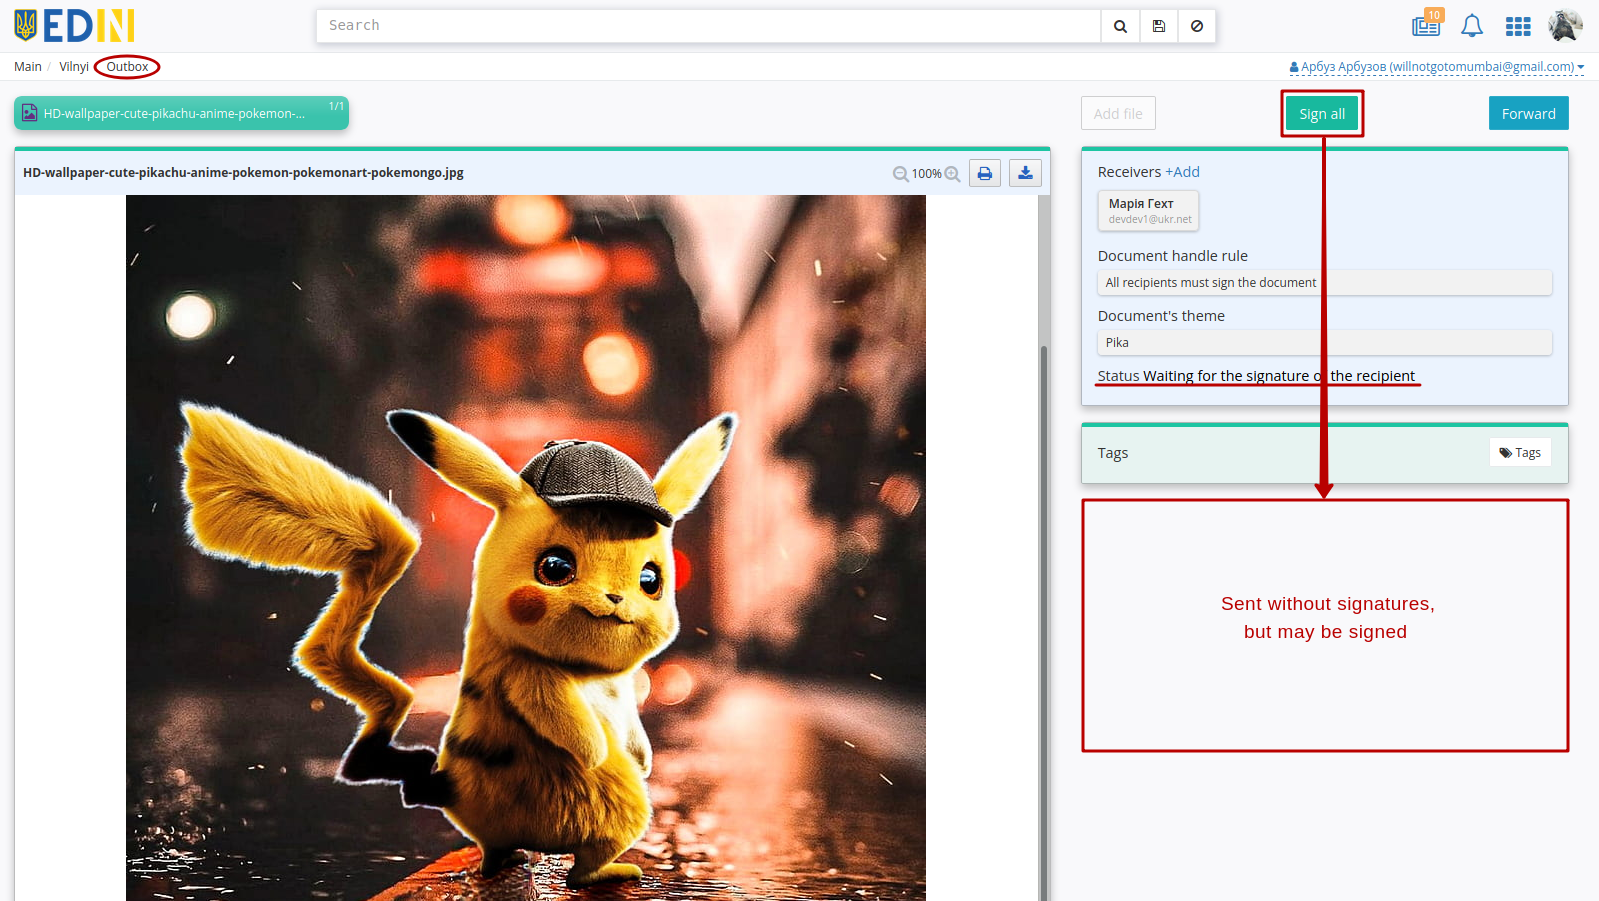
The Sender’s signature is not mandatory, but this functionality allows you to implement document management schemes in which the Recipient is the first to sign.
4.4 Signing and sending the document
Warning
The fields “USREOU of the recipient” and “USREOU sender” are optional to be filled out. The fields can be filled in to form control of the correctness of signing documents according to USREOU. If the fields are filled in, the “Vilnyi” service will check You and Your counterparties at the stage of signing documents (the specified value of the USREOU and USREOU of the signatory QES key must match). If the value is incorrect (8,9,10,12 digits, a combination of 2 letters and 6 digits are allowed), You will not be able to sign/send the document, and if the value does not match, an error will occur during signing:
You can sign the document while viewing the document - “Sign all” button:
Hint
Also in the Drafts folder is available mass signing functionality.
Attention
With mass signing, only one signature is applied at a time. When adding/deleting files to/from the document, previously applied signatures will be deleted!
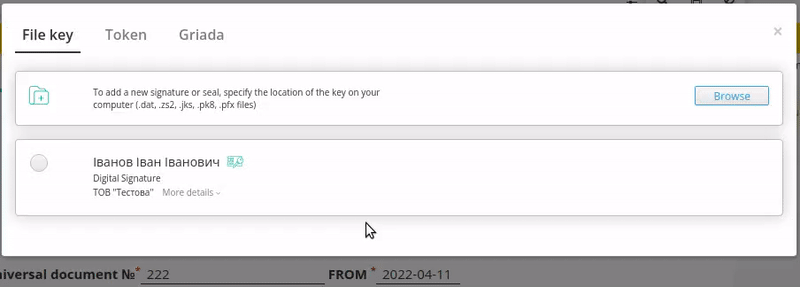
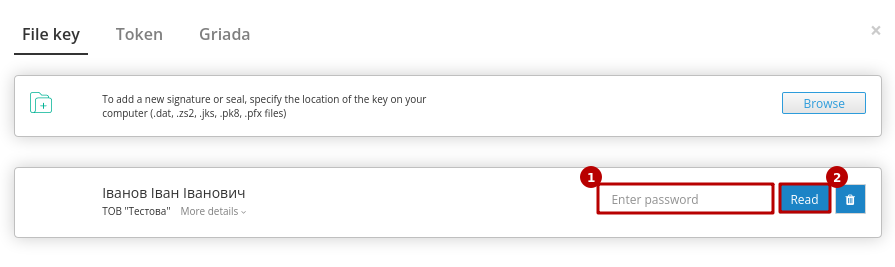
After initializing the signing library, the system will be able to add a file key. With first signing in the modal window you need to select a file (1), enter the password (2) and press “Browse” (3) key to sign:

Hint
Types of electronic signature files:
АЦСК “Україна” secret key signature files have the extension .ZS2 and the following values in file names:
Director «DS»
Accountant «BS»
Employee «SS»
Signet «S»
Encryption «C»
Universal key for printing and encryption «U»
АЦСК “ПриватБанк” secret key signature files have the extension .jks. Others АЦСК secret key signature files mostly have the extension Key-6.dat.

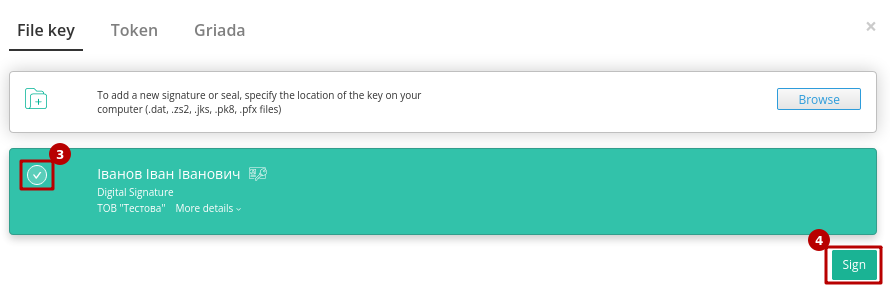
The person whicj perform signing will be automatically displayed when the key is successfully added. The user can add several keys - to select the desired signing for the operation, you need to check the box with the left mouse button and click “Sign”:
The signature form opens with the last selected and ready to sign EDS (subject to the validity of the key and the possibility of signing) for all subsequent signatures during this session (before leaving the “EDI NETWORK” platform):
Additionally, in the signing window you can click “More details” to view information about the signatory. You can use the trash can icon ( ) to delete invalid keys.
After authorization, only the password for the selected key must be entered for further signing with the previously added key(s):
Full instructions for setting up token signing are available at the following link.
Important
Signing is possible only if your token is physically connected to the device (USB port) from which signing will be performed.
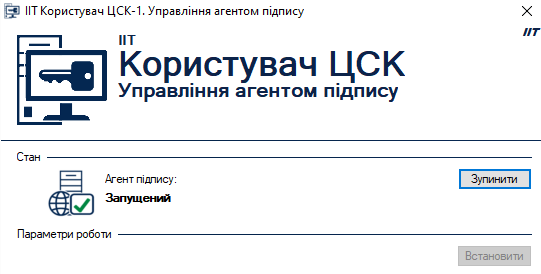
The Користувач ЦСК signature web-library (installed on the computer) must be launched:
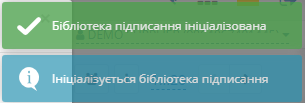
During the initial initialization of the signature library, confirm the permission of the website to the Користувач ЦСК signature library, click — “OK” :

At the first signing in the modal window, you need to “Select Token” (1), choose a key (2), enter a password (3), “Browse” (4) and “Add” (5) active key:
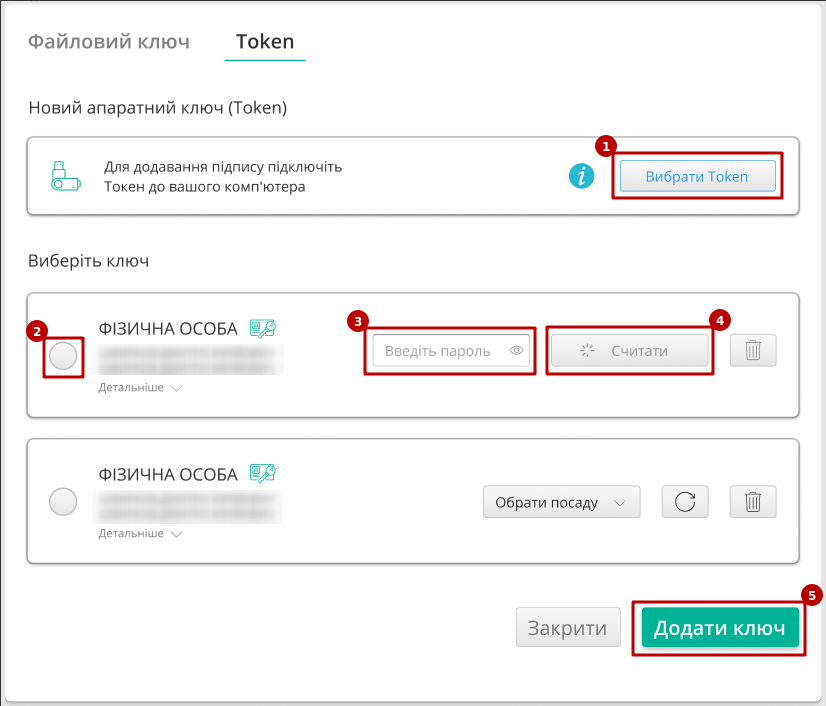
The user may have several keys added - to select the one required for the signing operation, you need to mark it with the left mouse button and press “Sign”:

Warning
If signing with this key has already been done or inconsistency of EDRPOU/TIN data is found (verification), then signing is blocked, and the user is given the appropriate message:

Additionally, in the signing window you can click “More details” to view information about the signatory. You can use the trash can icon () to delete invalid keys.
When working with the previously added key/s, you only need to enter the password for the selected key (steps 2-4 at the figures).
Signing with “Дія” mobile application (Дія.Підпис tab):
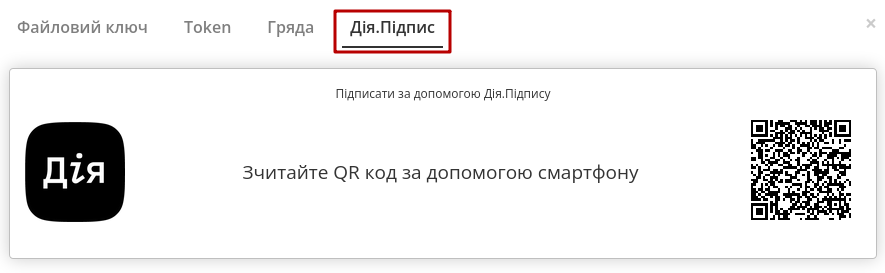
When working through a PC the qr-code is displayed and when work via a smartphone - a link is displayed (qr-codes and links leads to “Дія” mobile application).
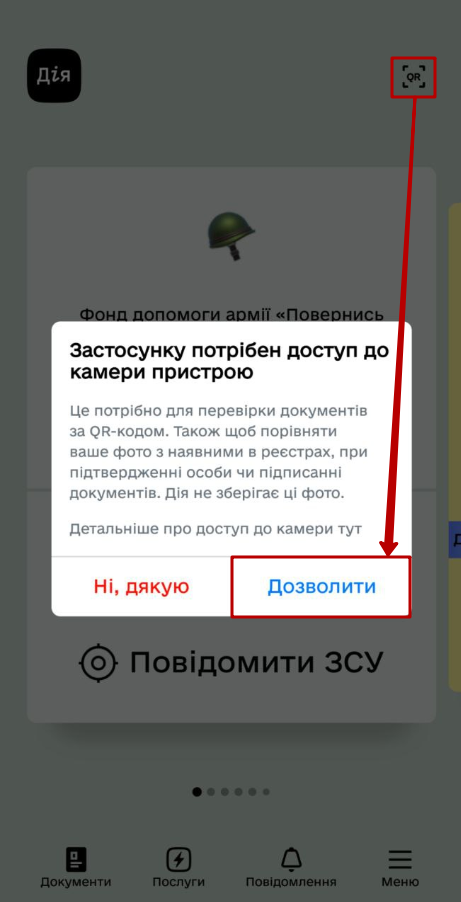
In order to read the qr-code in the “Дія” mobile application, you need to allow the application to use the camera:
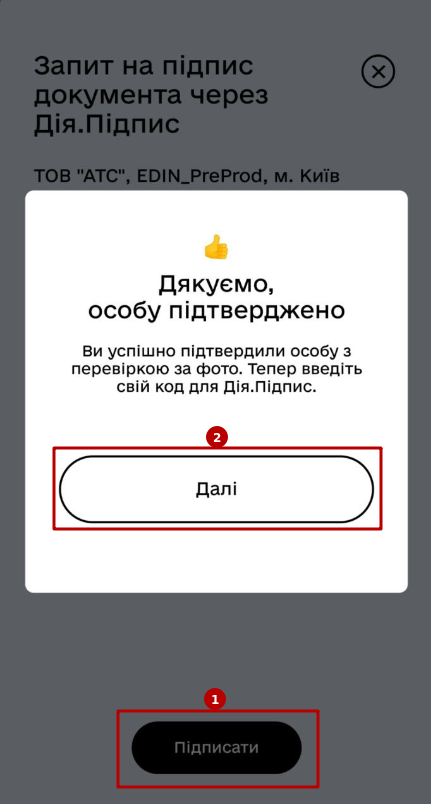
After forming a request to “Дія” application, you can “Sign” the document (requires identity verification with a camera and entering a code for Дія.Підпис):
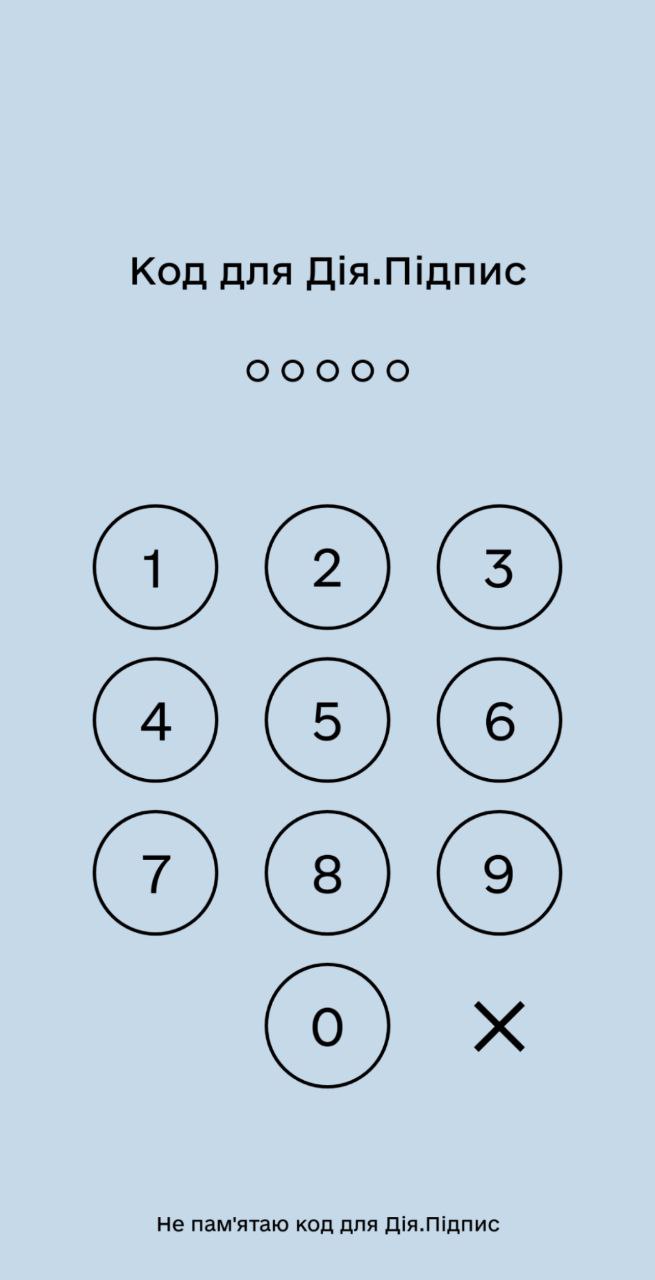
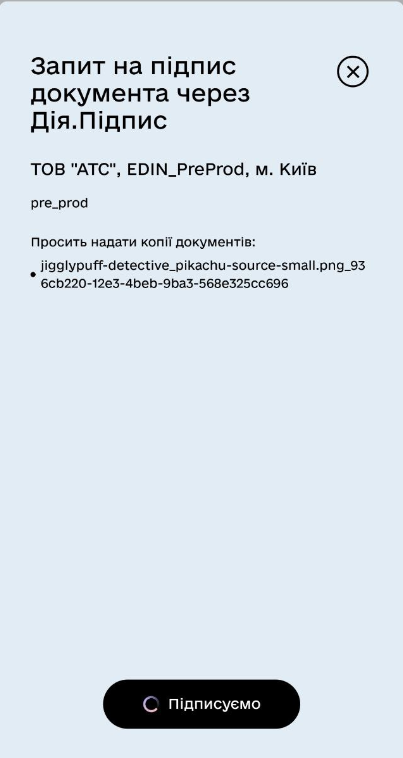
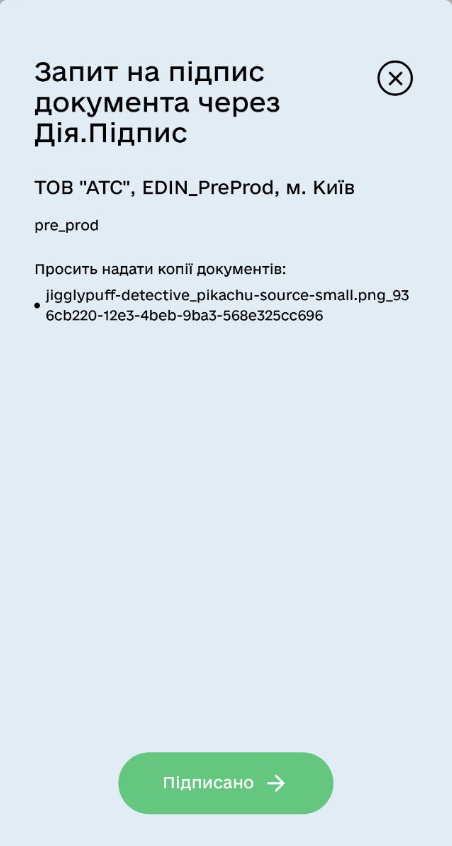
The document is signed.
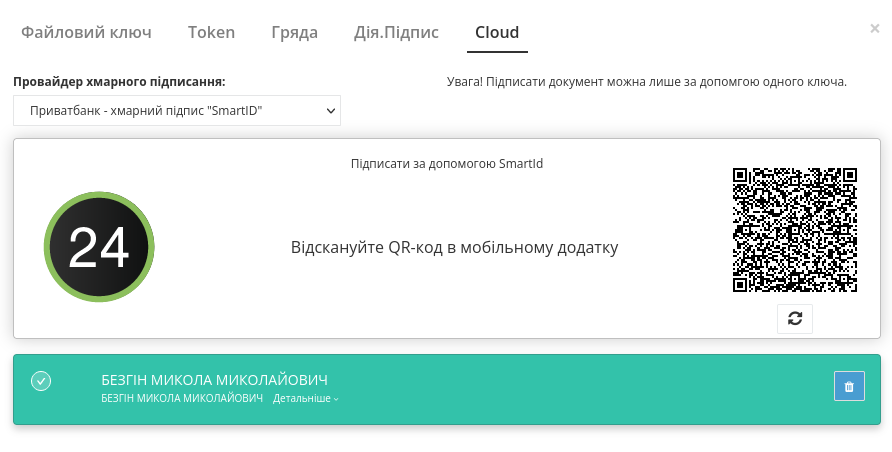
With cloud signing (Cloud tab) are available for use:
ТОВ «ЦСК «Україна» - хмарний підпис “CloudKey”
Приватбанк - хмарний підпис “SmartID”

Note
Cloud signing requires a mobile with a pre-installed app from the relevant signing provider!
Attention
You can sign a document only with one key (that means that signing a single document with a Signature and Seal will not work).
After you have chosen a cloud signing provider, a qr-code is generated to go to the mobile application of the signing provider.

In order to sign a document on the EDIN 2.0 platform, you need to read the qr-code in the “Privat24” mobile application using the “Scanner” (requires the use of a camera) and pass the “SmartID” authorization:
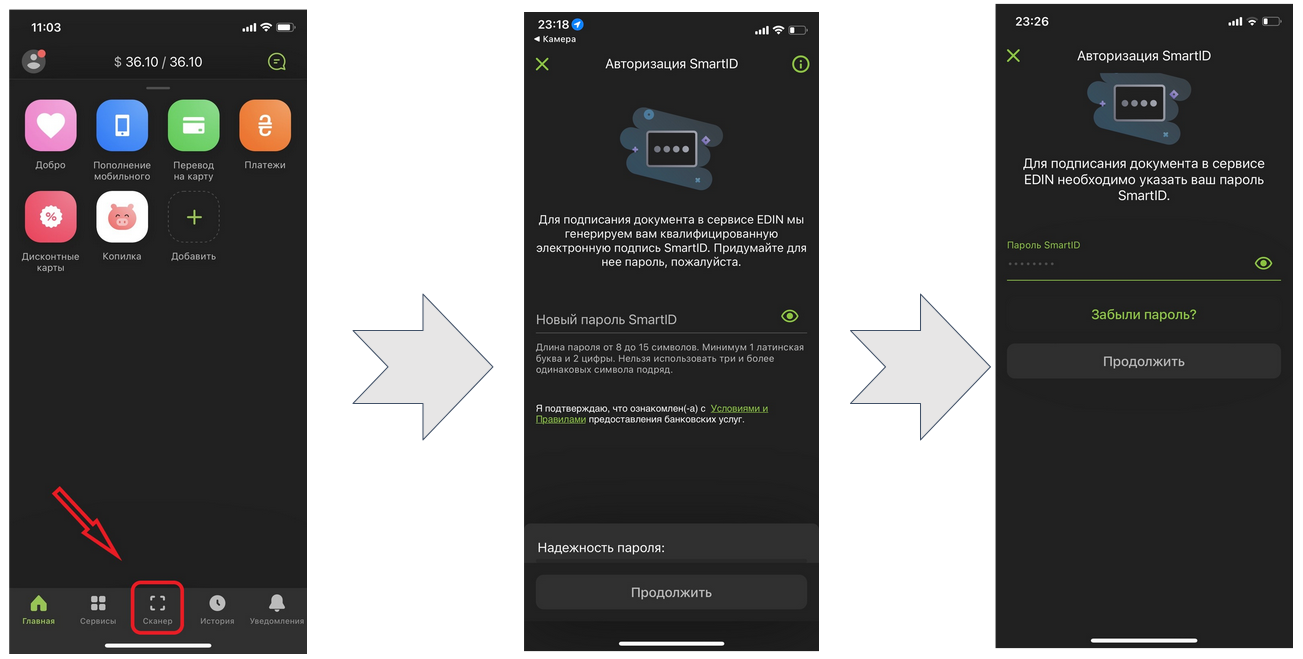
EDIN 2.0 platform will automatically pull up your QES. You must select the added QES and “Sign”:
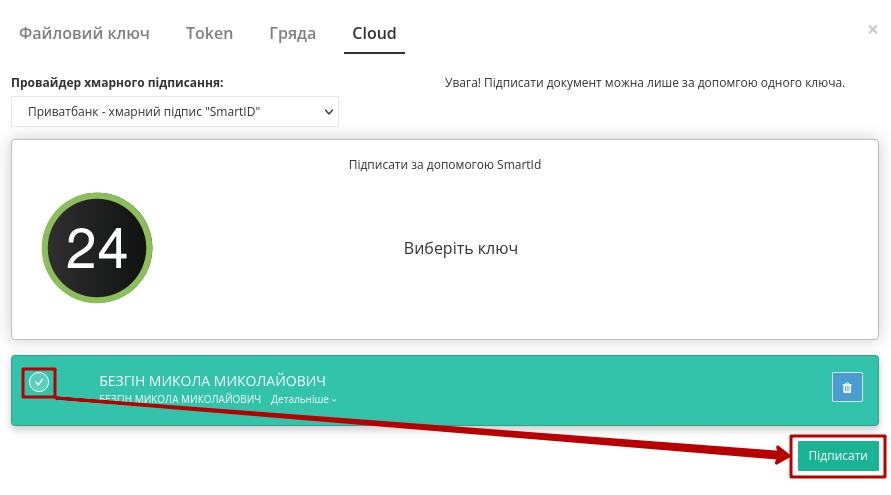
Next, you need to scan the qr-code again in the “Privat24” mobile application (described above).
The document is signed.
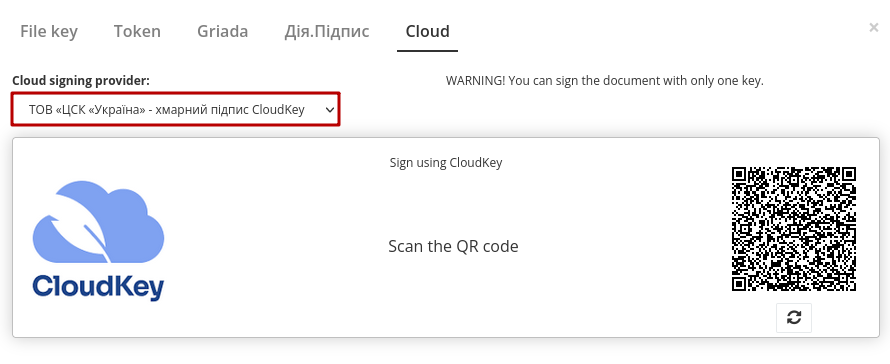
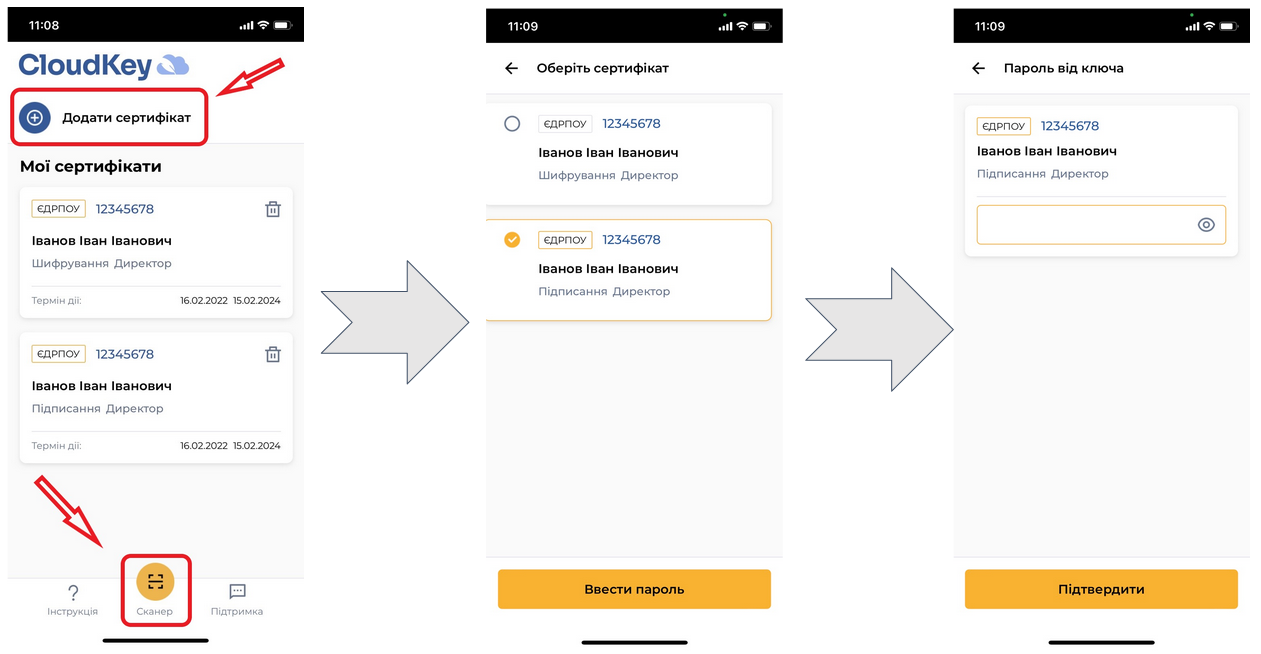
In the “CloudKey” application, you need to “Add a certificate” (initial settings). In order to sign a document on the EDIN 2.0 platform, you need to read the qr-code in the “CloudKey” mobile application using the “Scanner” (requires the use of a camera), select QES for signing, “Enter password” and “Confirm” signing action:
EDIN 2.0 platform will automatically pull up your QES. You must select the added QES and “Sign”:
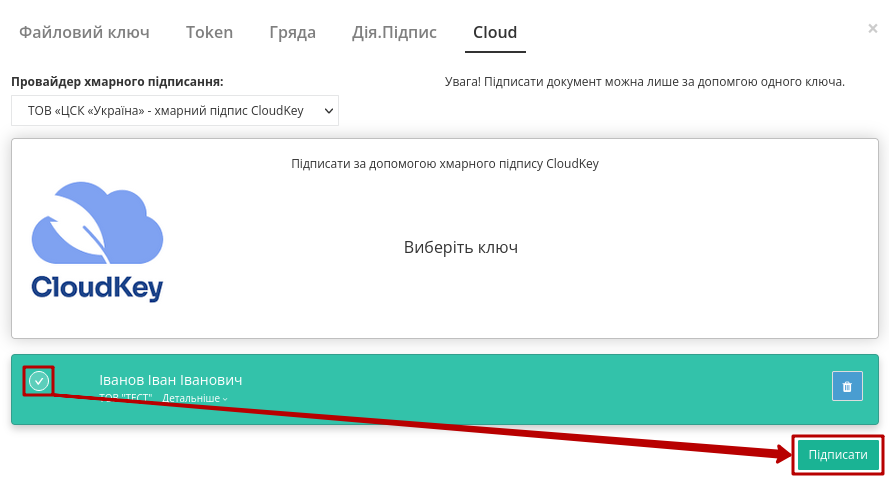
Next, you need to scan the qr-code again in the “CloudKey” mobile application (described above).
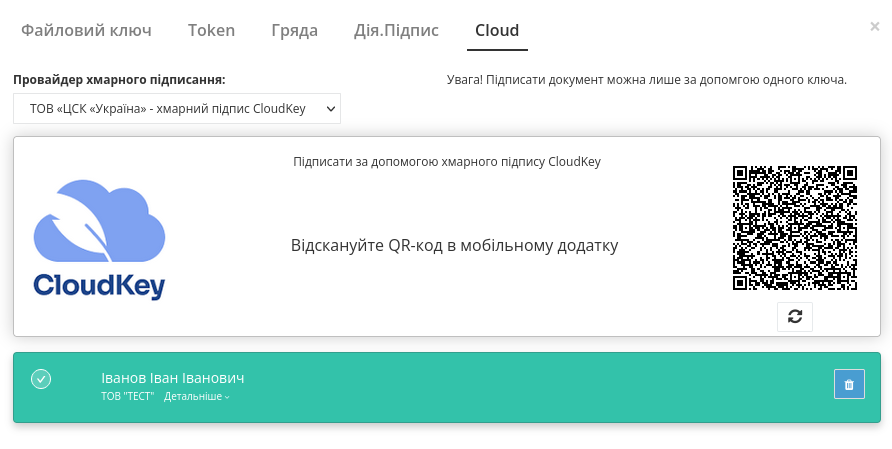
The document is signed.
Note
After signing files in PDF, JPG (JPEG), PNG, BMP formats, a watermark is added in the upper left corner of each page of the file when previewing them, and a signing letter page will be added:
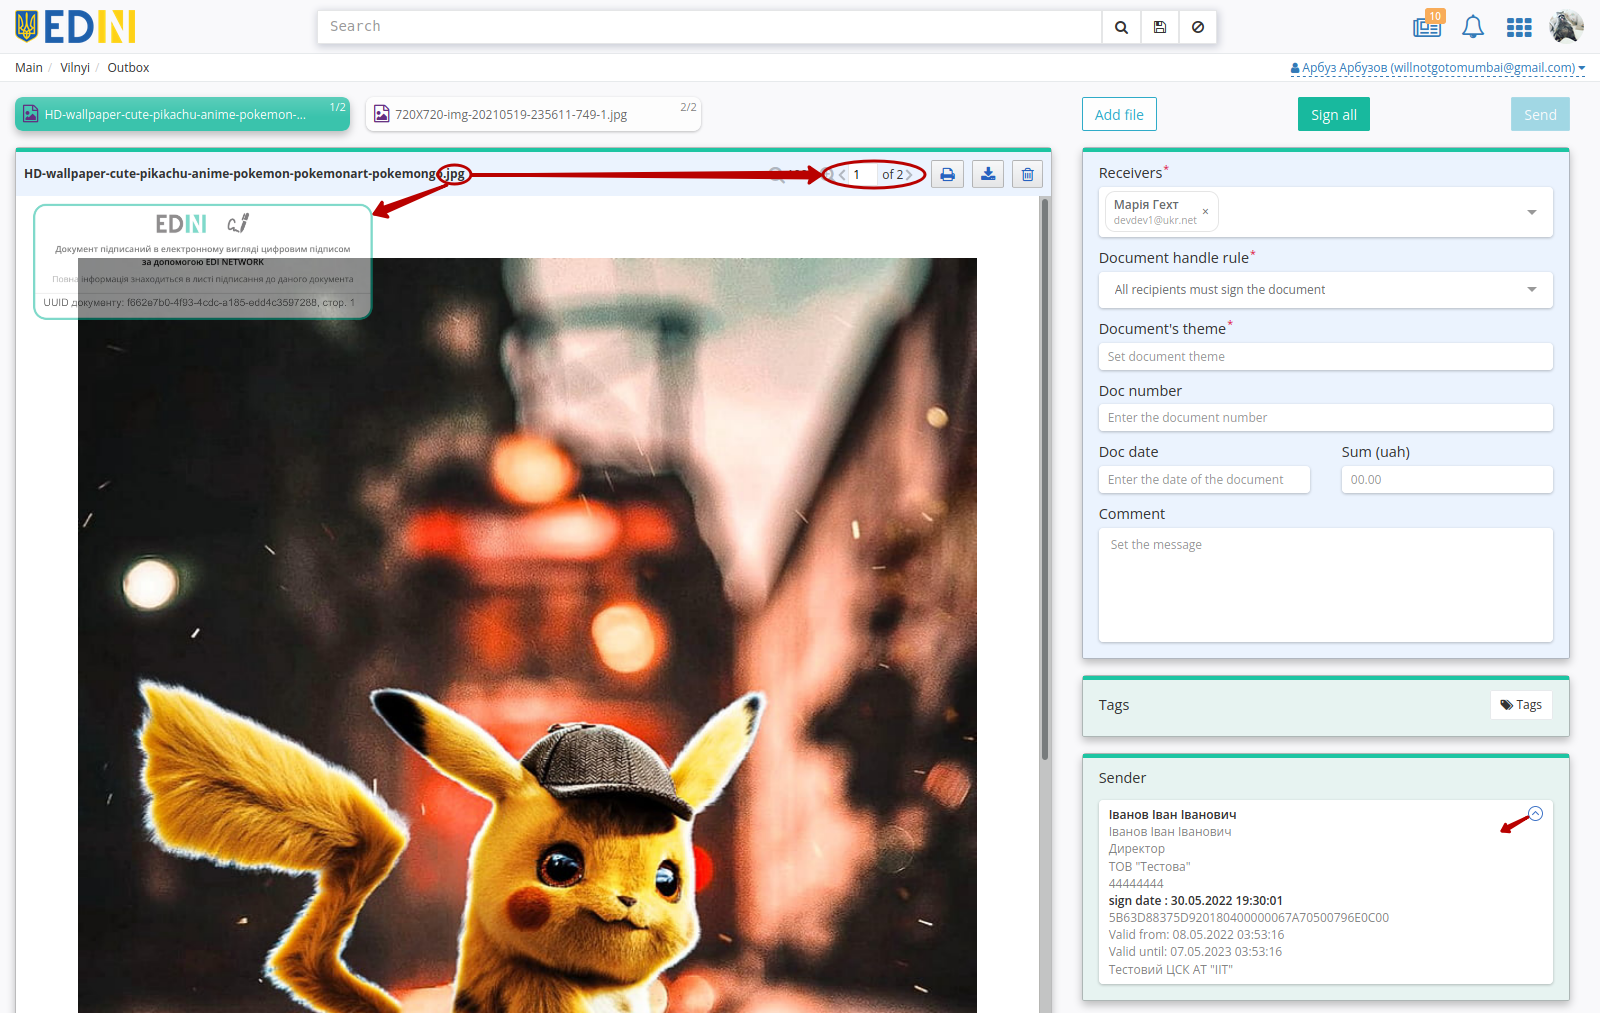
The watermark contains information that the file was signed in the EDI Network, the GUID of the document and the current page of the file.
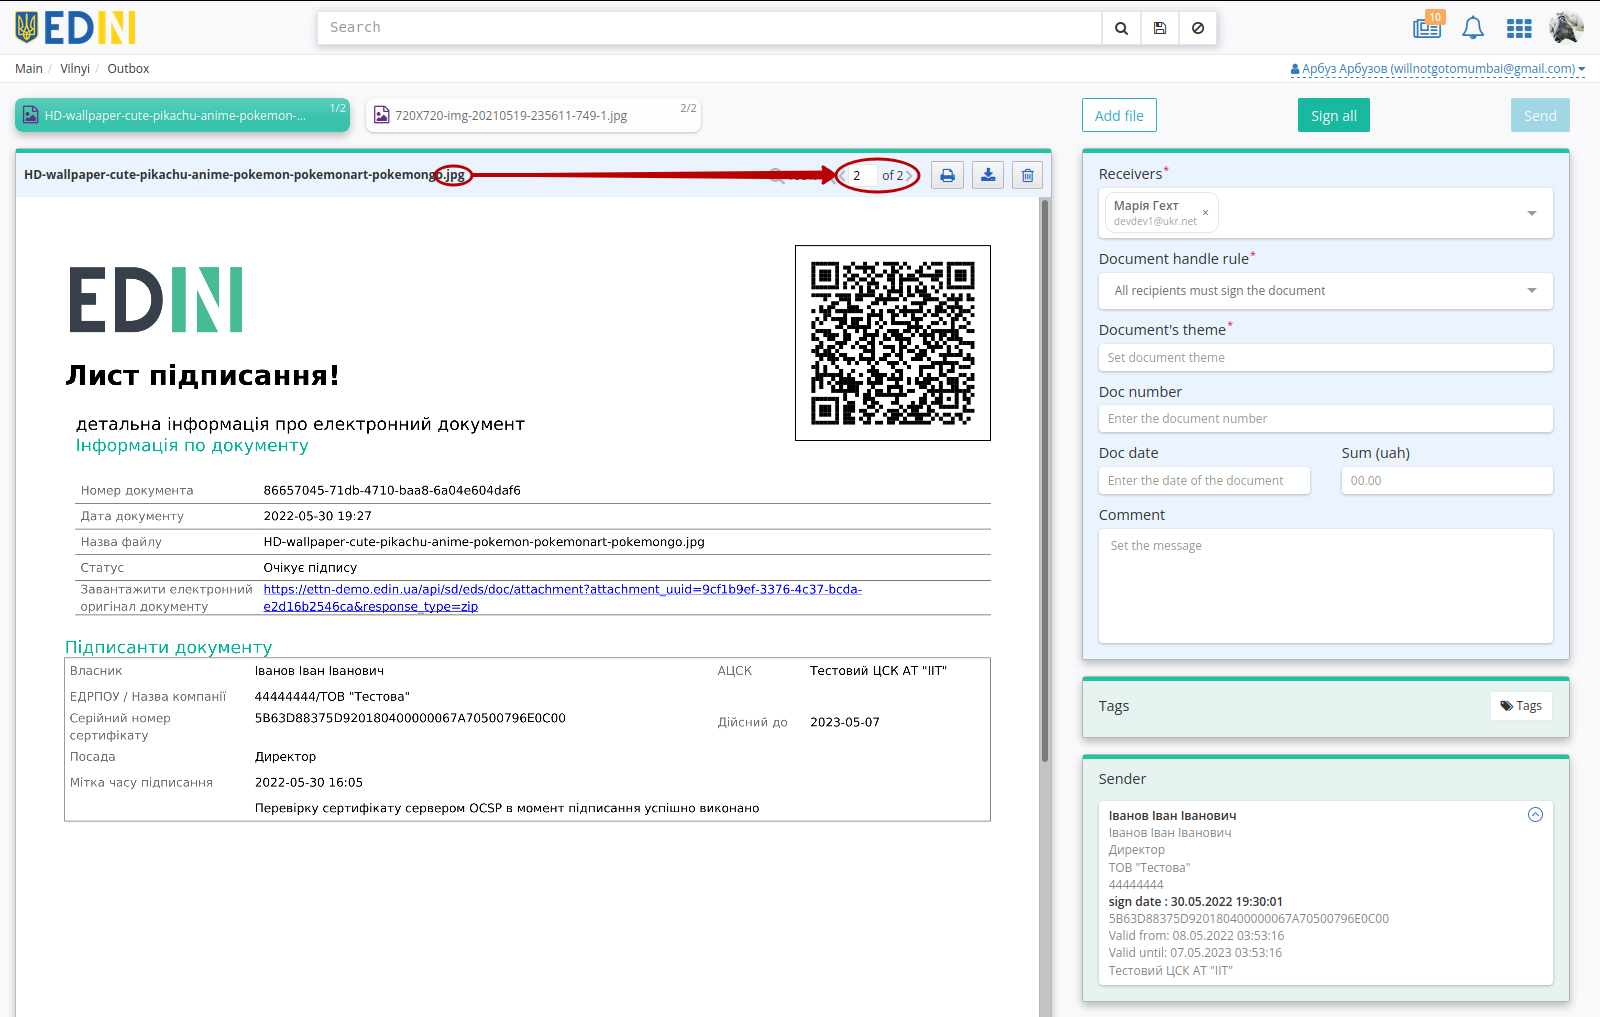
The signing letter contains a link and QR-code for downloading the document archive, information on the document and its signatories.
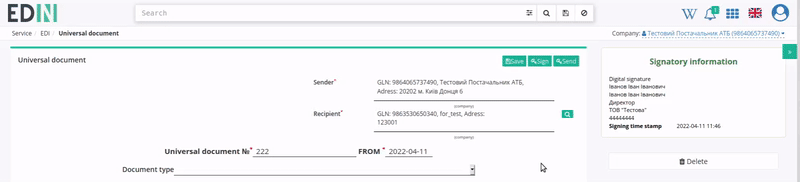
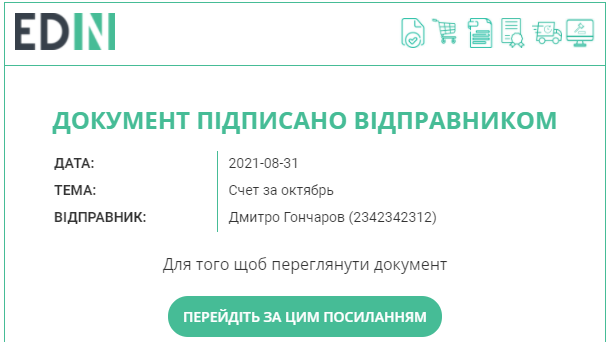
After signing the document, information about the signatories is displayed. To send documents you need to click on the “Send” button.
Hint
Also in the Drafts folder is available mass sending functionality.
If the Sender signs the document (after sending the document), all Recipients will be notified by Email:
After sending the document to the contractors, it is displayed in the journal of sent documents and has Pending signature of the recipient status (file and sign buttons are not active):
Note
Sent documents have labels (with hints when hovering the cursor):
 - “Partially delivered” (recipients include registered and unregistered users)
 - “All docs are delivered” (all recipients are registered on the platform)
 - “Waiting for receiver’s registration” (all recipients are unregistered users)
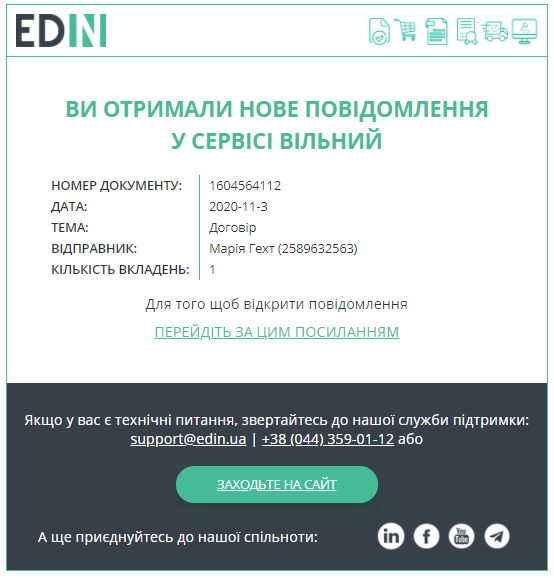
When sending the document, a letter to the specified “Recipient” e-mail is sent also:
5 Add recipients to the sent document
Attention
Only the Sender of the document has the opportunity to add new counterparties. Adding recipients to an already sent document is possible while the document (original) is in / / “Partially signed” / “Partially accepted” status (more details about document statuses).
To add recipients to the sent document the sender must go to the document and press the “+Add” button:
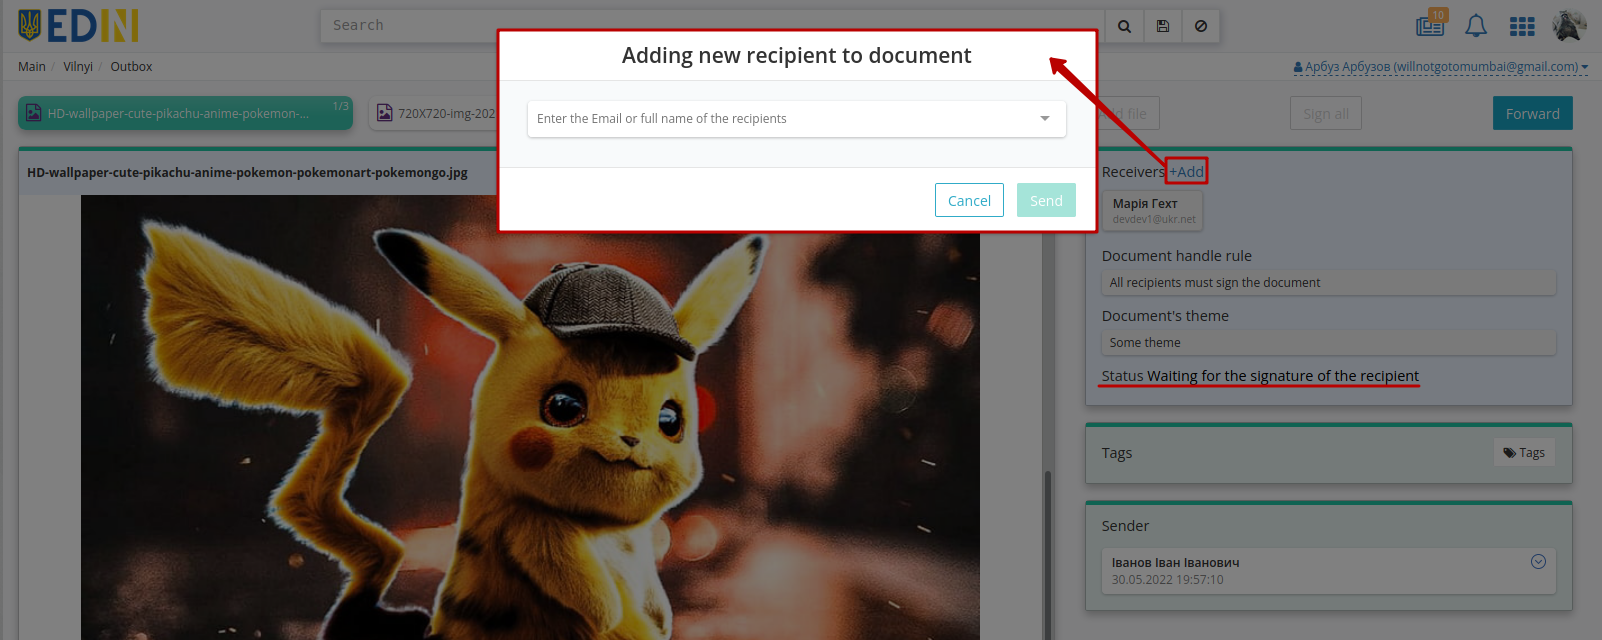
Finding and adding a new recipient is similar to creating a new document (it is possible to add an unregistered participant):
The document is sent to new contractors with “Send” button.
6 Work with incoming documents
All unread “Inbox” documents are displayed in bold:
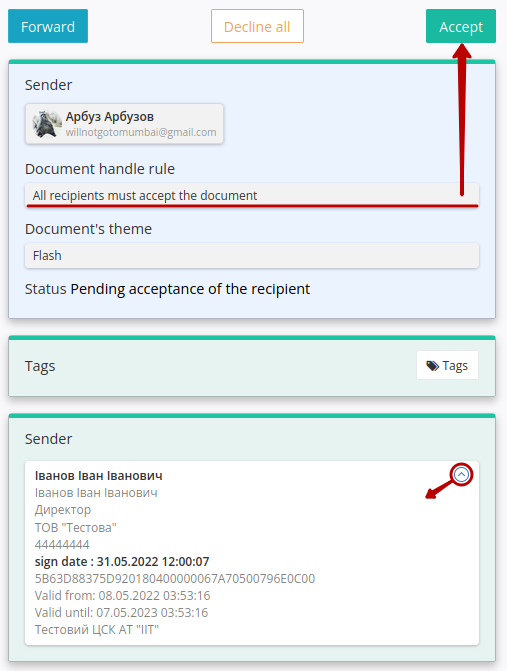
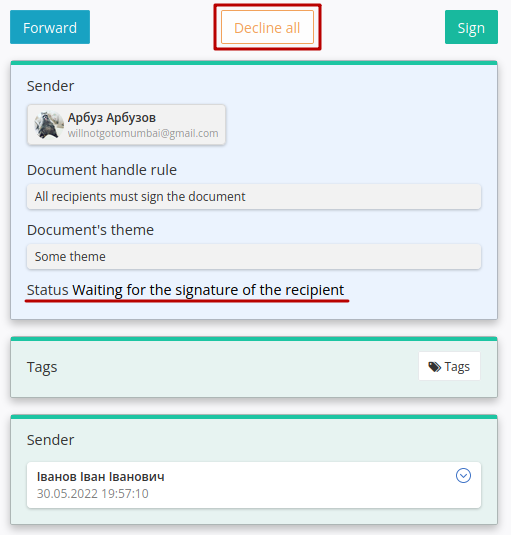
When you go to the document, the data about the signatory is opened (if the Sender signed the document), the files are available for viewing and downloading (). The following steps can be performed with the document: “Decline all” attached files or “Sign” / “Accept” them in response (according on the established rules of processing for this document):
Warning
The fields “USREOU of the recipient” and “USREOU sender” are optional to be filled out. The fields can be filled in to form control of the correctness of signing documents according to USREOU. If the fields are filled in, the “Vilnyi” service will check You and Your counterparties at the stage of signing documents (the specified value of the USREOU and USREOU of the signatory QES key must match). If the value is incorrect (8,9,10,12 digits, a combination of 2 letters and 6 digits are allowed), You will not be able to sign/send the document, and if the value does not match, an error will occur during signing:
Hint
The process of Signing of the document is typical and described in the section above.
After acceptance / signing the document changes its status to “Partially signed by recipients” / “Partially accepted” / “Signed” / “Accepted” / “Processed” depending on the established document handle rules, actions of Counterparties-Recipients (more about document statuses).
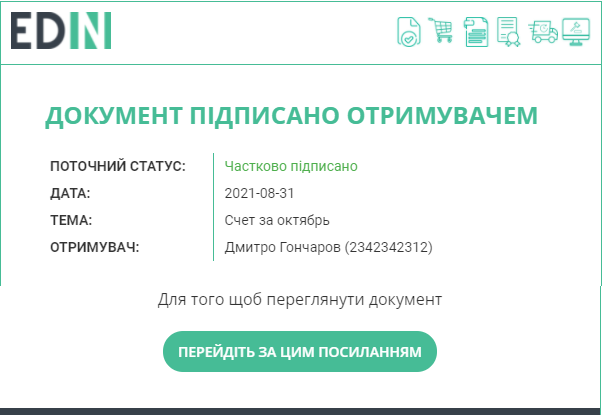
With signing / accepting the document by the Recipient, a notification letter arrives at the sender’s email, for example:
6.1 Document rejection
Attention
Only incoming documents can be rejected! It is possible to reject a document before it changes its status to the final one (more about document statuses)! A rejected document changes its status to “Rejected” for all participants, after which it cannot be signed / accepted by any participant.
To reject all attachments, open the document and press “Decline all” button:
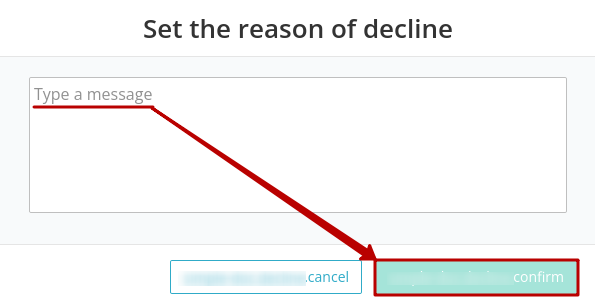
In case of rejection, it is necessary to indicate the reason for rejection and “Send”:
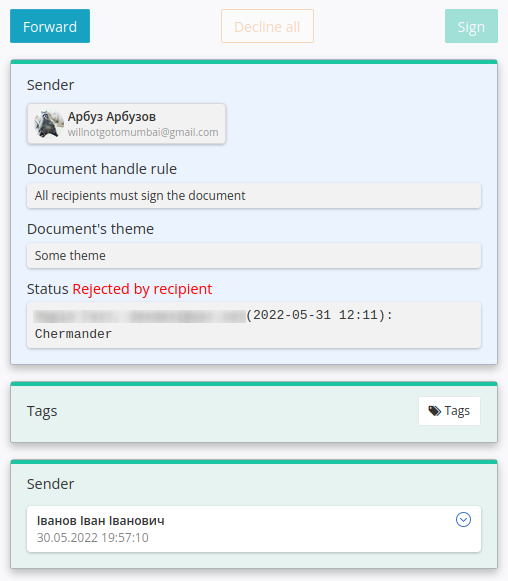
A rejected document changes its status to “Rejected”. The counterparty that performed the rejection is indicated under the status together with the reason for the rejection.
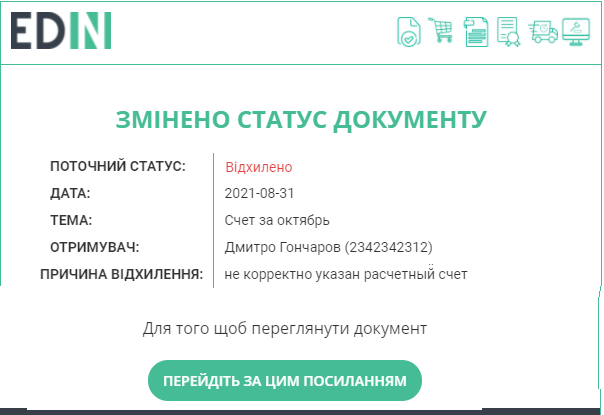
When the document is rejected, a notification letter is sent to the Sender’s email:
Document flow completed.
7 Forward the document
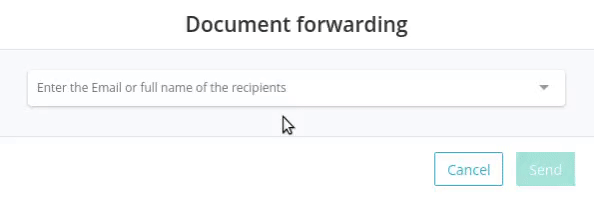
“Inbox” or “Outbox” documents can be “Forwarded”:

Finding and adding a new recipient is similar to creating a new document (it is possible to add an unregistered participant):
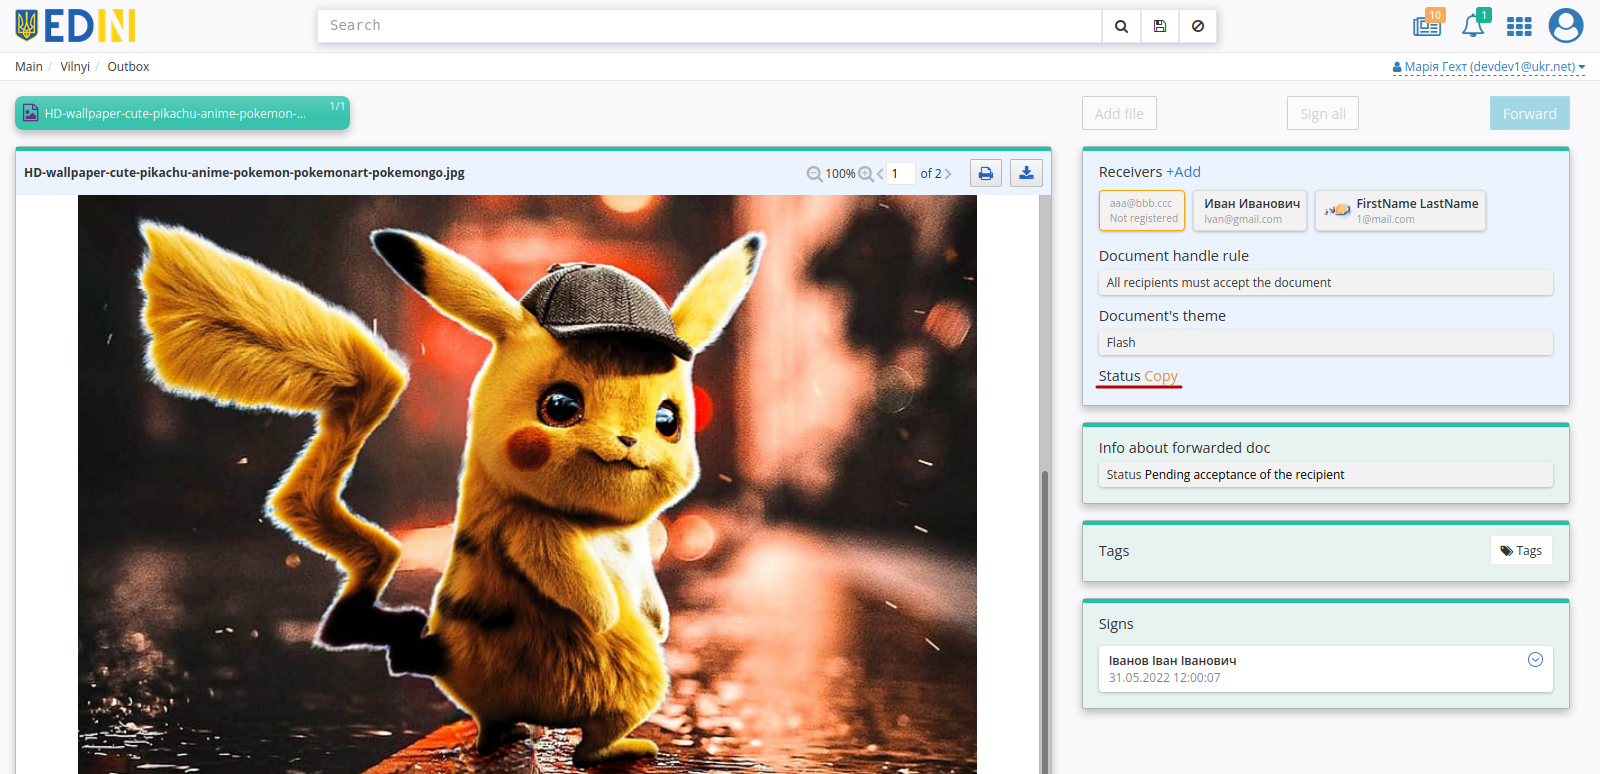
When forwarding, a “snapshot”-copy of the document with the “Unavailable copy” status is formed (contains the status of the original and information about the signatures at the time of making the copy):
No actions with the copy of the document are available (except the ability to download attachments).
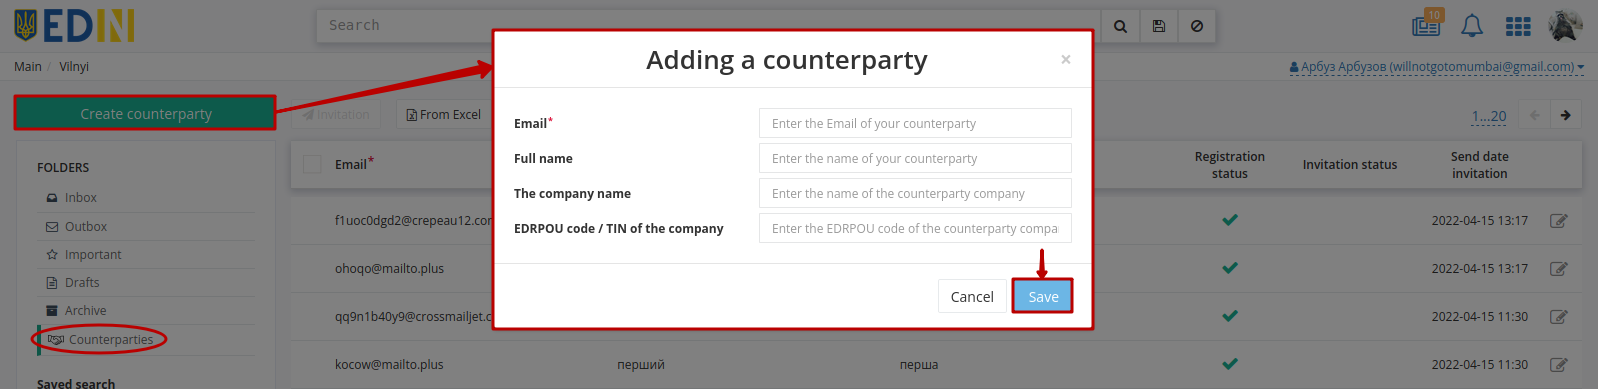
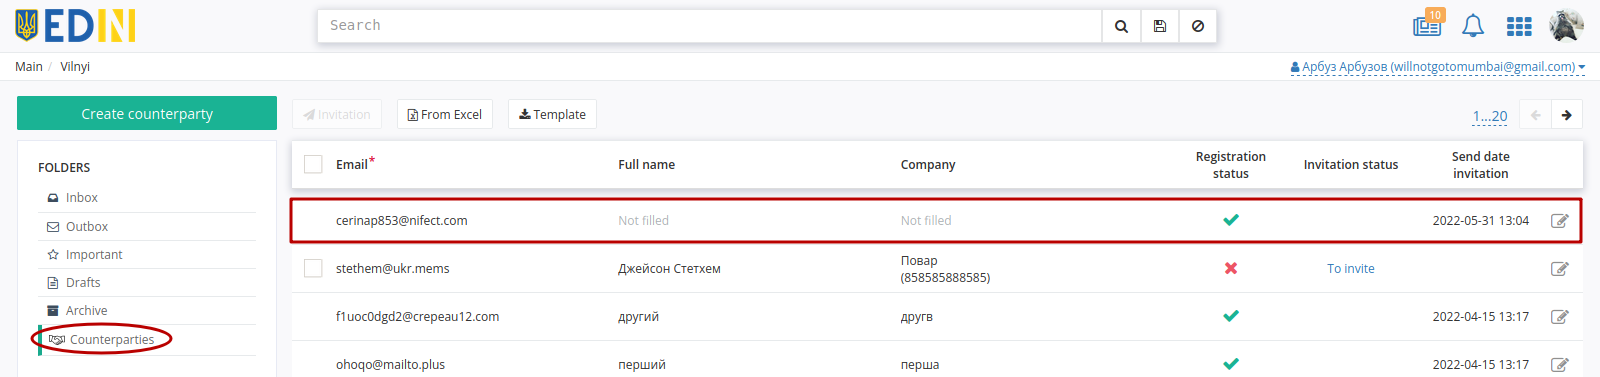
8 Counterparties (sending invitations)
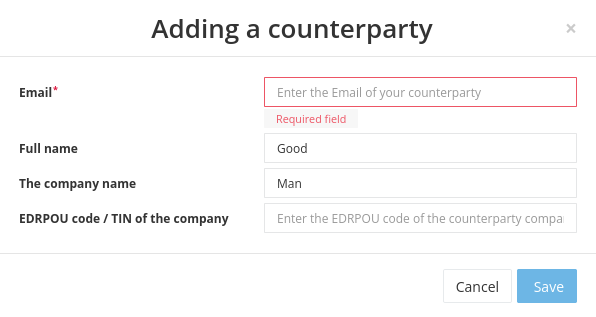
The section allows you to find your unregistered counterparties and send them invitations by e-mail. First you need to add counterparties to the journal - this can be done using the “Create counterparty” button, then “Save” journal data:
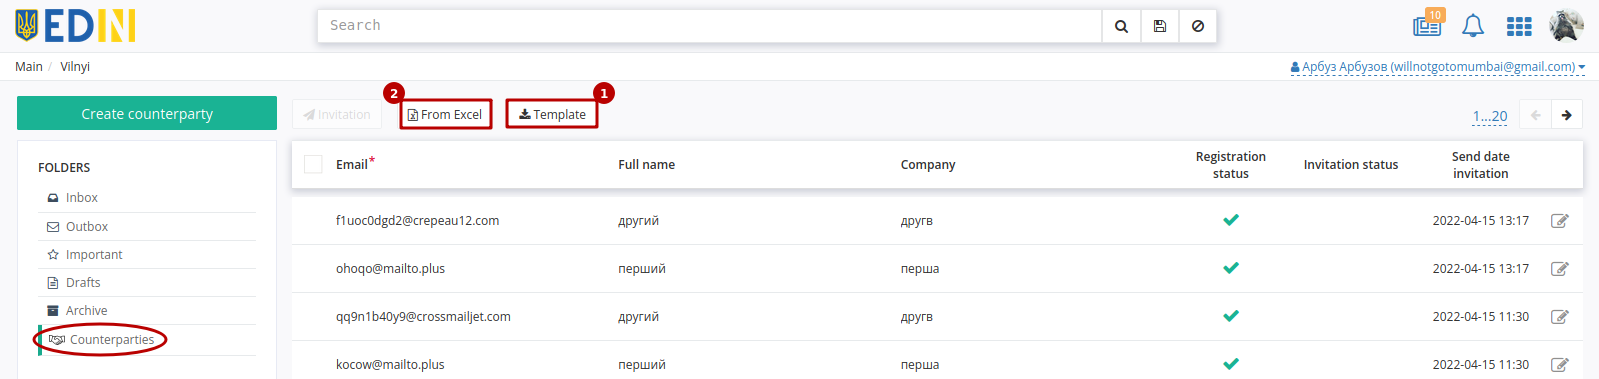
The functionality of mass downloading of e-mail addresses via xls-file, which should correspond to the template, has also been developed. To add data correctly, you must first download “Template” (1), focusing on which it will be possible to attach a list of your contractors without errors with a “From Excel” (2) button:
Data of contractors in the journal can be edited:

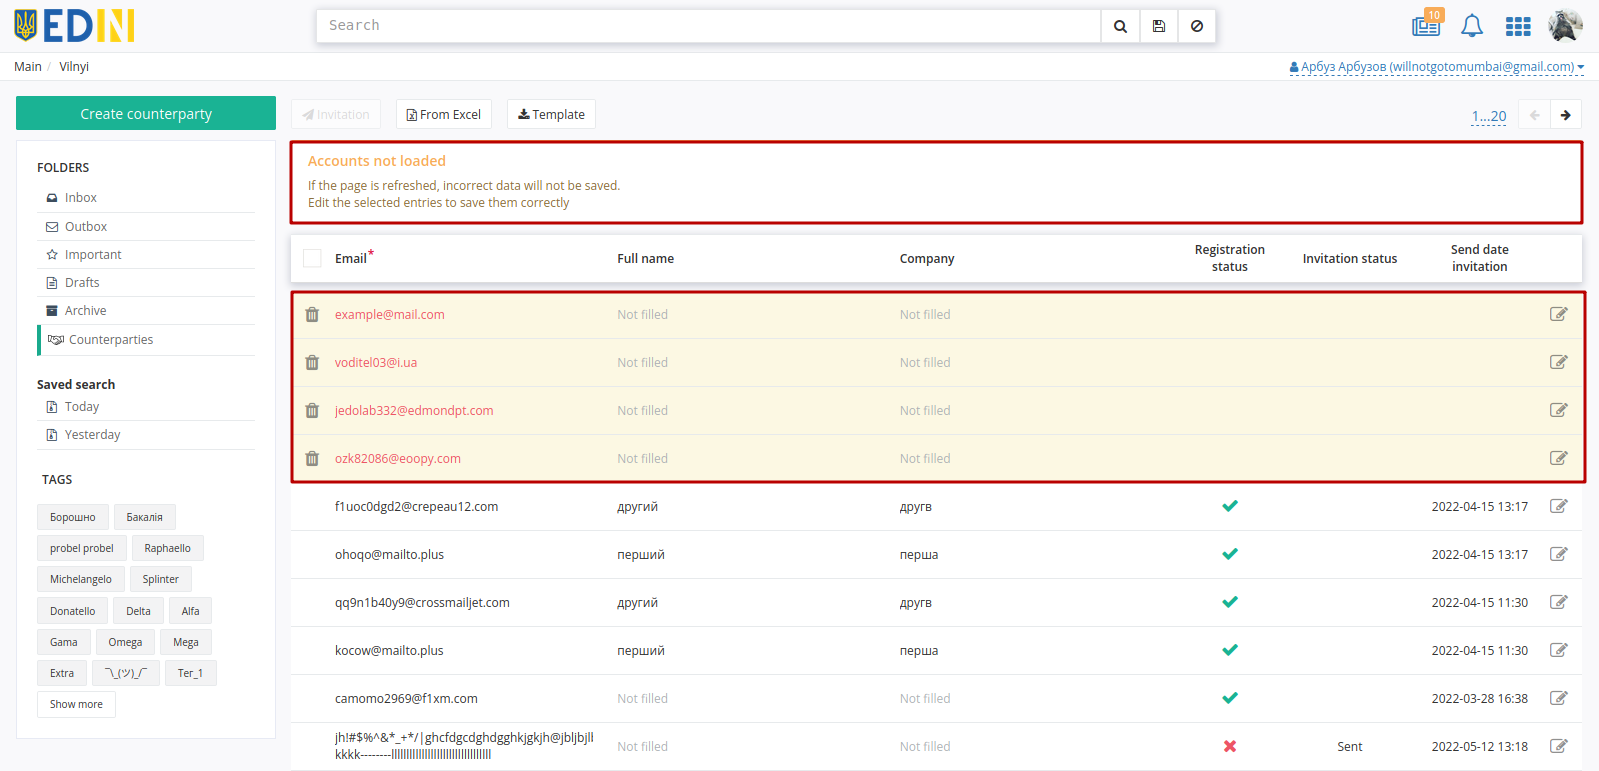
Attention
If the Excel document contains fields with errors or content that does not match the template, then such fields are highlighted in yellow and a message is displayed about requirements to make edits (such fields can be deleted by clicking  ):
):
Hint indicates in a line with error:

⠀⠀⠀⠀⠀⠀⠀
Once the contractors have successfully uploaded to the “Vilnyi” service it checks the entered addresses, whether they are registered in the service and sets “Registration status” (registered  or unregistered
  ):
):
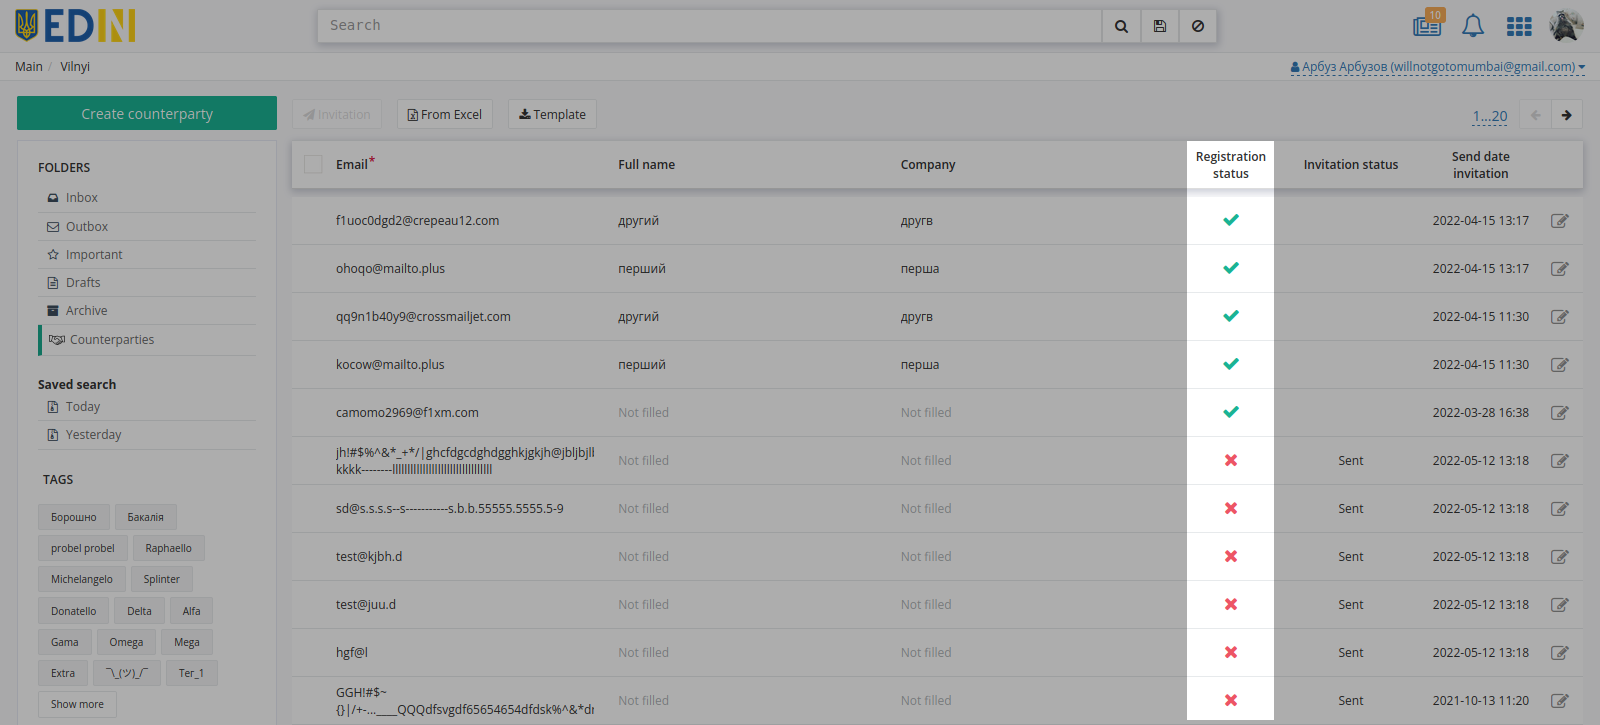
Each of the unregistered counterparties can be “Invited” individually (by clicking on “To invite” the button in the counterparty line) or in bulk (by marking unregistered counterparties and sending “Invitation” to all at once):
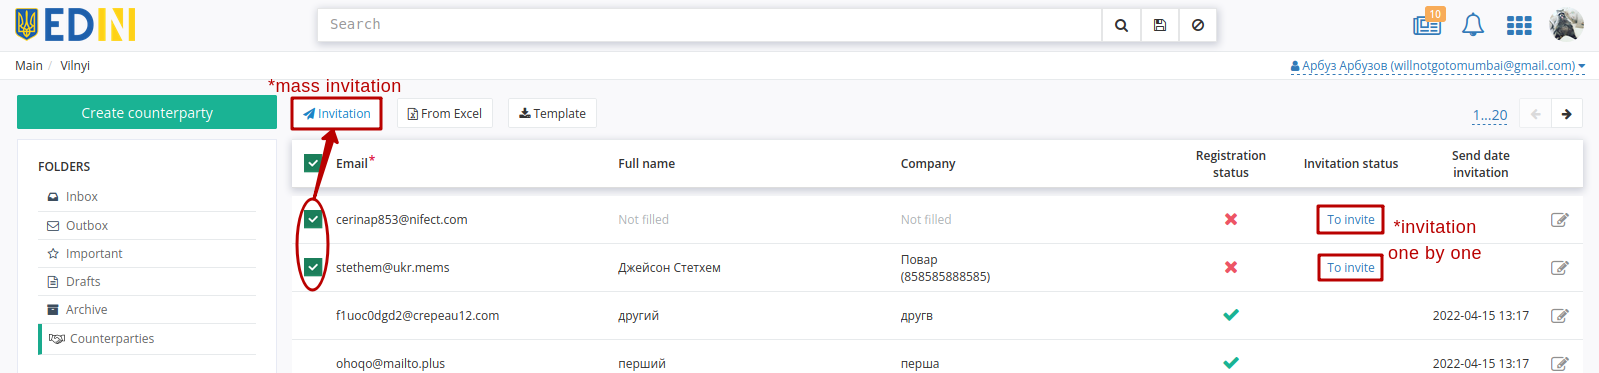
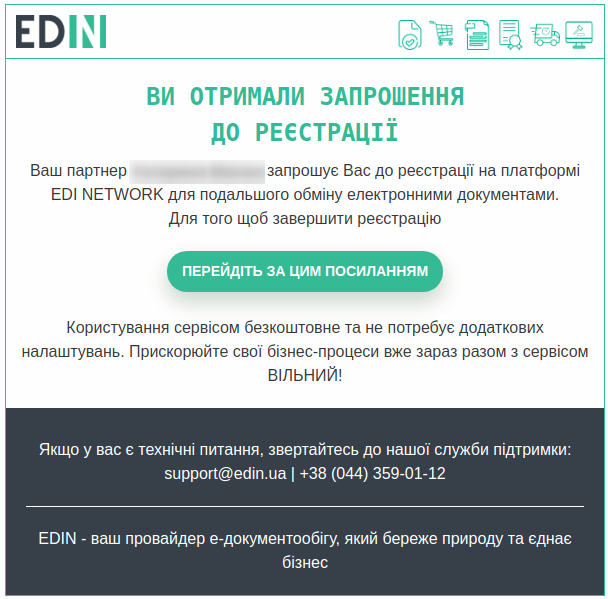
An invitation is sent to unregistered counterparties by e-mail:
When sending the invitation, the date of its sending is marked with the “Sent” status:
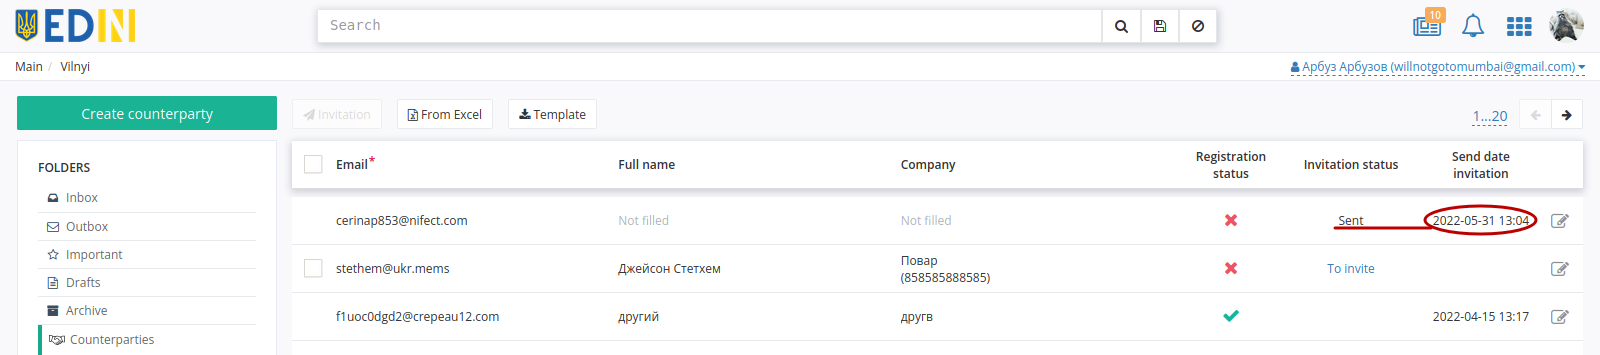
When the invited user has registered, a mark of the registered user will appear in the invitation field:
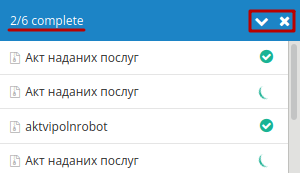
9 Mass operations
It is easy to download, sign, send, delete several documents at once in one click with the help of mass operations! When you start any mass operation in the lower right corner of the screen, a widget is launched that displays and successful / with mistakes result of the tasks for each document / action separately:
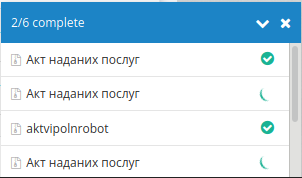
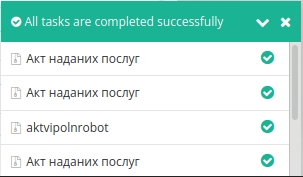
The status is displayed next to the document / action name in the widget:
 - task in the processing;
 - task completed successfully;
 - task execution error.
And the icon at the beginning of the completed action will prompt you which process was performed:
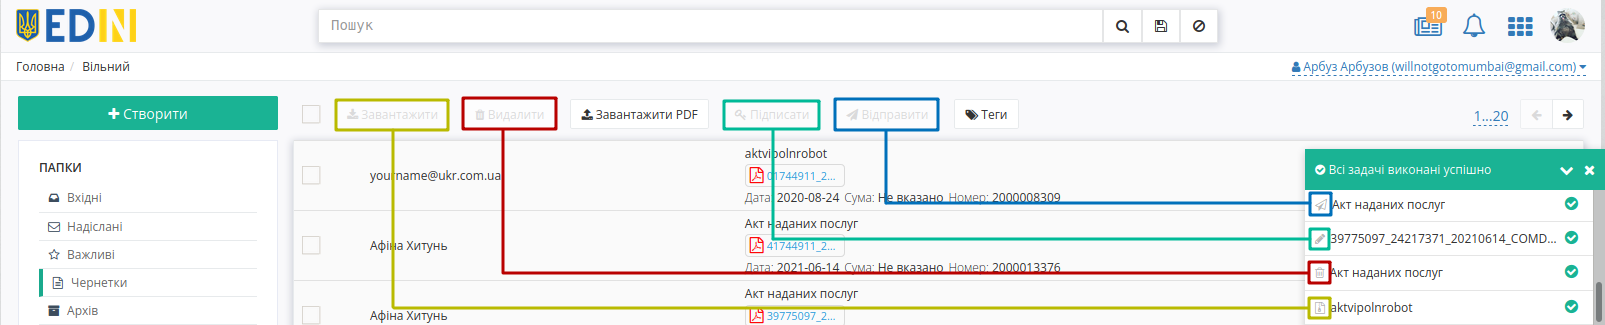
The widget can be minimized or closed even while performing tasks. The widget can be restored by clicking on the process / error icon at the bottom of the screen (widget with all successfully completed tasks is not restored after closing):
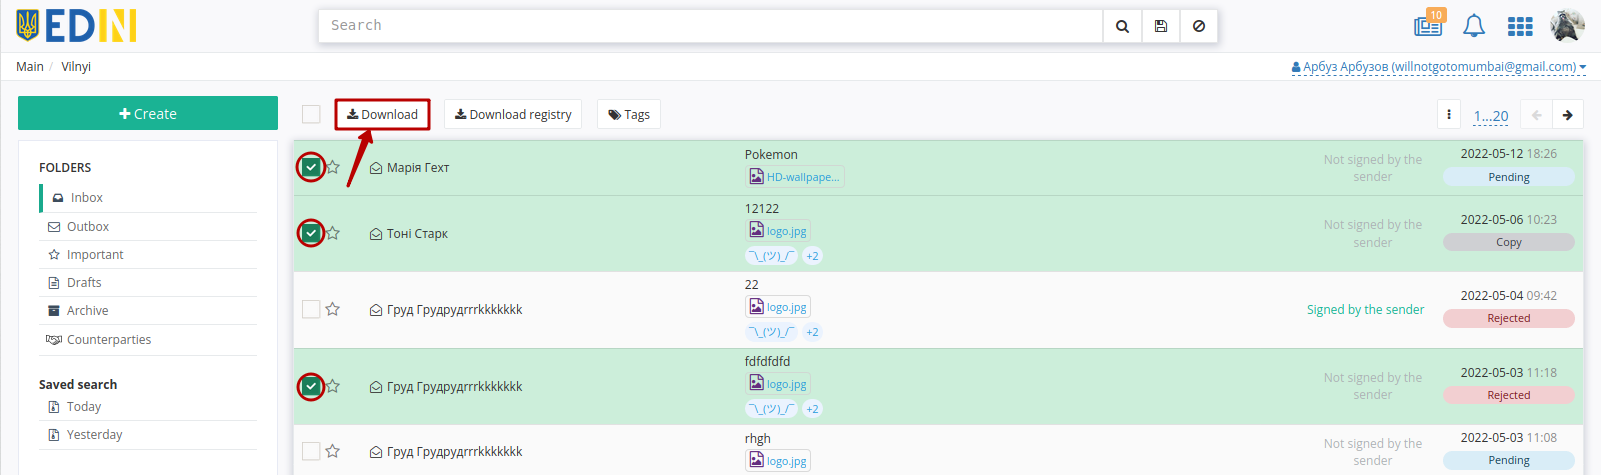
9.1 Mass download of the documents
Mass documents downloading is possible with the “Download” button:
Documents are downloaded as zip archives (archive name = first 10 characters of the document theme + Date + Creation time). Each of the archives contains directories (name = file name with extension) for each attachment. Each directory contains:
if the document is not signed: the original file;
if the document is signed: the original file and the signed file in p7s format.
Note
If the signed document contains a file in the PDF/JPG/JPEG/PNG/BMP format, then the downloaded zip-archive for each such file additionally contains a printed layout with a visualization of the signature in the form of a watermark and a signature letter in pdf format (more).
9.2 Creating and downloading a registry of the documents
Consolidated downloading of data from selected sent documents of the catalog (not more than 100 documents) is provided for accounting. To download, you need to mark the documents and press the “Download registry” button:
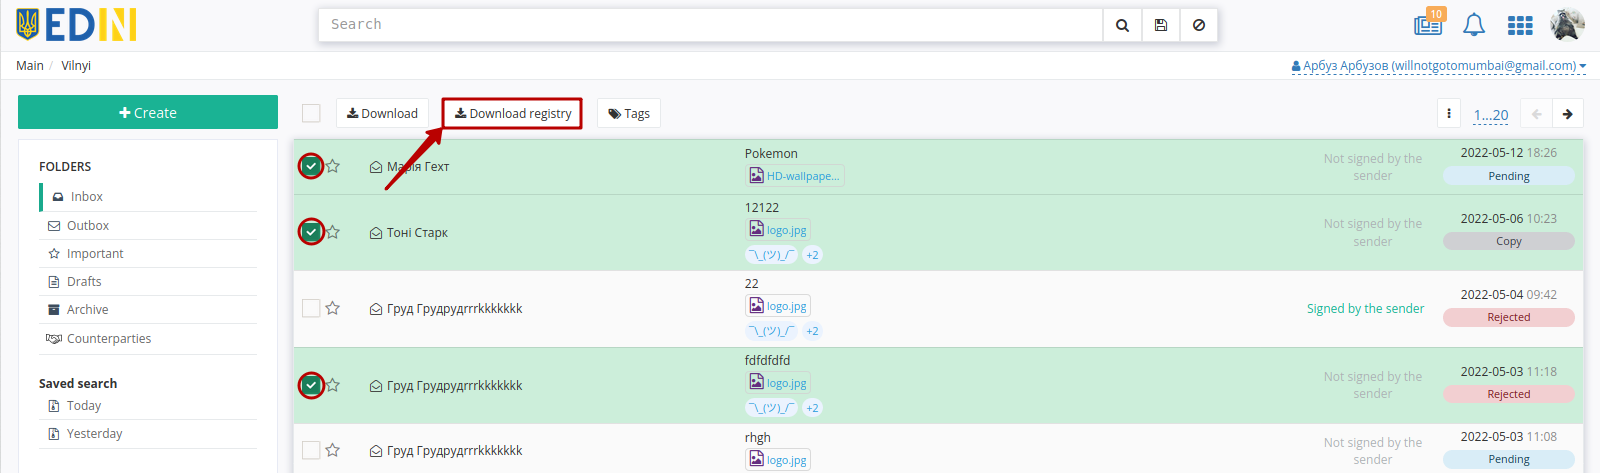
The registry is formed from selected documents into an xlsx-file with a name that is formed according to the template: List_of_documents _FolderName_Date(YYYY-MM-DD)_time(hh-mm-ss), for example: List_of_documents_Inbox_2021-06-30_12-47-31.xlsx. The following fields are entered in the registery: Recipient (for “Outbox”/”Important”), Sender (for “Inbox”/”Important”), Attachment file name, Document theme, Status, Submit date, Status change date, Document date, Document number, Document amount:

Note
Reloading the page may interrupt the file formation process (the registry file is not saved)! If an error occurs in the upper right corner of the screen, the message “Error creating the registry” is displayed.
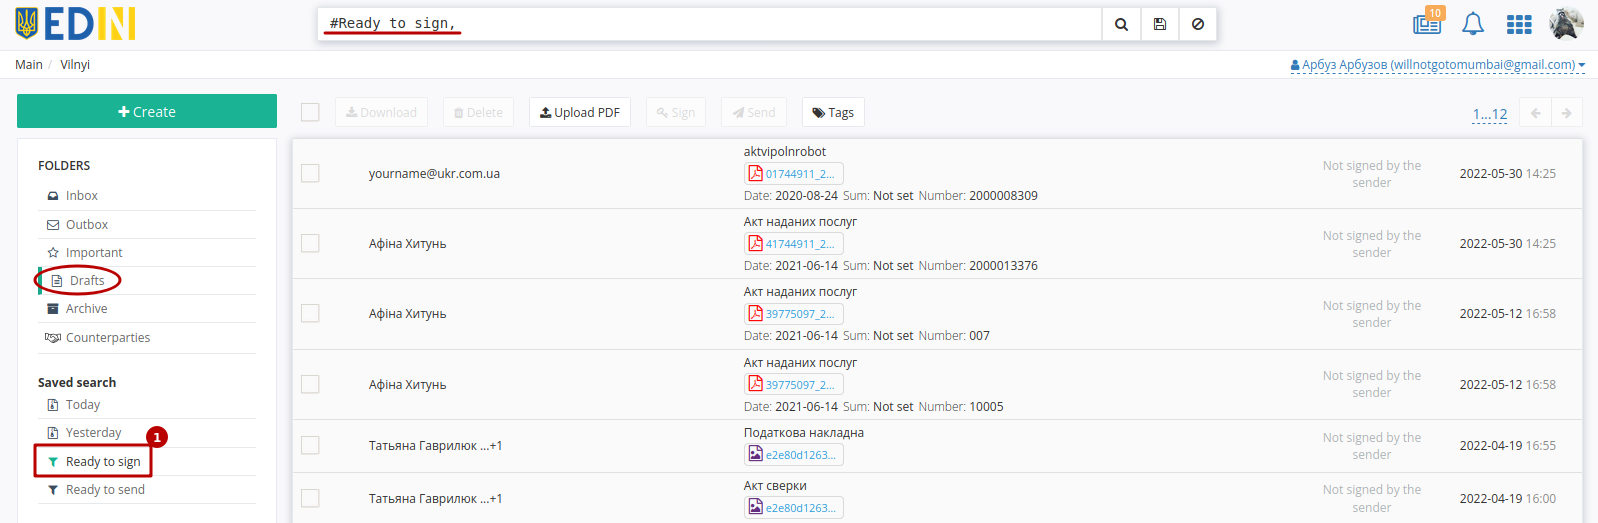
9.3 Mass signing of the documents
The mass signing functionality (maximum 100 documents) is available only in the Drafts folder.
Warning
The fields “USREOU of the recipient” and “USREOU sender” are optional to be filled out. The fields can be filled in to form control of the correctness of signing documents according to USREOU. If the fields are filled in, the “Vilnyi” service will check You and Your counterparties at the stage of signing documents (the specified value of the USREOU and USREOU of the signatory QES key must match). If the value is incorrect (8,9,10,12 digits, a combination of 2 letters and 6 digits are allowed), You will not be able to sign/send the document, and if the value does not match, an error will occur during signing:
For mass signing, you must first select all documents ready for signing (unsigned documents with attachments) using a convenient filter “Ready to sign” (1):
Next, you need to mark the desired documents from the list in order to “Sign” (2) them:
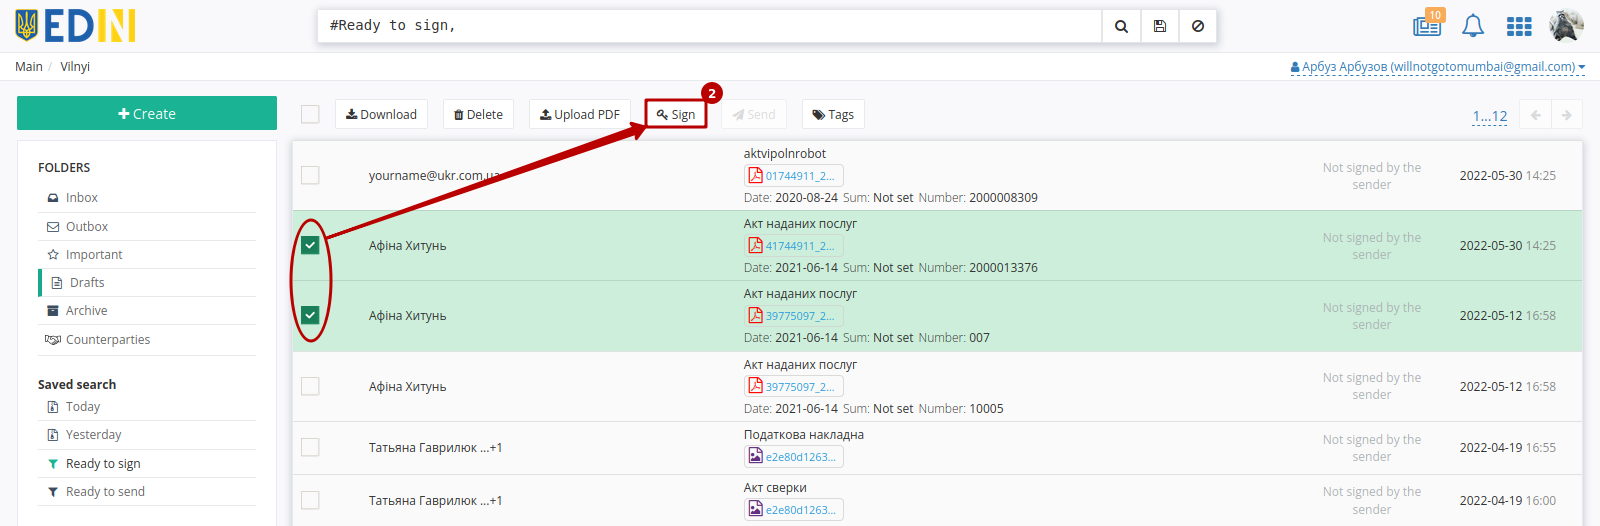
Attention
With mass signing, only one signature is applied at a time. When adding/deleting files to/from the document, previously applied signatures will be deleted!
Hint
The process of Signing of the document is typical and described in the section above.
9.4 Mass sending of the documents
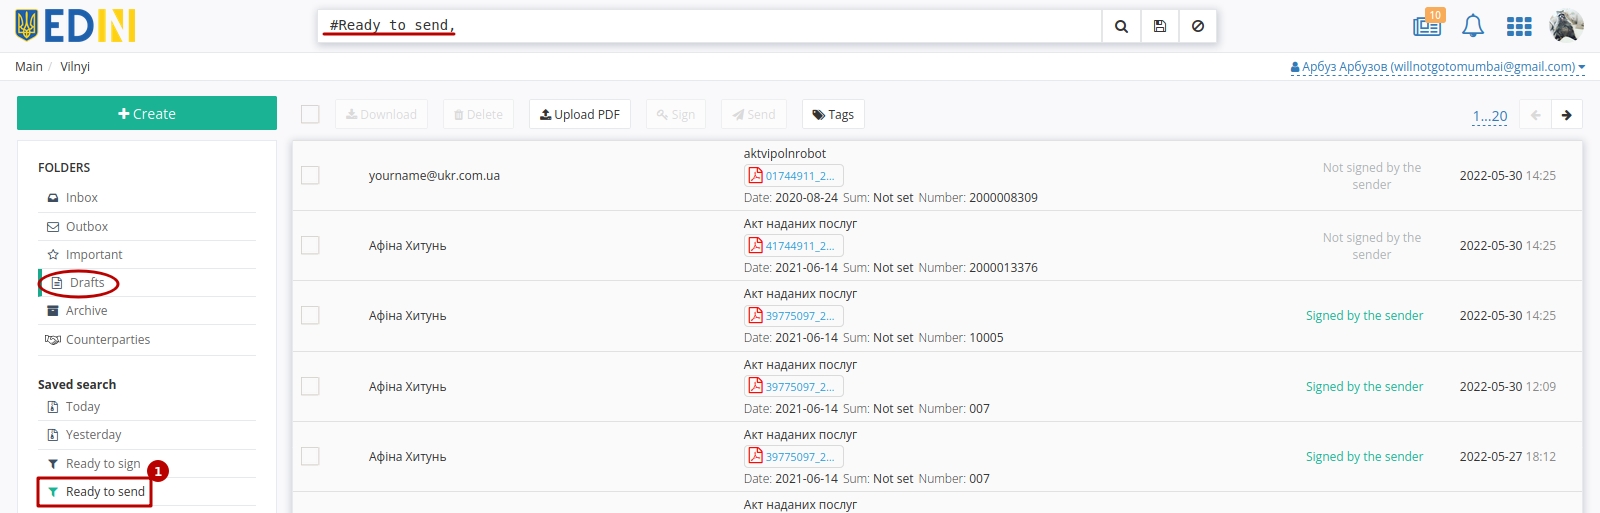
The mass sending functionality (maximum 100 documents) is available only in the Drafts folder. For mass sending, you must first select all documents ready to be sent (documents with attachments filled in the fields “Recievers” and “Theme”) using a convenient filter “Ready to send” (1):
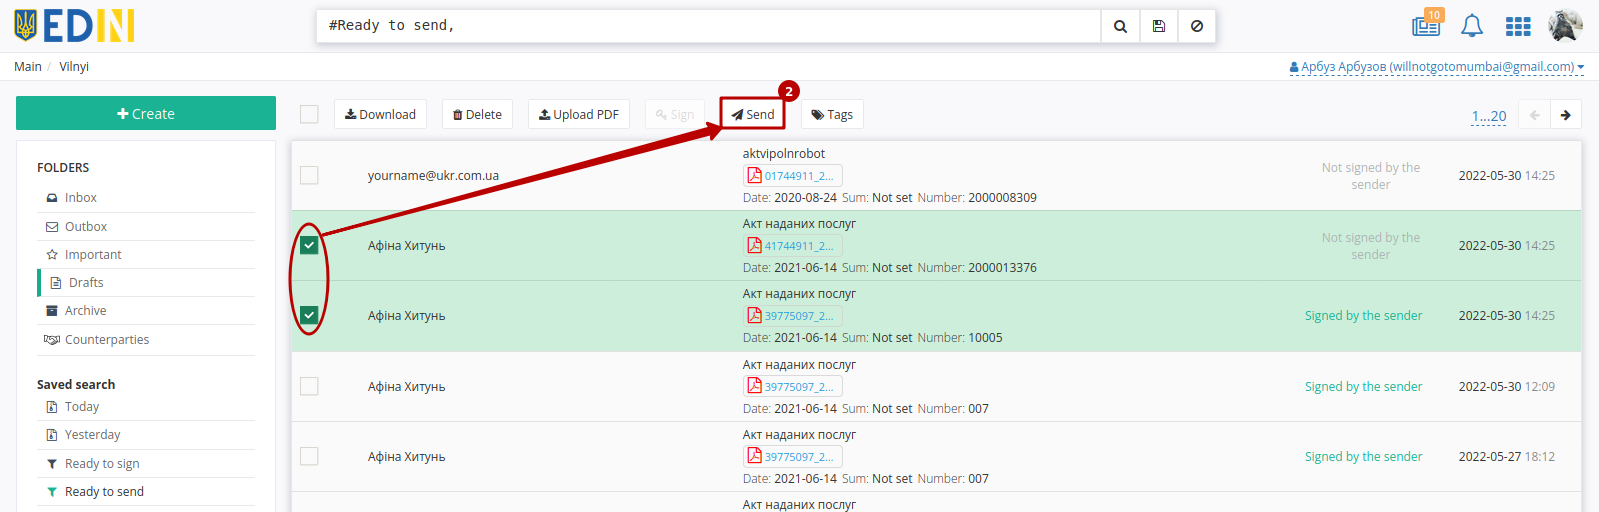
Next, you need to mark the desired documents from the list in order to “Send” (2) them:
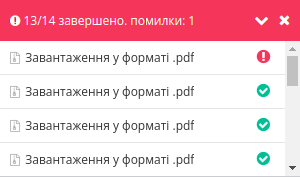
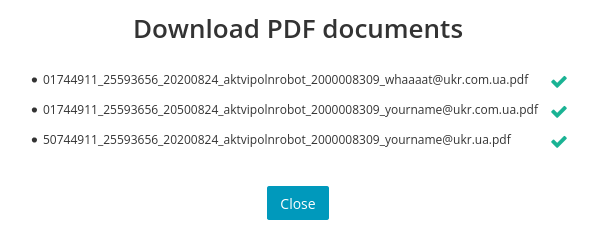
9.5 Mass upload of pdf-files
In the Drafts directory it is possible to upload pdf-files en masse using the “Upload PDF” button. After clicking the button in the popup window, the rules for uploading are specified:
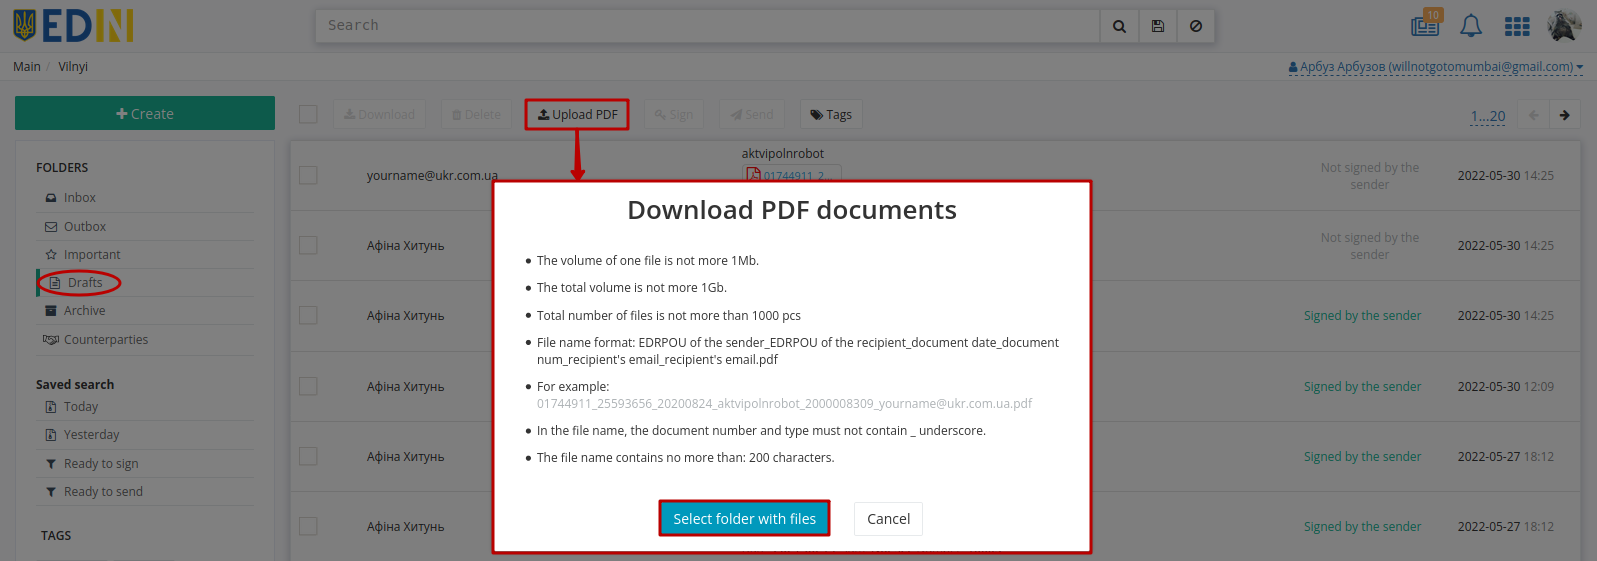
To select and upload pdf-files, you need to specify the folder where these files are located (button “Select folder with files”), then the upload process will be displayed:
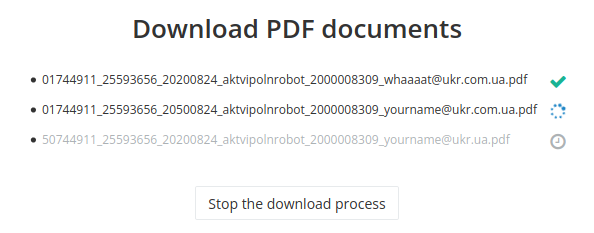
The upload process can be interrupted by the button “Stop the upload process”. Each document has a upload status mark next to each document:
 - file in queue;
 - file in the processing;
 - file uploaded successfully;
 - file upload error (such file is accompanied by a detailed description of the cause of the error):

Once the upload process is complete, it is possible to read the result (if necessary, correct errors that may have occurred during the download) and “Close” download results window:
10 Tags
It is possible to “bind” tags to service documents. Tags is some kind of your identifiers, which are displayed only to you. Tags make search of the document or group of documents much easier.
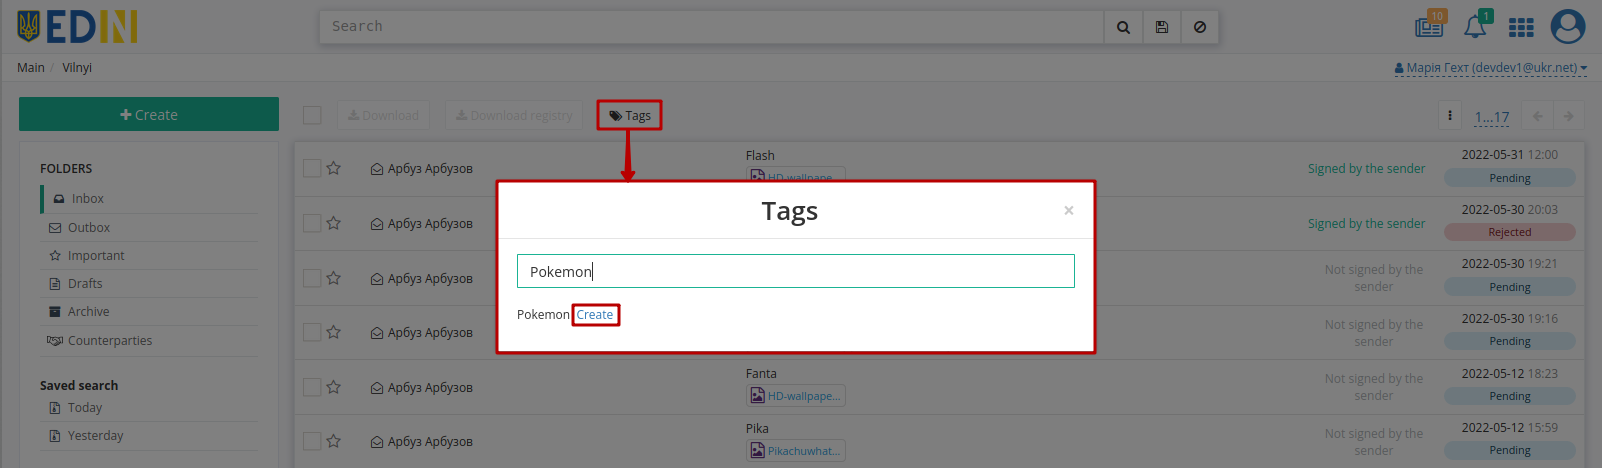
In order to create a new tag you need to click on the “Tags” button, then enter an unique name of the future tag (not more than 20 characters) in the pop-up window and click on the “Create “ button:
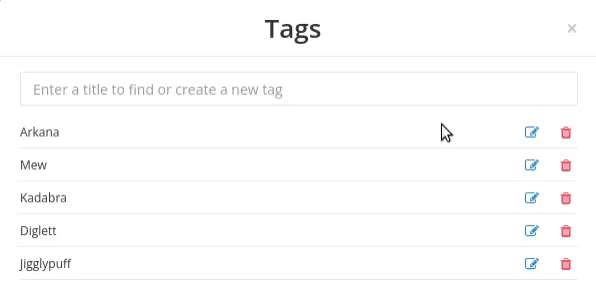
The last 10 created tags are displayed when you press the “Tags” button again (other tags can be searched by name):
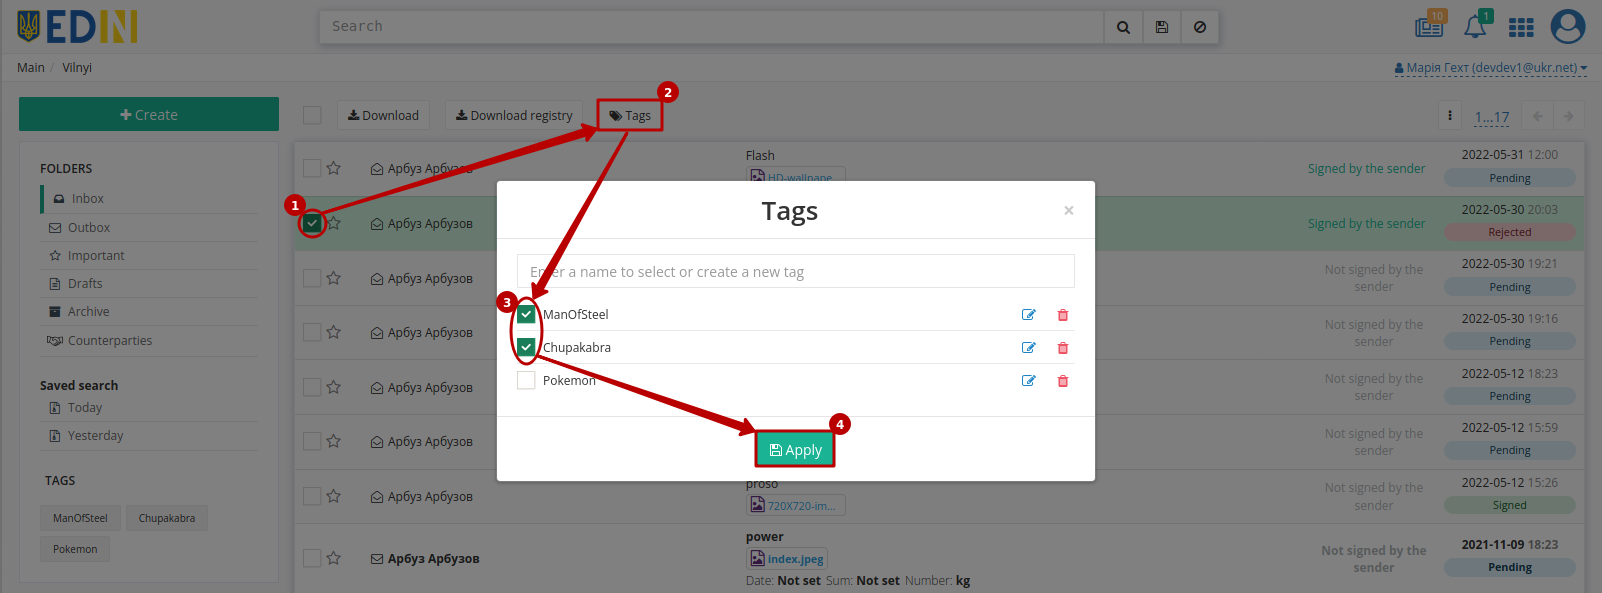
To add / remove tag (s) you need to select the document (s), click on the “Tags” button, check / uncheck accordingly and click on the “Apply” button:
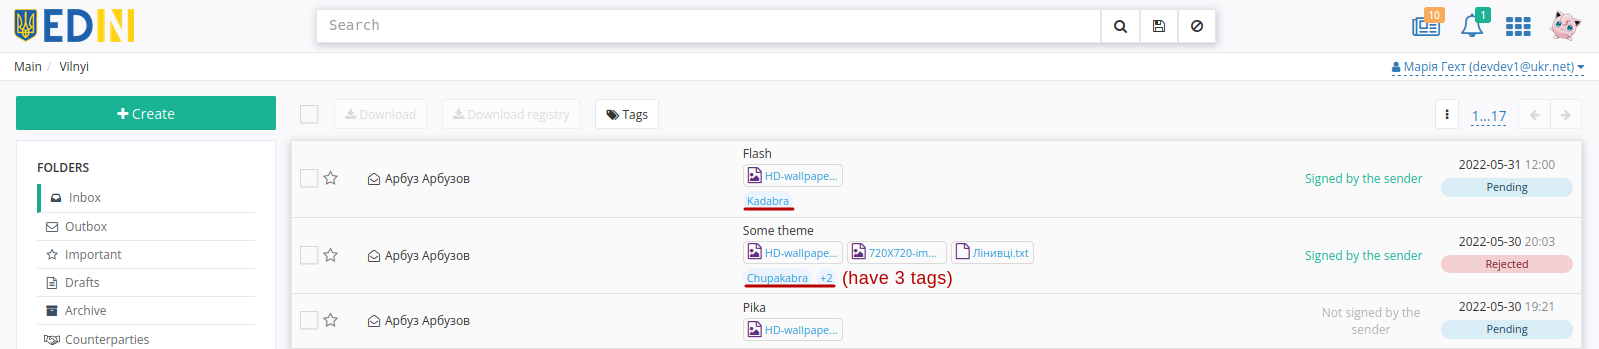
Tags are displayed in the document journal:
Hint
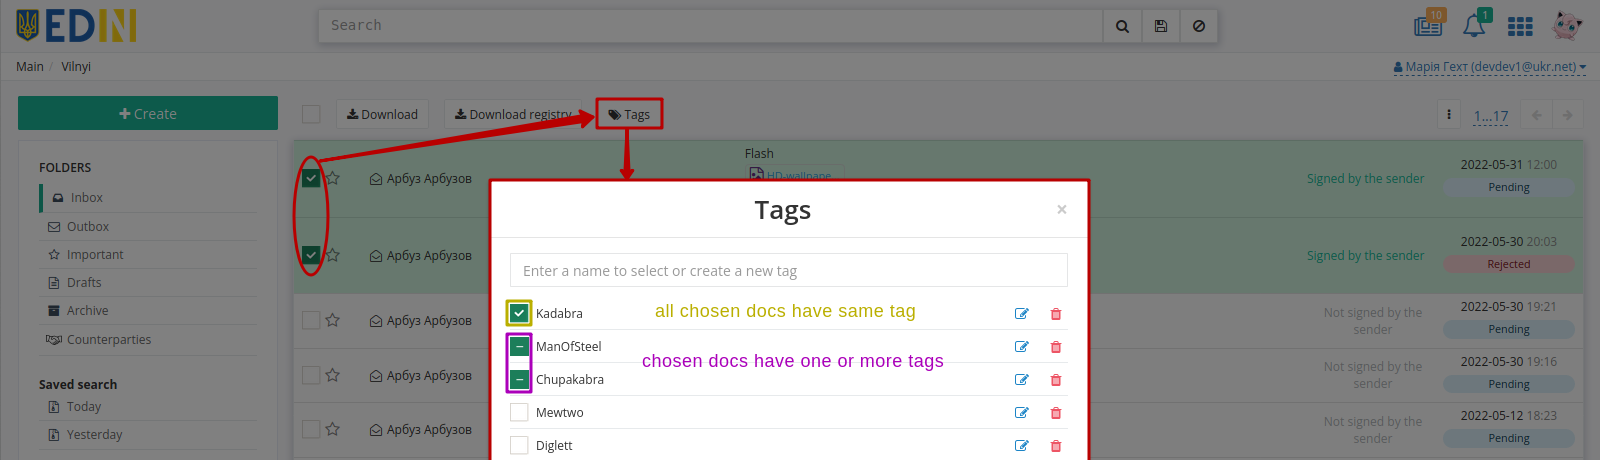
If you select several documents in the pop-up “Tags” common and unique assigned tags will have different marks:
The full list of tags is displayed when viewing the document:
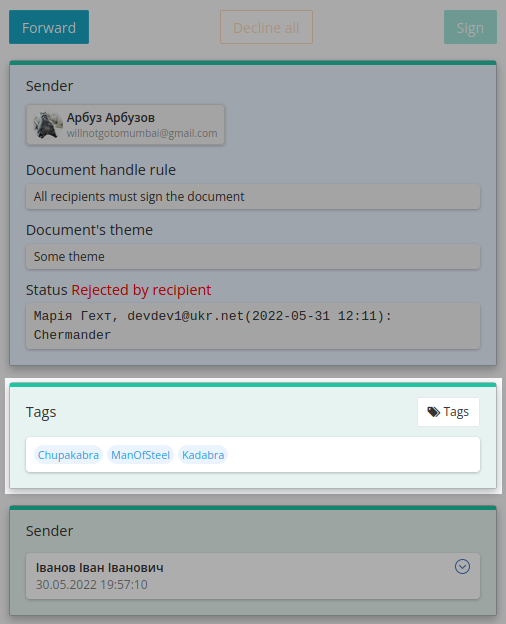
When viewing the document there is a “Tags” button, which has a similar functionality for creating / editing / deleting tags, allows you to add tags to an open document:
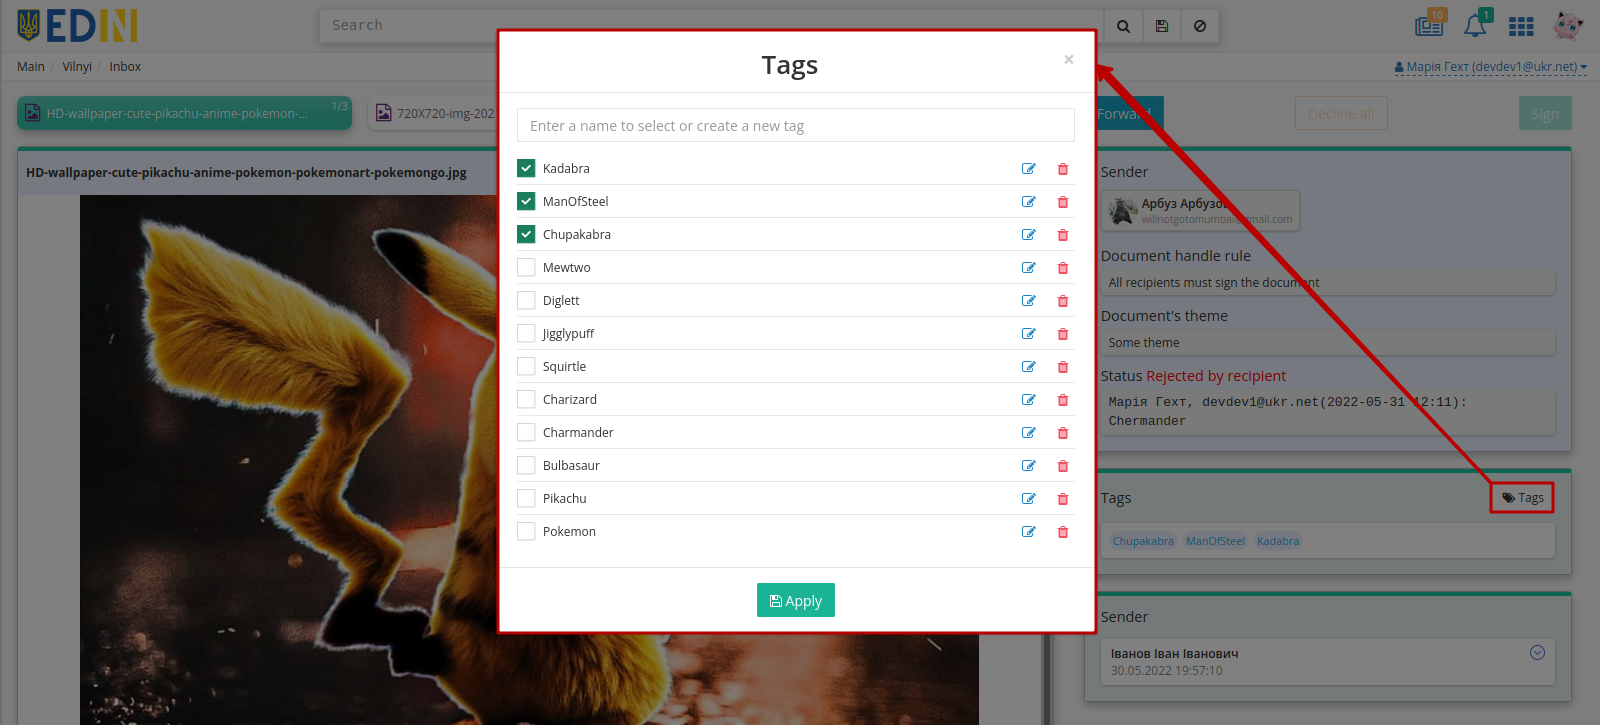
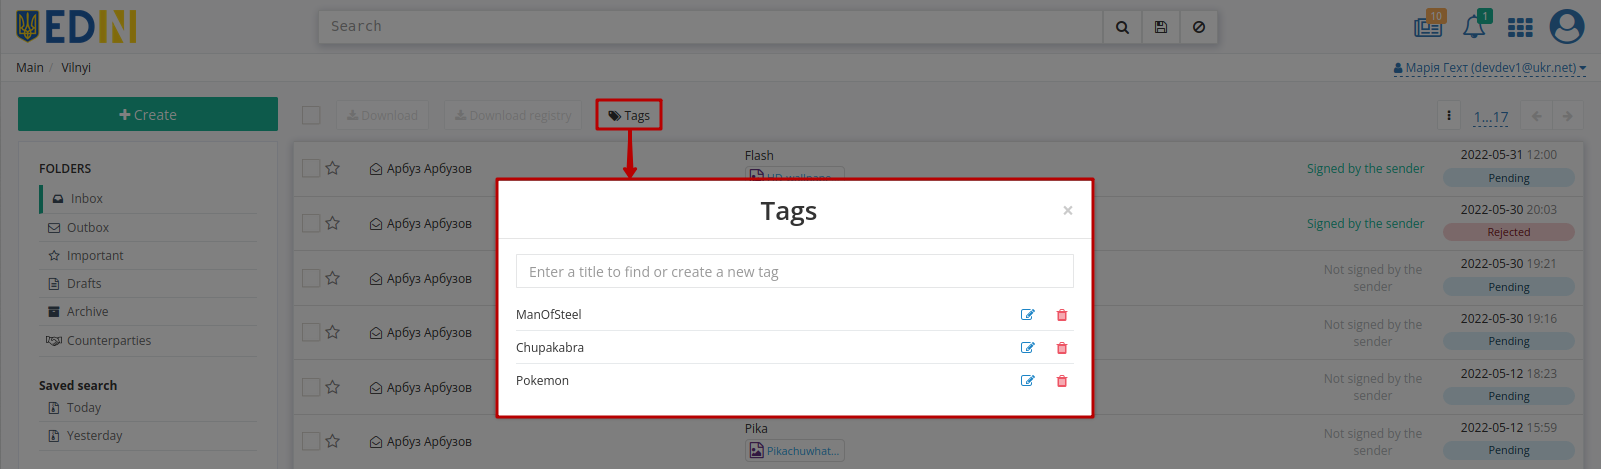
Created Tags can be Edited  or Deleted
  with special buttons. When editing a tag name you need to “Save” changes - all documents that already had this tag will be updated automatically:
11 Search and filter documents
11.1 Document search
It is convenient to filter documents in the service with the help of “Search” functionality (all “Available search keys” can be viewed in one click):

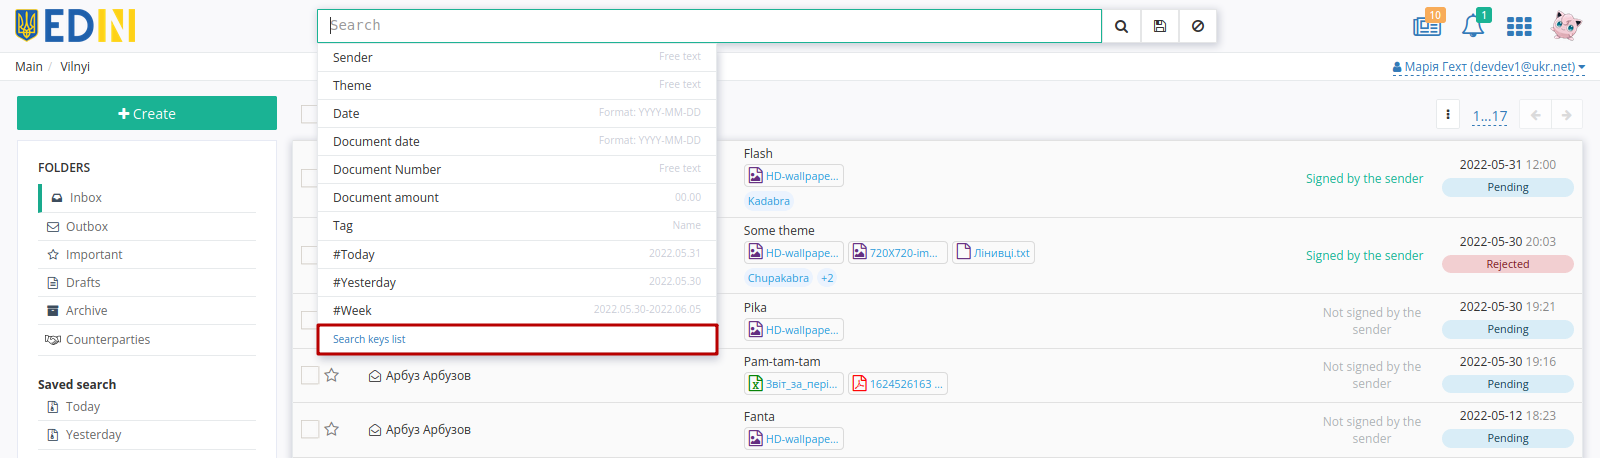
You need to select / enter a parameter (several parameters are entered through a comma), the text if necessary and press  . Frequently used search queries are recommended to save to your own search (“Saved search” block):
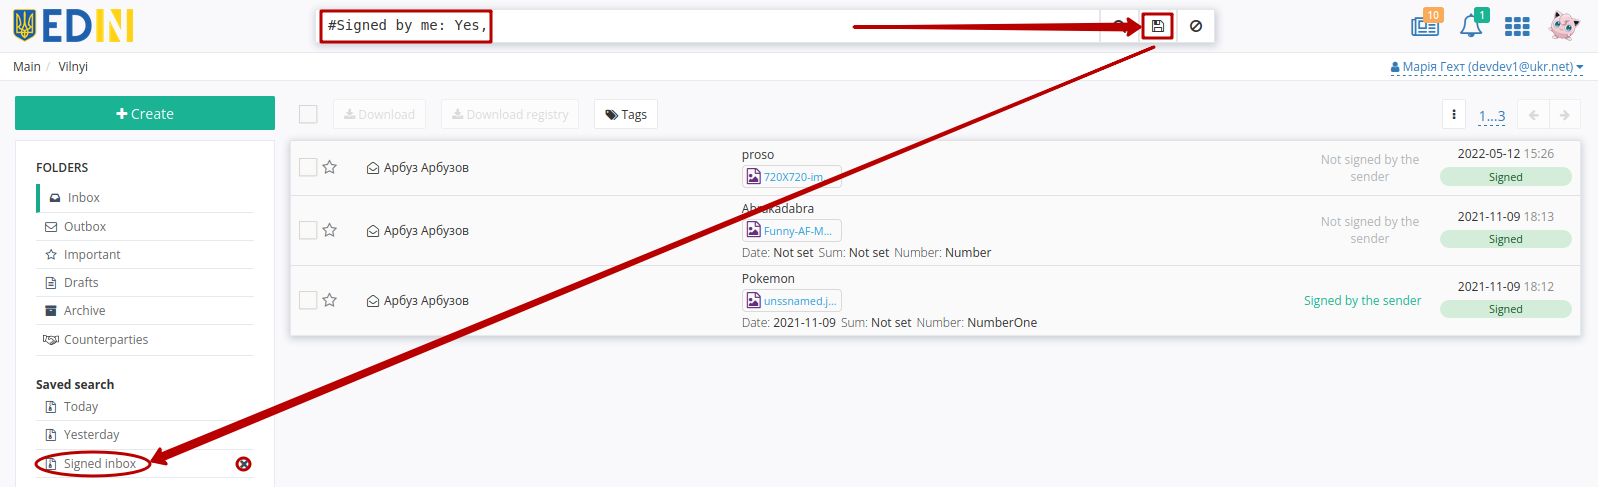
Saved search applies only to a specific folder of the query: “Inbox” / “Outbox” / “Important” / “Drafts” / “Archive”. By default, filters for Today’s and Yesterday’s documents are available in the “Saved search” block.
Note
The Sender/Recipient filter displays the document’s name, email, and UUID during search and filtering, but when you save these filters and select them later, only the uuid is saved and displayed:

You can delete a saved search using the cross icon. You can clear the “Search” line with the “Reset filters”  button. When you switch between the folders, the search bar is cleared. If the user has filtered a list of documents, then switched to viewing this document and back, the search is saved.

11.2 Quick document filters
The quick filter button is available for the “Inbox” and “Outbox” folders and is located in the upper right corner of the document journal:

For “Inbox”:
All - all incoming documents;
Unread - documents that have not yet been viewed (opened);
Read - documents that have already been viewed (opened).
For “Outbox”:
All - all sent (outgoing) documents;
Delivered - documents, all Recipients of which received the document (marked
);Error - documents with errors (Recipients will not receive them);
Sent - sent (outgoing) documents awaiting Recipients’ actions (in the status of “Pending”).
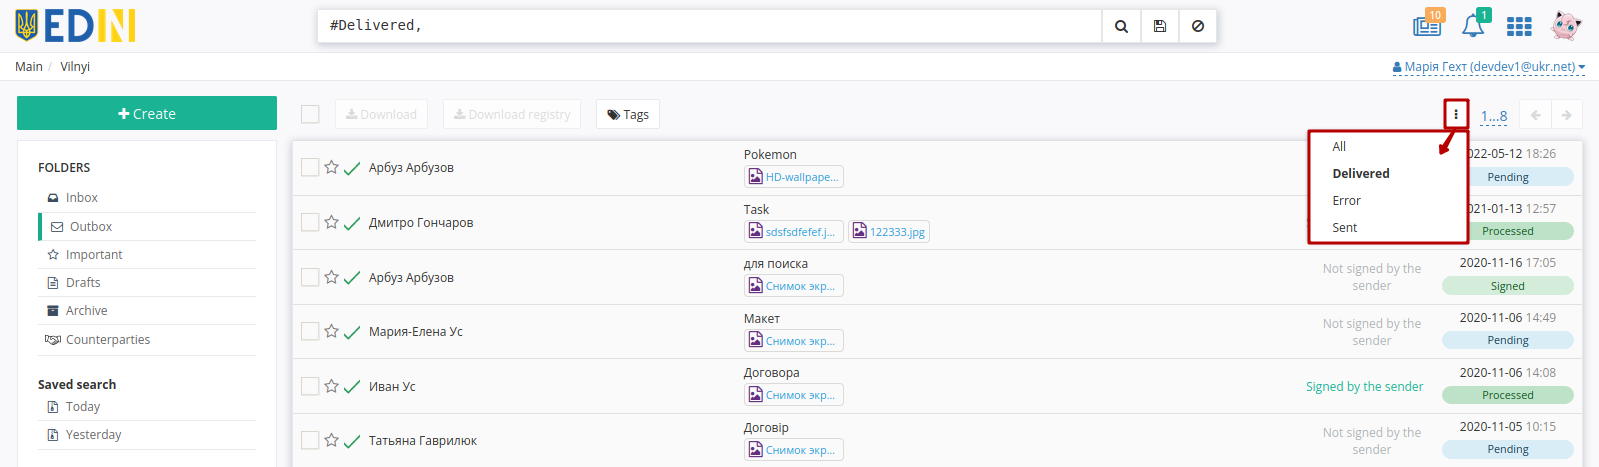
Hint
The filter value is duplicated in the search bar and saved during a given session for current folder.
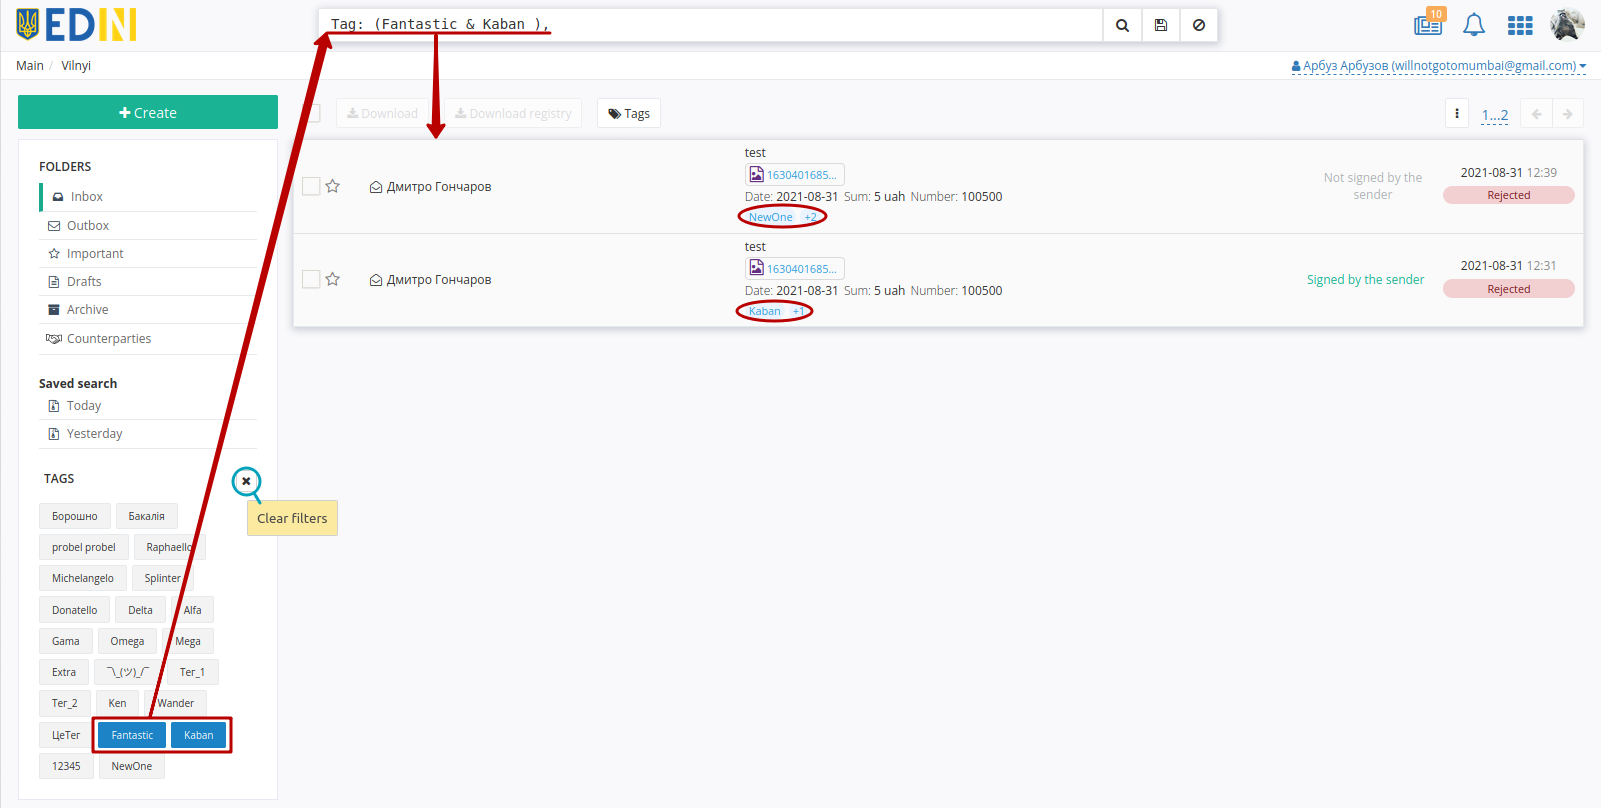
11.3 Search by tags
Due to functionality of tags is possible to create a personal system of “marking” documents, which will significantly speed up your personal search:
Tag search can be reset by clicking on the already selected tag or reset all filters. The “Tags” block displays 15 frequently used tags (the rest are available via the “Show more” button):

Contacts
Service support service: support@edin.ua